Bulk Operations on Test Executions
Use bulk operations to assign Execution Status, Execution Type, Assignee, and Planned Date across test suites that contain multiple test cases, platforms, releases, and cycles.
Test Case Selection Options
When you select test cases for a bulk operation, you can scope your selection using the checkboxes on the screen. The following selection types are available:
Platforms
Releases and Cycles
Platform Attribute: To view Platform attributes, select the icon adjacent to the platform name.
Select a particular release and cycle for all test cases on the current page.
Select a Platform with all test cases under all releases and cycles.
Select individual test cases.
Select a test case with all releases and cycles and platforms associated with it.
Select all test cases under all releases and cycles associated with all platforms.
Bulk Execution
To bulk execute test runs, perform these steps:
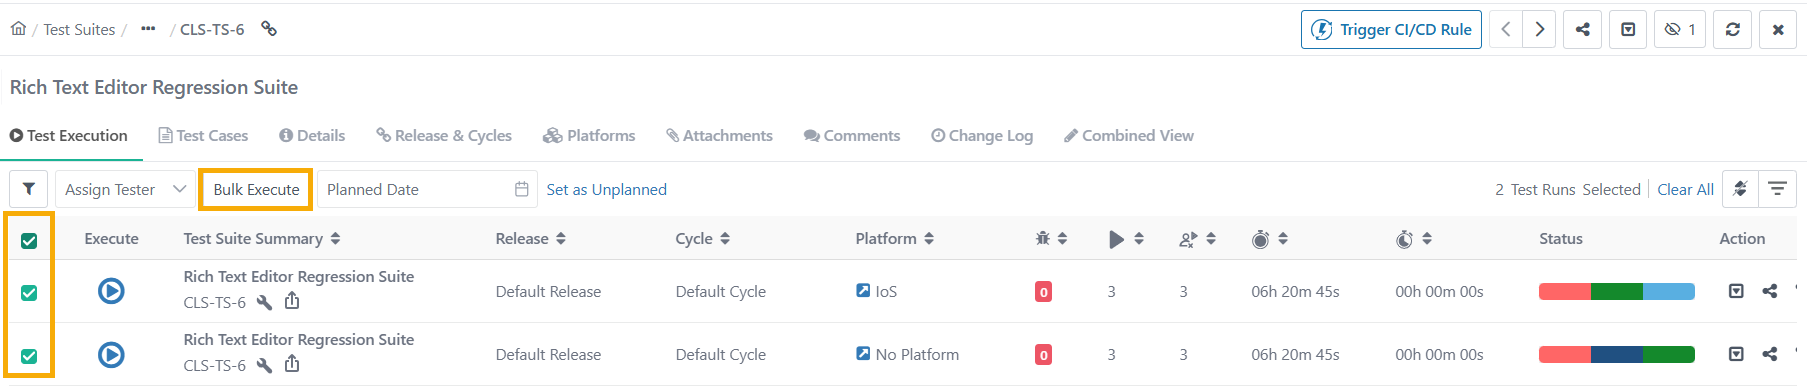 |
Go to the Test Suite module and select Test Execution tab.
Select test cases to execute.
Select Bulk Execute.
Note
You can select a maximum of 20 test execution runs at a time.
In the bulk update panel, apply one or more of the following updates:
Execution Status
Execution Type
Assignee
Planned Date
Select Update to save your changes.
Execution Status
You can assign execution status to multiple test cases at a time.
Testers often run continuous executions and update statuses at the end of a session. Updating Execution Status in bulk makes it faster and easier.
To update execution status in bulk, perform the following steps:
On the Execution screen, open the Bulk Operations drop-down and select the Execution Status.
Select test cases to update.
In the Execution Status drop-down, select a status.
Optional: Enter a comment to explain the status change.
Select Update.
QMetry applies the status to all selected test cases.
Execution Type
You can assign Execution Type in bulk to test cases whose execution type is similar.
To bulk update execution type, perform the following steps:
On the Execution screen, open the Bulk Operations drop-down and select Execution Type.
Select test cases to update.
In the Execution Type drop-down, select the type you want to assign.
Select Update.
QMetry applies the execution type to all selected test cases.
Assignee
Note
Users with ANY of the following permissions can Assign, Modify, Unassign test execution testers:
Test Suite Modify Permissions.
Test Suite Execute Permissions.
To assign test cases in bulk, perform the following steps:
On the Execution Screen, open the Bulk Operations drop-down and select Assignee.
Select test cases on the grid.
In the Assignee drop-down, select the tester.
Select Update.
QMetry assigns all selected test cases to the tester.
Planned Date
You can set a single planned date for multiple test cases at a time.
Note
Users with ANY of the following permissions can modify the Planned Date:
Test Suite Modify Permissions
Test Suite Execute Permissions.
You can set a single planned date for multiple test cases in bulk.
To set planned date, perform the following steps:
Open the Bulk Operations drop-down and select Planned Date option.
Select the test cases from the grid.
Open the Planned Date calendar and choose the desired date for the selected test cases.
If no planned date is available, click Set as Unplanned.
The planned date for all the selected test cases gets updated in bulk.
Issues
You can link QMetry issues or Jira defects to multiple test cases at a time. This is useful when a single issue affects several test cases and you want to avoid linking it individually to each execution.
To link issues in bulk, perform the following steps:
On the Execution Screen, open the Bulk Operations drop-down and select Link Issues.
Select test cases on the grid.
Select Assign Issue, then follow the standard process for linking existing issues.
When you open the linked issue in Jira, the test case links in Jira appear in accordance with the defects linked to those test cases.
Test Run UDFs
Use the Bulk Operations menu to update test run user-defined fields (UDFs) for multiple executions at once. This option appears only when the project has at least one Test Run UDF configured.
You can update up to 1,000 records at a time. Bulk update is not applicable to Archived Test Cases.
Test Run UDF values do not reset on version sync or build updates.
For E-signature Enabled Projects
When you enable eSignature, the Test Suite Execution status determines whether UDFs are editable.
Approved: UDFs are editable. The Test Run UDFs option is available in Bulk Operations.
In Review or Closed (at any level): UDFs are read-only. Saved values remain visible, but you cannot update them. The Test Run UDFs option does not appear in the Bulk Operations menu.
For Part 11 Compliance Enabled projects
When you enable Part 11 Compliance, you do not need to authenticate credentials to update Test Run UDFs.
Update Test Run UDFs in Bulk
To update Test Run UDFs in bulk, perform the following steps:
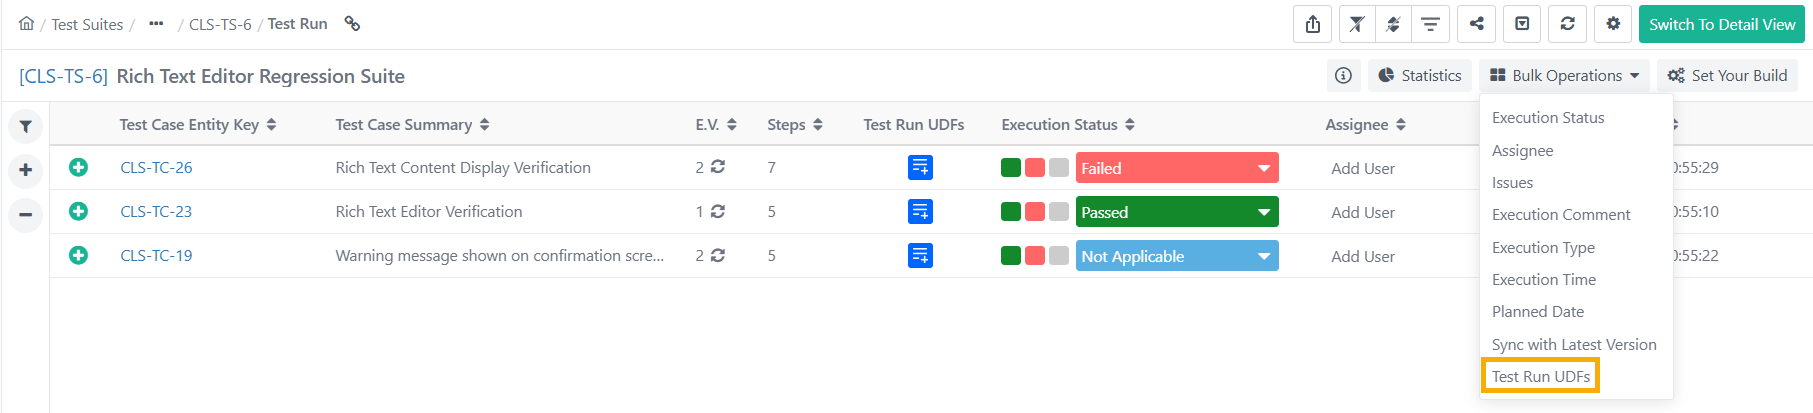
Go to the Test Suite module and select the Test Execution tab.
Select the test case executions to update.
Open the Bulk Operations drop-down and select Test Run UDFs.
Select the test cases individually or click Select All (Across Pages).
Select Select Test Run UDFs.
In the Bulk Update Test Run UDFs panel, set the values to update.
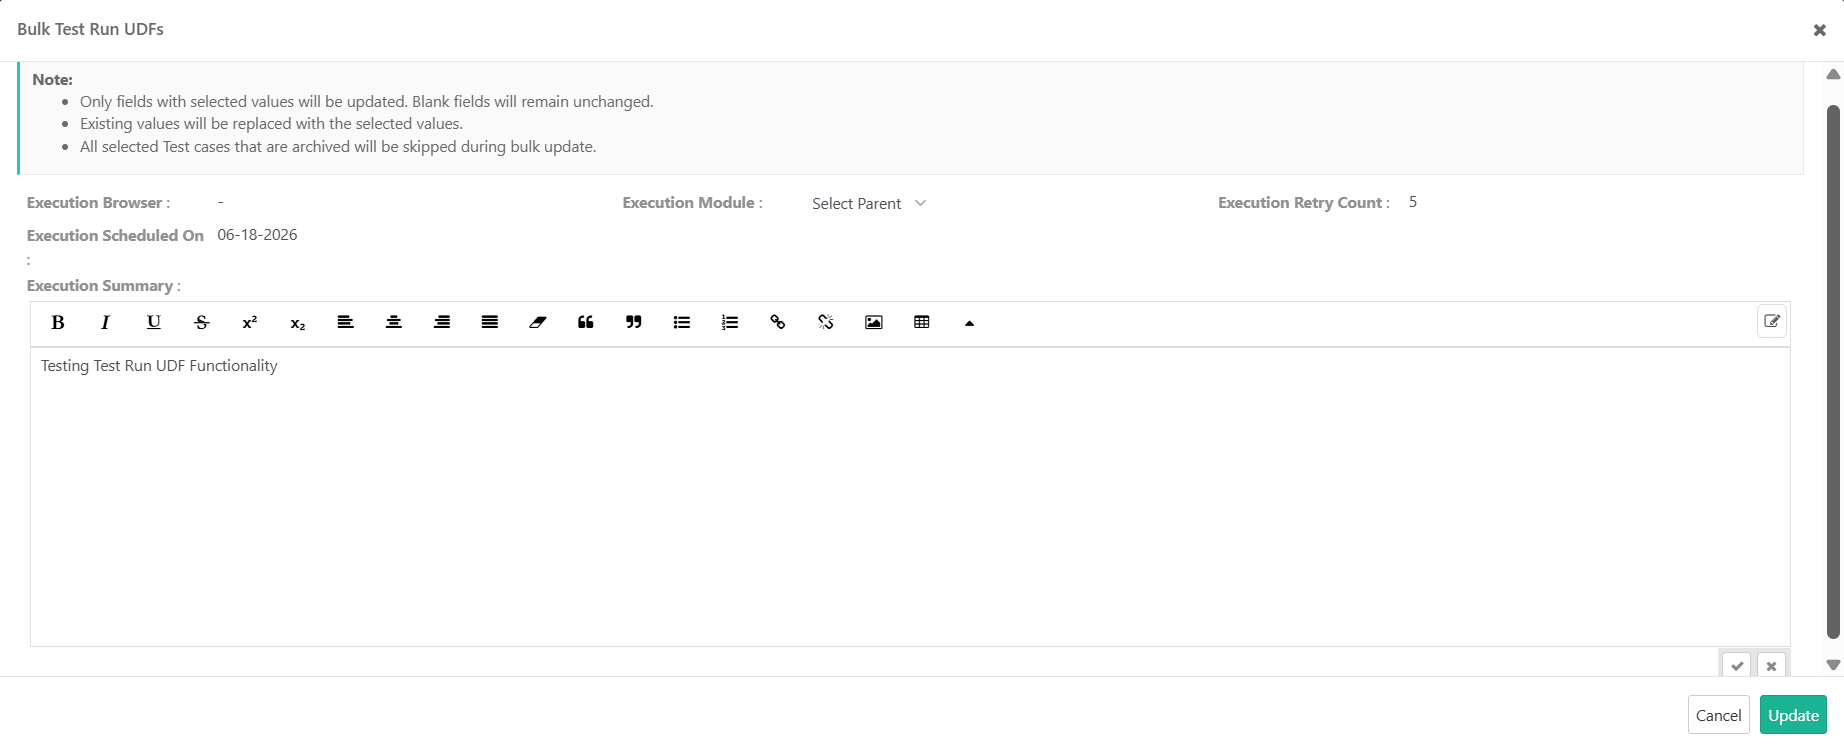
Select Update to apply the changes.
You can track the update status from Scheduled Tasks.
Note
When you run a bulk UDF update:
QMetry fills empty UDF fields with the selected value
QMetry replaces existing field values with the new value.
Fields left blank in the bulk update panel are not updated for any test case.
Multi-Select List UDFs
For Multi-Select List Execution UDFs, choose how QMetry applies new values.
Append to existing: QMetry adds new values without removing existing selections. This is default setting.
Replace all with: Existing selections are completely overwritten by the selected values.
QMetry records all details related to bulk UDF updates in the Change Log tab.
Execution Comment
You can add a single execution comment to multiple test case runs in bulk.
Note
You need Test Suite Execution Permissions to add execution comment.
The following constraints apply to bulk execution comments:
You can update up to 1,000 records in a single operation.
The Select All option is not available for test case dependent projects.
To use rich text in comments, enable the Rich Text Editor in Project settings. It supports formatted text but not image insertion, image copy-paste, or user tagging.
Comments apply at the Test Case Execution level only, not at the Test Step Execution level.
The maximum comment length is 65,535 characters.
To set execution comment in bulk, perform the following steps:
On the Execution Screen, open the Bulk Operations menu, and select Execution Comment.
Select test case executions using check boxes and filters.
In the text box, enter the comment, and select the check mark to save.
The comment is updated in all selected test case execution runs.
Execution Comment
Note
You need Test Suite Execution Permissions to add execution comment.
You can add execution comments for multiple test case runs in bulk. This comes handy when you need to add the same comment for multiple test case execution runs in a test suite.
To set execution comment in bulk, perform the following steps:
On the Execution Screen, open the Bulk Operations menu, and select Execution Comment.
Select test case executions using check boxes and filters.
In the text box, enter the comment, and select the check mark to save.
Note
You can update up to 1,000 records in a single operation.
The Select All option is not available for test case dependent projects.
To use rich text in comments, enable the Rich Text Editor in Project settings.
Rich Text Editor supports formatted text but excludes image insertion, image copy-paste, and user tagging.
You can add comments at the Test Case Execution Level and not at the Test Step Execution Level.
The maximum comment length is 65,535 characters.
Execution Time
Users can modify the execution date and time for multiple test cases at a time.
To enable the editing of the Execution date and time, go to Customization and select General Settings and Audit and turn the Allow manual edit of last executed date or time flag On.
Open the Bulk Operations drop-down.
Select Execution Time.
Select test cases on the grid.
Select the date and time of execution using calendar and click Apply.
The date and time is changed under the Executed At column for the selected test cases.