Managing Platform Attributes
Use Platform Attributes across projects to:
Search for platforms by attribute value and link filtered platforms to a Test Suite.
Record configuration information that may be common across different platforms
Record configuration information that may vary during testing.
Improve reporting by filtering test results by platform or attribute.
Note
A Platform Attribute created in one project can also be used in other projects.
An organization may need to test a mobile app against the latest Android OS. They are not concerned about the specific device as much as the operating system itself. Each platform can have an attribute for OS which specifies the version. During test they can test multiple different mobile phones (often based on availability) and use the attribute OS to record which version of the OS was tested.
Add Platform Attributes
To add platform attributes, perform the following steps:
Go to Project Management and select Platforms and Attributes.
Select the Platform Attributes tab.
Click New.

In the Field Type, select the type of Platform Attribute to create: String, Large Text, Number, Lookup List, Multi Lookup List, or Date Time Picker.
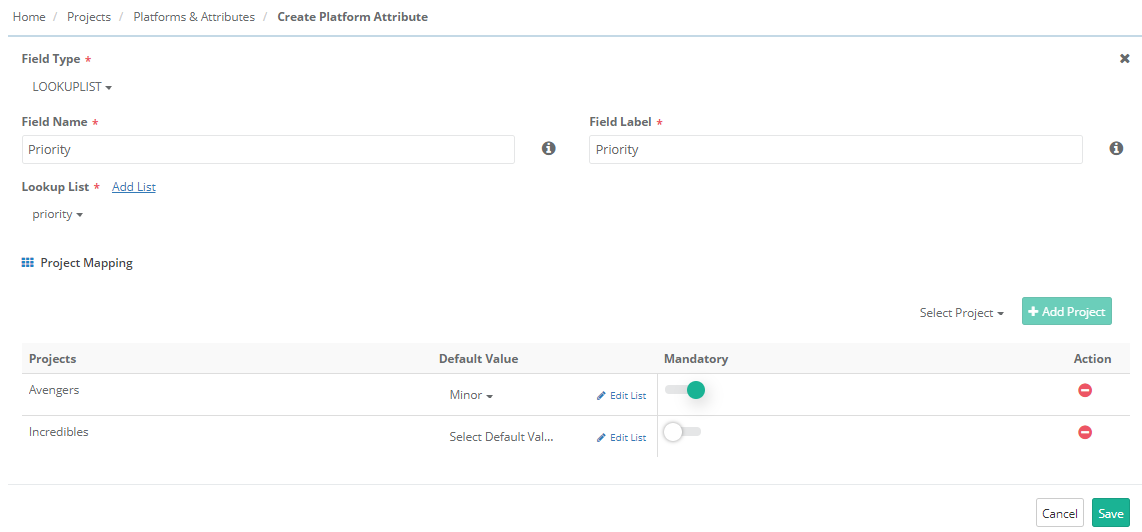
To create a Lookup List Platform attribute, select Lookup List and enter the required details.
Field Name: An unique identifier for the field. The Field Name remains the same across projects. Spaces are not allowed.
Field Label: The label displayed in the user interface. The Field Label acts as an alias and can vary by project.
Lookup List: For a Lookup List field, select the list to use. If the required list does not exist, click Add List to create a new list.
Default Value: Specify the default value for the list.
Share Platform Attributes Across Projects
A Platform Attribute must be mapped to a project before it is available in that project. Users can map only projects to which they have access.
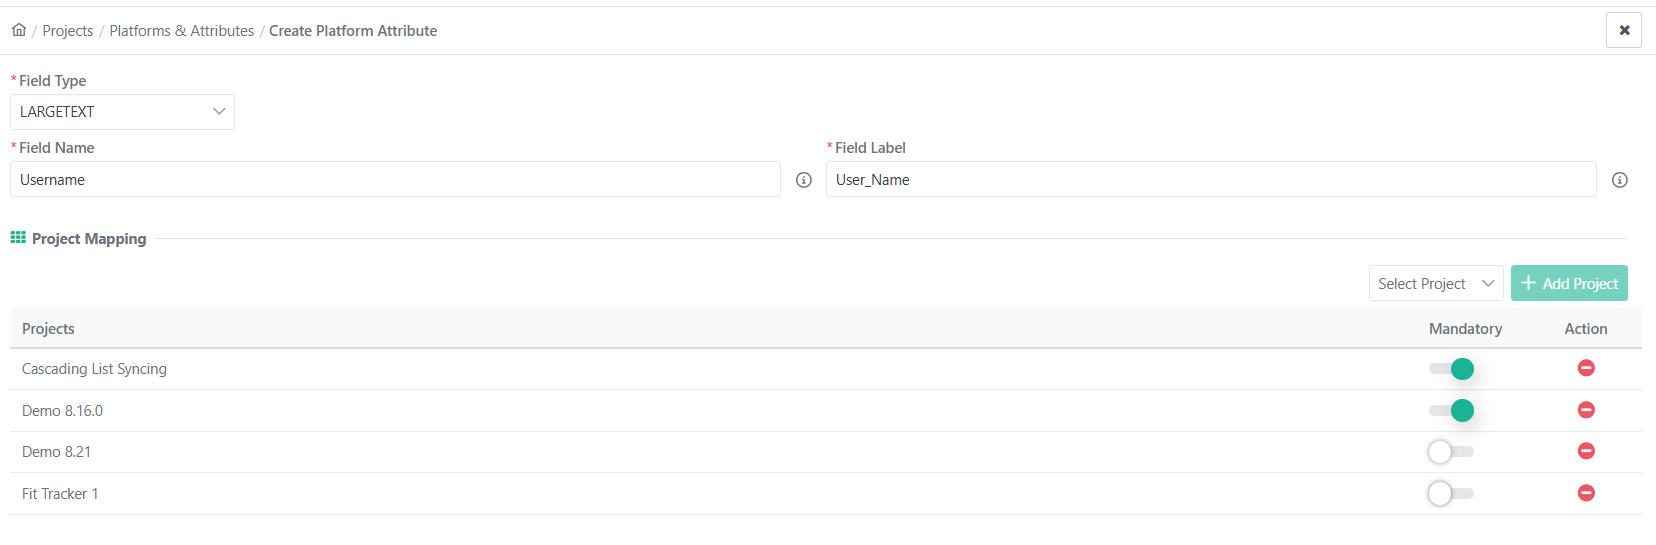 |
On the Create or Edit Platform Attribute screen, select the Project to share the platform attribute.
Click Add Project.
In the project mapping grid, review the projects in which the Platform Attribute is available. Enable the Mandatory option for that project to make the field mandatory.
Click Save.
The Platform Attribute is now available in the mapped project or projects.
Sharing Platform Attribute Values through Copy and Import
You can share Platform Attribute values across multiple projects. You can copy the Platform Attribute Values from a source project to multiple destination projects.
Copy and import events for Platform Attributes are also recorded in the Audit Log Report.
Use Case: A project administrator wants to reuse existing list values from one project in multiple other projects instead of manually adding and maintaining the same values in each project.
Required Permissions:
You should have the following permissions for creating or modifying Platform Attributes.
Source/Destination | Permissions |
|---|---|
Source Project The Project from where the platform attributes will be copied. |
|
Destination Project The Project where the platform attributes will be created. |
|
Import Platform Attributes from Other Projects
To import Platform Attributes from other projects, perform the following steps:
 |
Go to Project Management and select Platforms & Attributes.
Select the Platform Attributes tab.
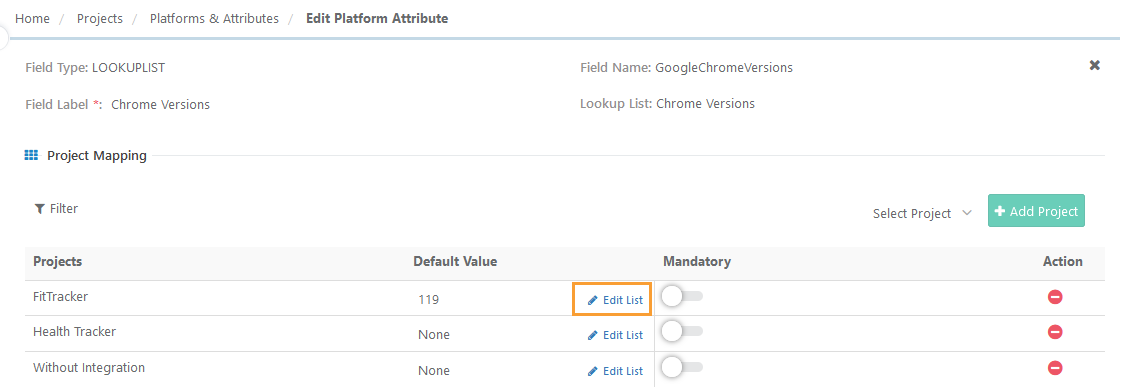
Select Edit for the Platform Attribute.
Select Edit List for the project from where you want to copy the Platform Attribute values.
Click Import.
Select the project from where you want to import the Platform Attribute values.
Select the values to import and click Import.
Note
You can select a maximum of 100 Platform Attributes at a time.
When copying, duplicate entities with the same name and alias are ignored.
Copy Platform Attributes to Other Projects
Note
The platform attribute list values can be copied to only those projects with which the platform attribute has been mapped.
To copy platform attributes to other projects, perform the following steps:
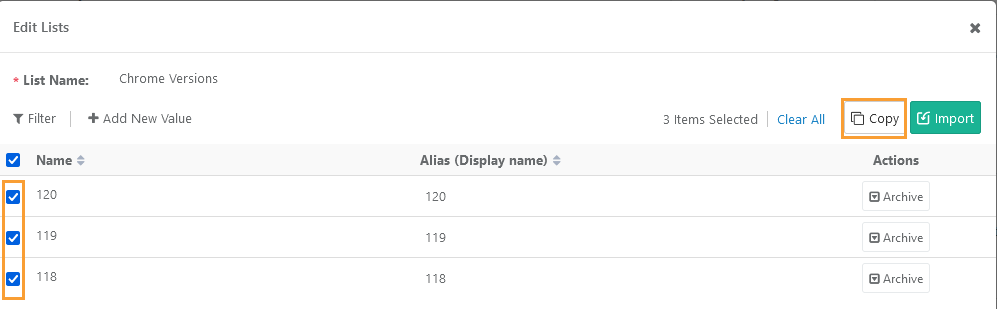 |
Go to Project Management and select Platforms & Attributes.
Select the Platform Attributes tab.
Edit the Platform Attribute the values of which you want to copy to other projects.
Select Edit List for the project to copy the Platform Attribute values.
Select the Platform Attribute values.
Select Copy.
Select the target projects to copy the selected platform attribute values.
Click Copy.
The selected Platform Attribute values get copied to the target projects. You can view the progress in the Scheduled Task section.
Note
You can select a maximum of 100 Platform Attributes at a time.
You can select a maxximum of 5 projects at a time.
The system ignores duplicate entities for name and alias.
Link Attributes to Platform
To link attributes to platform, perform the following steps:
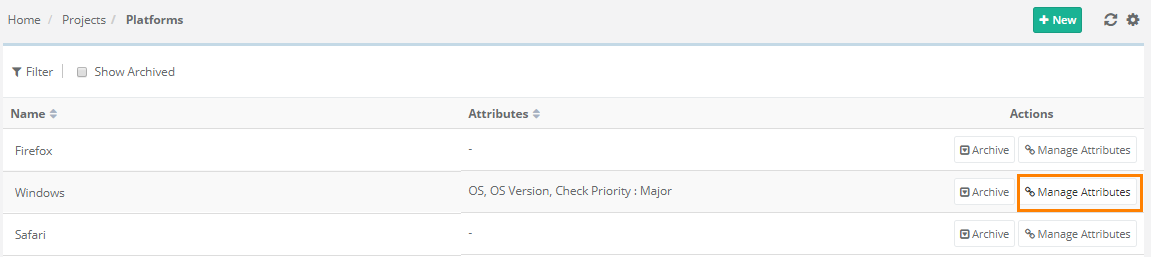 |
Expand the Projects section on the tree and open the Platforms & Attributes sub-section.
Go to the Platforms tab.
Click Manage Attributes for the platform.
Go to the Available Attributes tab. To add more attributes, click on the Create New Platform Attribute link.
Select the attribute to link to the platform and click Link Selected Platform Attributes.
The attributes are linked to the platform. The linked attributes are displayed on the Linked Attributes tab.
To unlink an attribute, you can do it from this pane.
Note
To link/unlink Platform Attributes, the user role should have "View" and "Modify" rights for Platform. The rights are assigned from Customization > Roles.
Archive Platform Attributes
To archive a Platform Attribute, open the Linked Attributes tab on the Manage Attributes screen and enable the Archive flag for the attribute.
Edit Platform Attributes
To edit platform attributes, perform the following steps:
Go to Projects and select Platforms & Attributes.
The Platform Attributes tab shows platform attributes.
Click Edit under the Actions column for the attribute.
You can modify the following values:
Field Label
Field Default (for "String" field type)
Flag for Mandatory
Remove association with current Project
Tag Attributes at Runtime
A Platform Attribute can be configured so that its value can be changed at runtime. By default, Test Suite executions use the values configured under Projects > Platforms & Attributes. When Tag At Runtime is enabled, users can specify a different value for an execution.
This is useful when configuration information changes between executions. For example, a hardware company may need to record the firmware version used during each test. Testers can change the firmware value for each execution, including when testing an earlier firmware version. Each execution is then associated with the firmware version used for that run.
Enable Tag At Runtime
After linking attributes to a platform, open the Linked Attributes tab for that platform and enable Tag At Runtime for the required Platform Attribute.
Specify Runtime Attribute Values
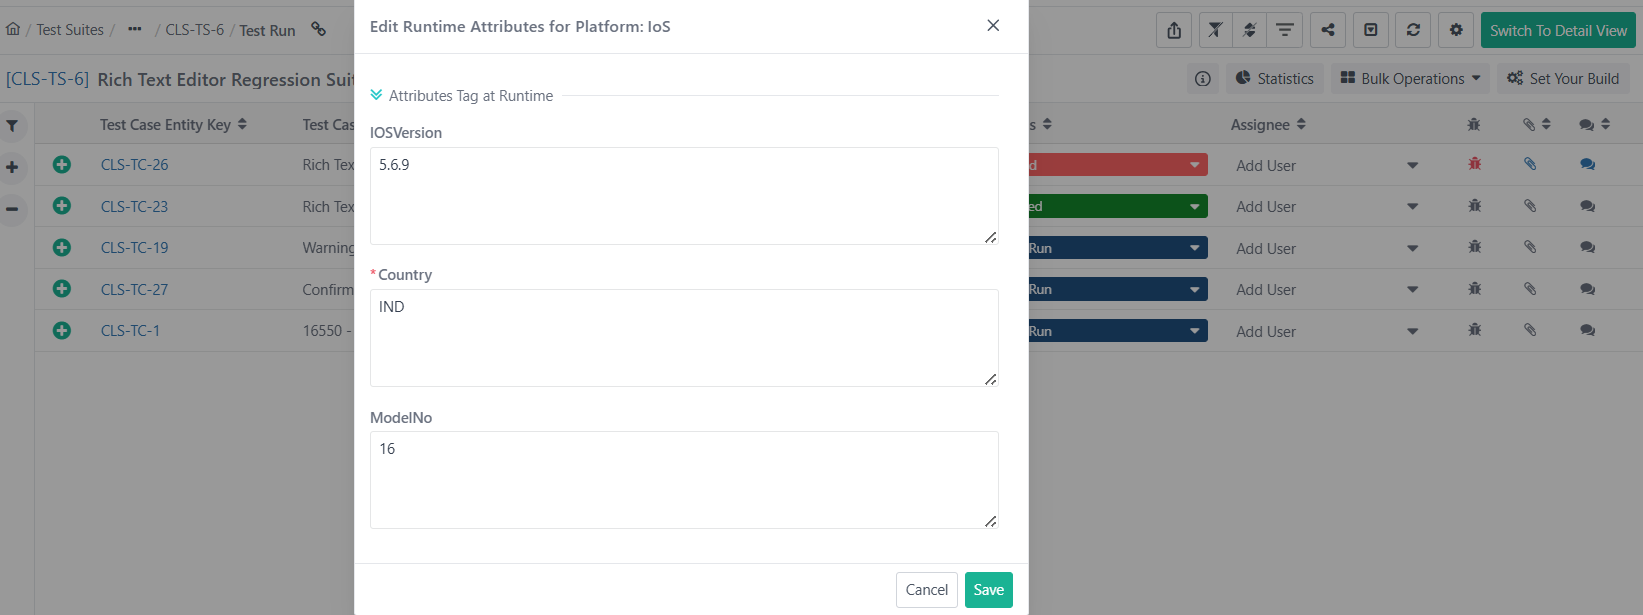
On the Test Suite Execution screen, Platform Attributes configured with Tag At Runtime appear as Runtime Attributes. When you execute the Test Suite, a dialog appears in which you can review or change the runtime values before execution.
If a Runtime Attribute is required, provide a value for each execution, even if the same Test Suite and platform were used previously. Runtime values apply to the individual execution and do not replace the configured default values. After the execution, the values are retained as part of the execution history.
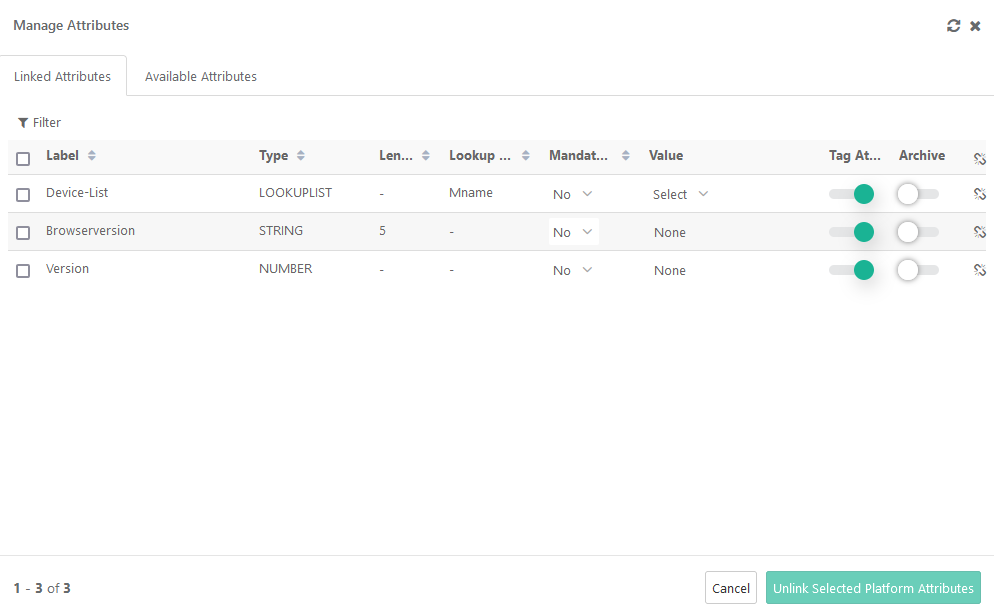
View Runtime Attribute Values
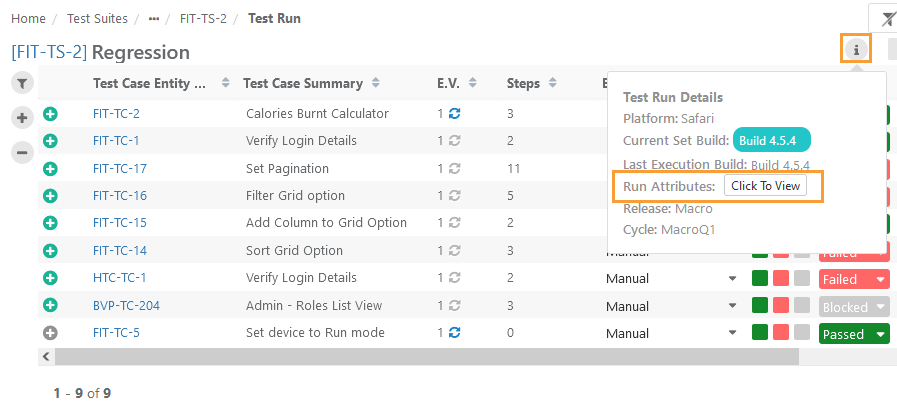
On the Test Suite Execution screen, click Click to View for Run Attributes to view the Runtime Attributes. When Platform Attributes are linked to the platform, the Click to View control is available.
Runtime values are displayed in the Platform Attributes column so that users can identify the Platform Attribute values associated with each test execution. They are also available in:
The Test Executions tab of the Test Case detail view.
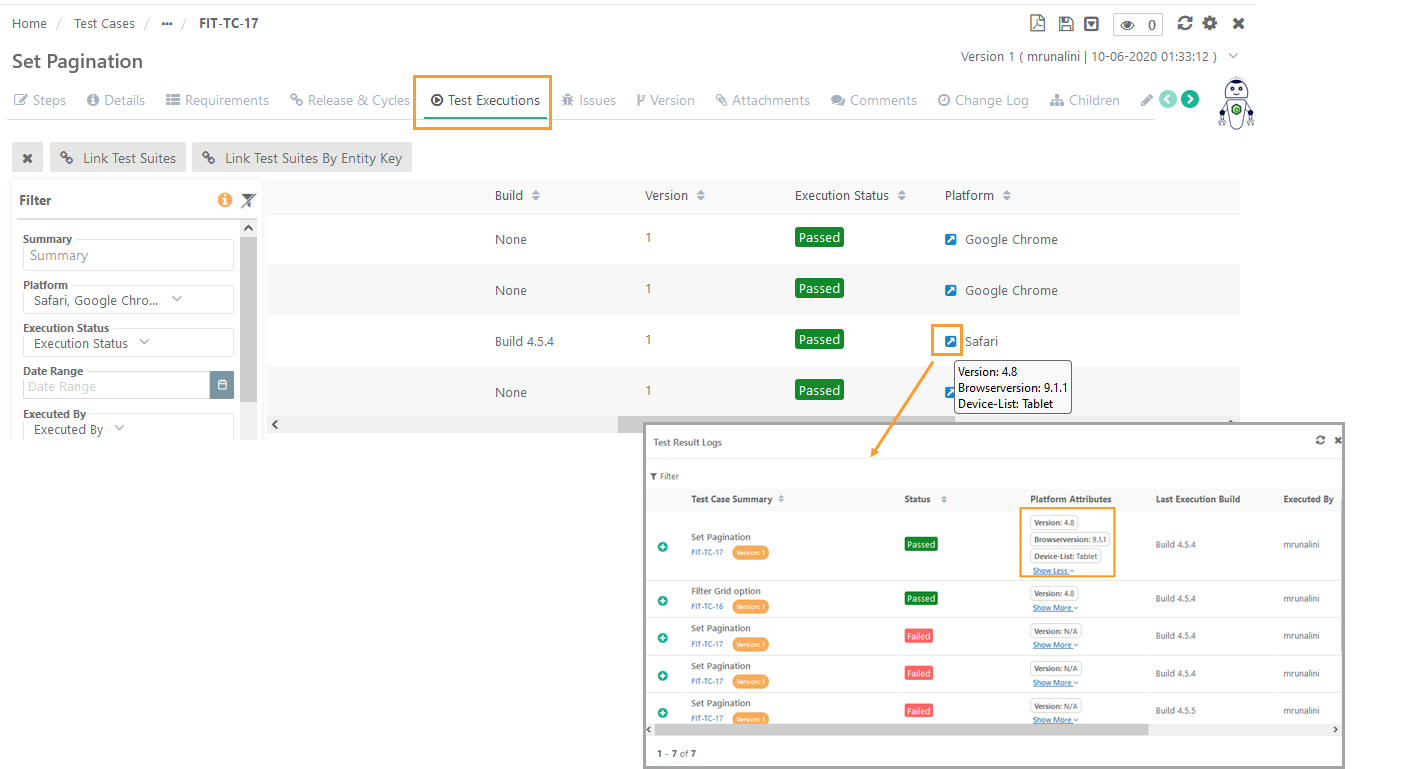
The Test Executions tab of the Test Suite detail view.