Importing Test Cases from an Excel File
Import test cases from Excel to create new assets in QMetry or update existing ones through re-import. The system retains the order of test cases as defined in the file. Accepted formats: CSV, XLS, and XLSX. Maximum file size: 10 MB.
You can also import test cases into specific folders or sub-folders within the Test Case module of the current project.
Pre-requisites
Convert your data to system format before importing.
Get Link permissions for Test Cases, Requirements, and Issues across all relevant projects.
Keep columns consistent across all sheets. The first sheet defines the field mapping for all sheets in the file.
Preparing Excel File
Use any of the following templates to prepare your excel for import:
TestCases with Steps in Multiple Rows_multiple worksheets.xlsx
TestCases with Steps in Single Row_multiple worksheets.xlsx
Use comma-separated values for fields with a multi-lookup list.
If a column has no matching QMetry field, create a custom field from Manage Fields.
Import excludes Graphs, Filters, Merge Cells and HTML Tags.
To import into multiple folders, use a colon-separated list of folder names.
Blank columns, headers, or introductory rows are permitted but ignored during import.
Test Step Format
Test Case Steps in Single Row: All steps for a test case are listed in one row.
Test Case Steps in Multiple Rows: Each step is written in a separate row.
Importing Assets from Excel
To import assets from Excel, perform the following steps:
Open the specific module.
Click Cog (⚙️) and select Import.
Upload Source File
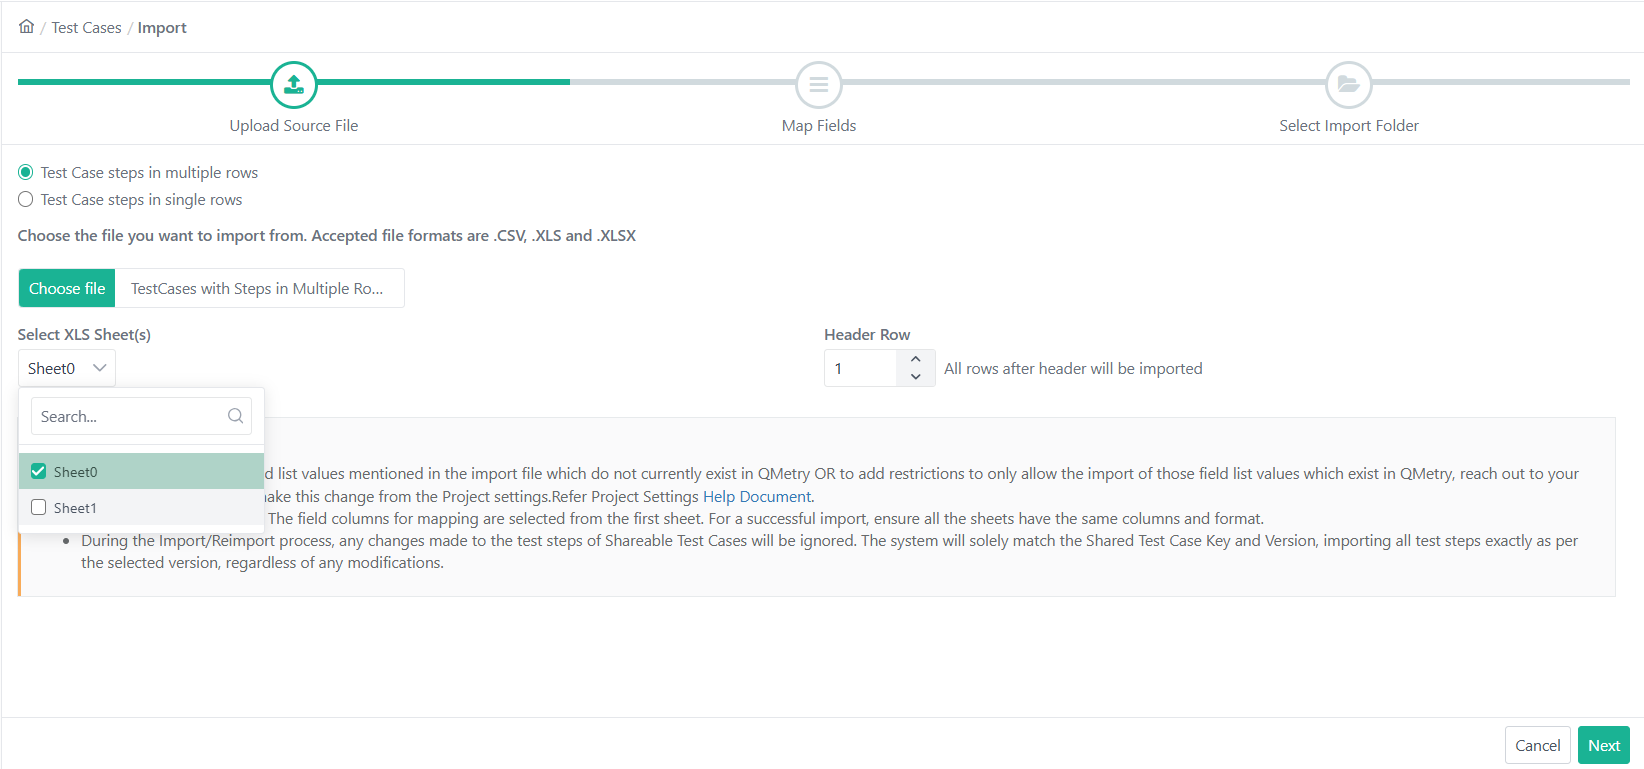
Click Choose File to browse and upload the file to import. Select at least one sheet from the Excel file.
Note
If an “Invalid file” message appears while uploading an Excel file, open the file in Microsoft Excel. Save it as an “Excel Workbook” with a new name, and then try importing the new file.
Select XLS Sheet: Choose the sheets to import. Select at least one sheet that contains the requirements.
Importing Multiple Sheets: The first selected sheet defines the field columns for mapping. All sheets must share the same columns and format.
Header Row: Enter the row number to set it as the header row. The system imports all rows below it.
Mapping the Fields
Map each Excel field to the corresponding QMetry field. The system marks all mandatory fields in red.
Click Save Map, enter a name, and save the mapping.
Saved mappings appear under My Mappings and can be reused in future imports.
Save Mapping
Select one of the following to save the mapping:
Auto Map: Use Auto Map to automatically match columns to system and custom fields by keyword.
My Mappings: The drop-down displays all mappings saved by the logged-in user during requirement imports. The selected map name indicates the mapping currently in use.
Click Next to proceed.
Select Import Folder
Select the destination folder for import.
To create a new folder, select a parent folder, enter the folder name, and click Add Folder.
Create folder with sheet name: Enable Create folder with sheet name to automatically create one folder per sheet.
Import with Warning: Enable Import with Warning to truncate requirement summaries longer than 255 characters instead of failing the import.
Click Finish to start the import. Track Progress in the application header.
Re-importing Test Cases
Re-import modified test cases to update existing ones.
When you map a Test Case Entity Key column QMetry identifies and updates the corresponding test case. Each re-import increments the version number by 1.
Same folder selected: Test Case stays in its original location. Existing folder associations are unchanged.
Different folder selected: Test Case is reused in the new folder. It retains its original folder associations.
If a selected folder does not exist, the system automatically creates it during the reimport process.
Note
You can only add folder associations via re-import.
To re-import test cases, perform the following steps:
Export test cases from QMetry via Bulk Operations.
Make edits in Excel.
Follow steps 1–3 in the Importing Test Assets from Excel section.
Note
The system increments the version number by 1 for each re-import.
Map the mandatory and optional fields.
Map Entity Keys to update the right test case.
Map Summary and all required fields.
Map Folder Path only if moving assets to a different folder.
Note
Unmapped fields retain values from the previous version.
Save Mapping Configuration.
Select Import Folder.
Click Next
Note
You can have blank columns, headers, or sheets during upload. Organizations may use the first sheet or initial rows for content like a name, logo, or introductory text instead of actual test cases.
Linking Requirements and Issues During Import
To automatically link requirements or issues to test cases at import time, add a Linked Requirements or Linked Issues column to your import file and include the relevant keys.
Note
To link multiple requirements or issues, enter the keys in comma-separated format, for example, Pro1-REQ-1, Pro1-REQ-2, Pro1-REQ-3).
Supports up to 25 requirement keys and 10 issue keys per test case.
If a requirement or issue key is missing, archived (requirements only), or inaccessible, QMetry skips that key and continues processing. To track the details, check the import log.
You can map either Entity Keys or External Keys for a given field, but not both simultaneously. Selecting one option disables the other.
Mapping the Fields
During field mapping, map the Linked Requirements and Linked Issues columns to the following QMetry fields:
Asset Type | Excel Column | QMetry Field | Project Scope |
|---|---|---|---|
Internal Requirements | Linked Requirements | Linked Requirements: Entity Keys | Same project or another project |
External Requirements | Linked Requirements | Linked Requirements: External Keys | Same project only |
Internal Issues | Linked Issues | Linked Issues: Entity Keys | Same project or another project (Internal Issue Module projects only) |
External Requirements | Linked Issues | Linked Issues External Keys | Same project only (External Issue Module projects only) |
Fresh Imports
When the Test Case Entity Key column is not mapped, QMetry treats all records as new test cases and versions them as version 1.
Linking Requirements
QMetry links each new test case to the latest available version of the corresponding requirements.
Linking Issues
QMetry links each new test case to the corresponding issues.
Direct Linkage is set to Yes and Execution is set to No for each linked issue.
Linking Requirements During Re-import
The following table describes how QMetry handles the Linked Requirements column during test case re-import.
Scenario | QTM Behavior | Scheduled Tasks |
|---|---|---|
Requirement Key is missing in Excel. | Existing requirement linkages remain unchanged. | None |
Requirement Key is present in Excel. No previous requirement version is linked to the test case | QMetry links the test case to the latest available version of the requirement. | None |
Requirement Key is present in Excel. Requirement is already linked to the test case. | QMetry skips the key and continues processing. | View warning message in Scheduled Tasks - Import Log |
Requirement Key does not exist in QMetry You don't have access to the requirement. Requirement is archived | QMetry skips the key and continues processing. | View warning message in Scheduled Tasks - Import Log |
Linking Issues During Reimport
The following table describes how QMetry handles the Linked Issues column during test case re-import.
Scenario | QTM Behavior | Scheduled Task |
|---|---|---|
Keys - Not provided | Existing issue linkages remain unchanged. | None |
Key - Provided Linkage - No previous linkage with any version of the test case | Links QMetry the test case to the issue. Direct Linkage = Yes, Execution = No | None |
Key - provided Linkage - Issue already linked to the test case | QMetry skips the key and continues processing. | Warning message in audit log |
Key is missing or belongs to a project you cannot access | QMetry skips the key and continues processing. | Warning message in audit log |
Importing Test Cases with Linked Shareable Test Cases
Note
The Shareable Test Case must already exist in the system before import.
To link Shareable Test Cases during import, include the following columns in your import file:
Shareable Test Case Entity Key.
Shareable Test Case Version Number.
Download Templates
Note
The Shareable Test Case Key and Shareable Test Case Version Number fields can be mapped or unmapped during import.
The system matches only the key and version during import; it ignores any changes to the test case content.
The system creates the shareable test case steps as part of the independent test case in the following scenarios:
When the Shareable Test Case Key or the Version is Invalid.
When the Shareable Test Case Key or the Version is Archived.
When the Shareable Test Case Key is for another project, and you do not have access to the test case.
Reimporting Test Cases with Linked Shareable Test Cases
During re-import, the system creates a new version of each test case, preserving links to the Shareable Test Cases while applying changes from the Excel file.
For reimporting steps, see Importing Test Cases Containing Linked Shareable Test Cases.
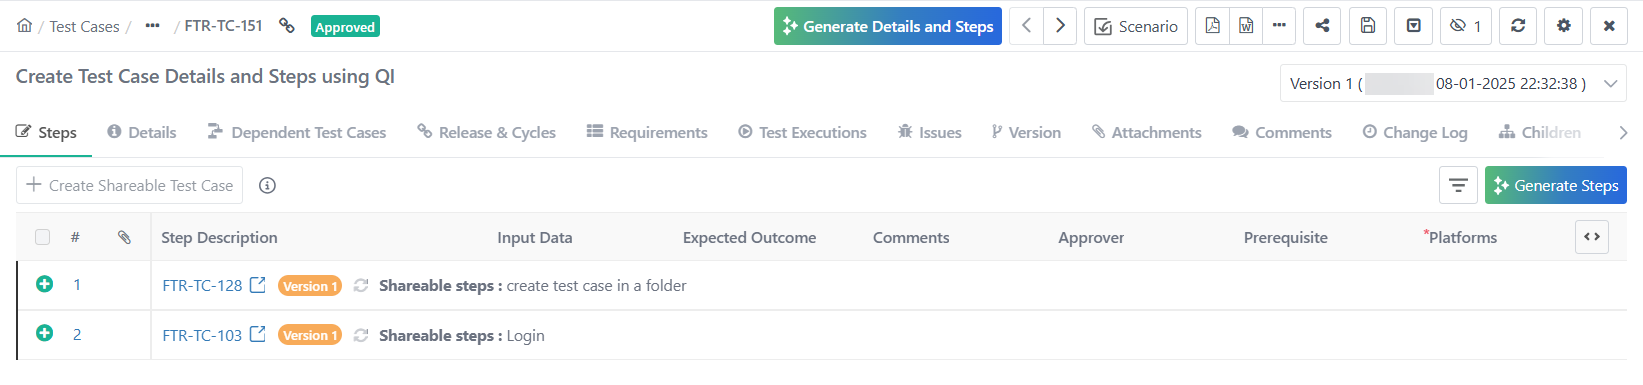 |
The shareable test case link remains intact. You can click the shareable test case entity key.
Note
Map or unmap the Shareable Test Case Key and Shareable Test Case Version Number fields during import.