QMetry Plug-in for Jenkins
The QMetry Test Management plug-in for Jenkins integrates your continuous integration and continuous delivery (CI/CD) pipeline with QMetry. You configure Jenkins to submit test results to QMetry without writing code or calling the REST application programming interface (API) directly.
The plug-in accepts test results from automation frameworks such as Cucumber, TestNG, JUnit, and QAF. In addition, you can define a Custom Automation Import Template to import Extensible Markup Language (XML) result files from frameworks that QMetry does not support out of the box.
Download Link: QMetry Test Management for Jenkins
For more info visit QMetry Test Management.
Pre-requisites
Before you begin, ensure the following:
QMetry Test Management is installed on Cloud or Server.
Jenkins is installed and running.
Install the Plugin for Jenkins
To install the plugin for Jenkins, perform the following steps:
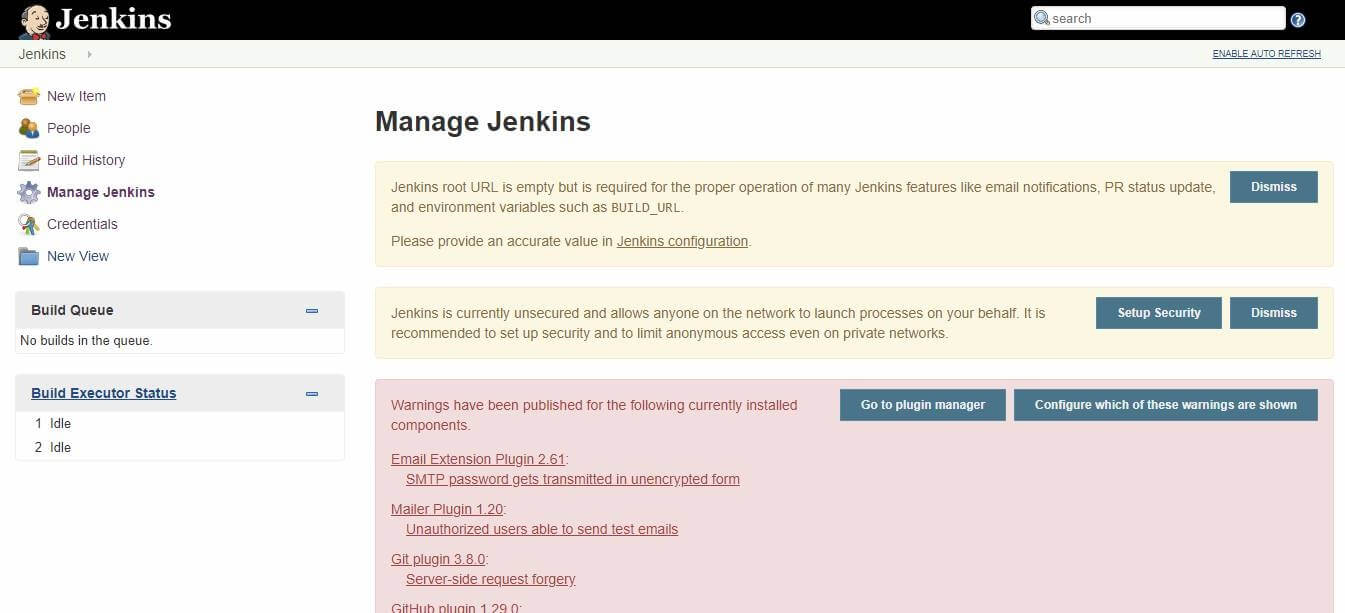
Login to Jenkins and go to Manage Jenkins.
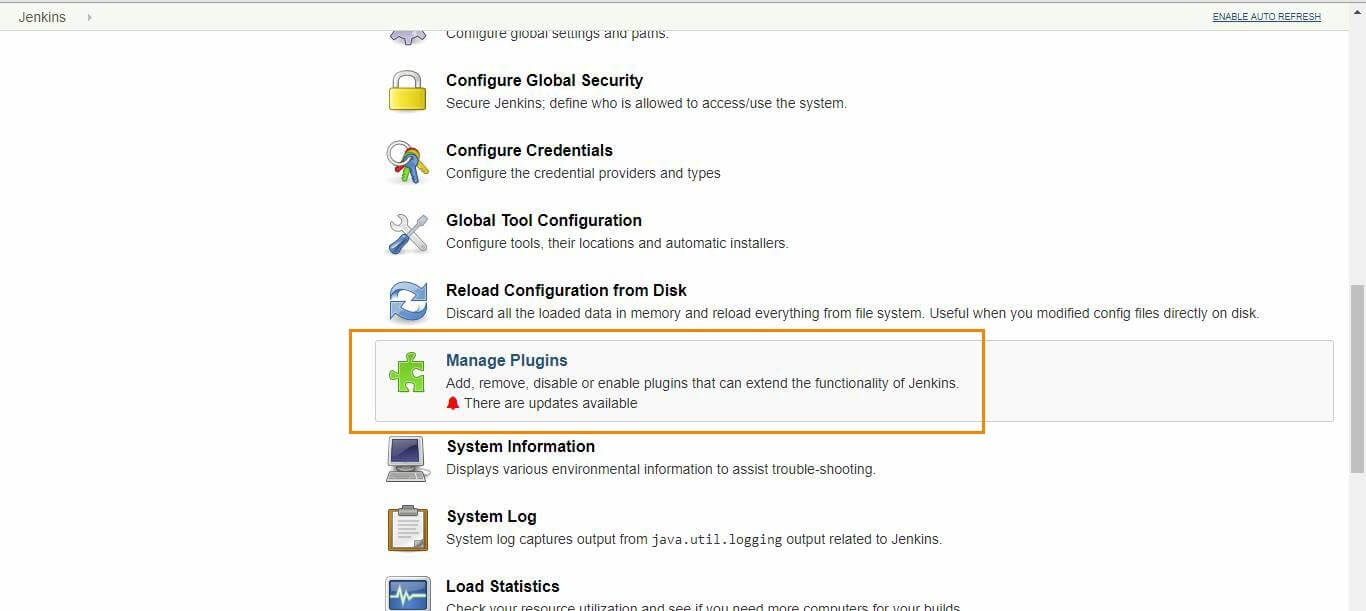
Locate the Manage Plugins section.
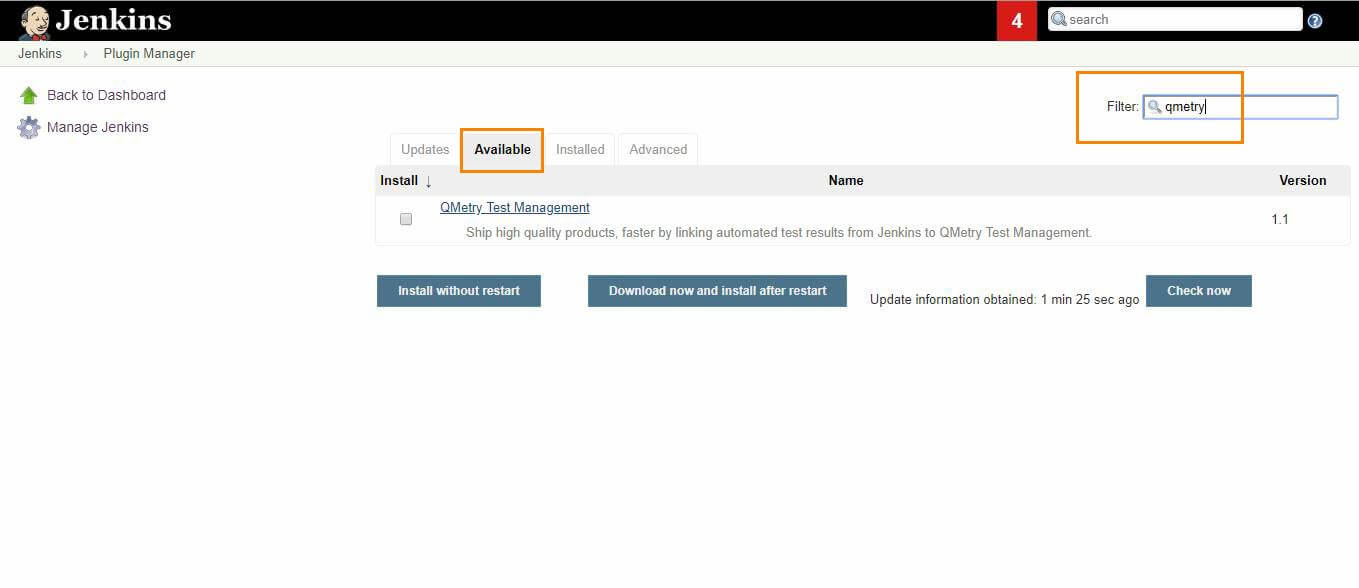
Open the Available tab and search QMetry Test Management.
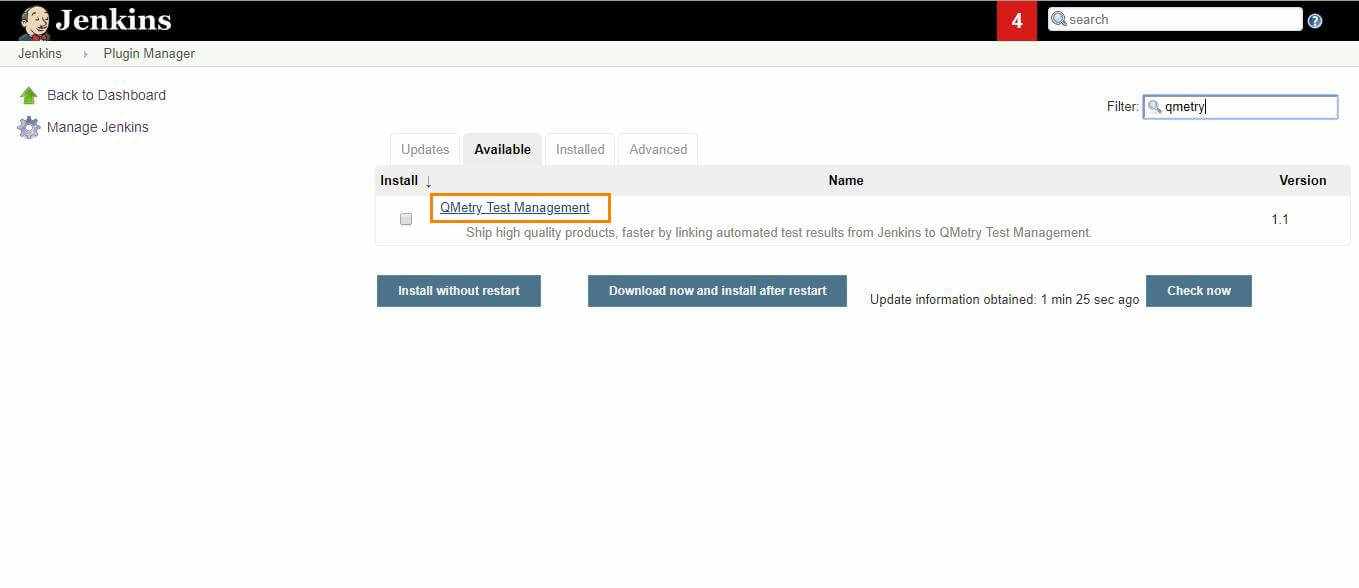
Select the QMetry Test Management Plugin, then select Install without Restart or Download Now and install after restart.
Configuring a Jenkins job
You can configure a Jenkins job to publish results to QMetry Test Management using a Freestyle project or a Pipeline. The following sections describe both approaches.
Freestyle project
To create and configure a Freestyle project in Jenkins, perform the following steps:
Note
Release is mandatory if Cycle is specified.
Note
Release is mandatory if Cycle is mentioned.
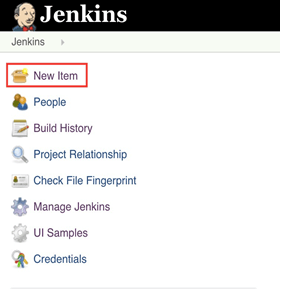
On the Jenkins menu, click New Item.
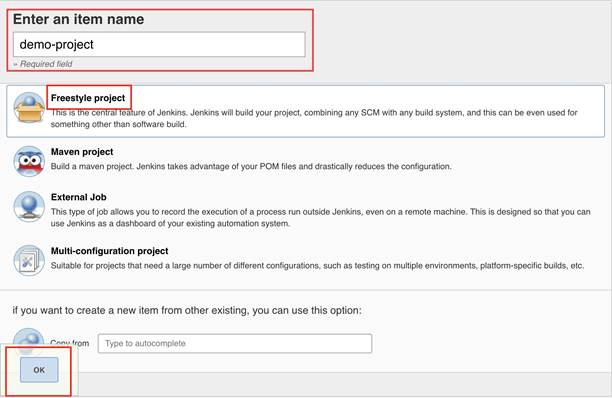
Enter a name for your job, select Freestyle project , and select OK.
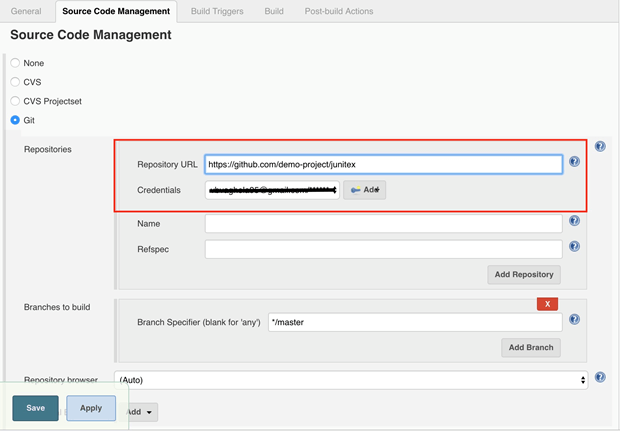
On the Source Code Management tab, select the option where your source code is hosted, for example, Git, and provide the required information.
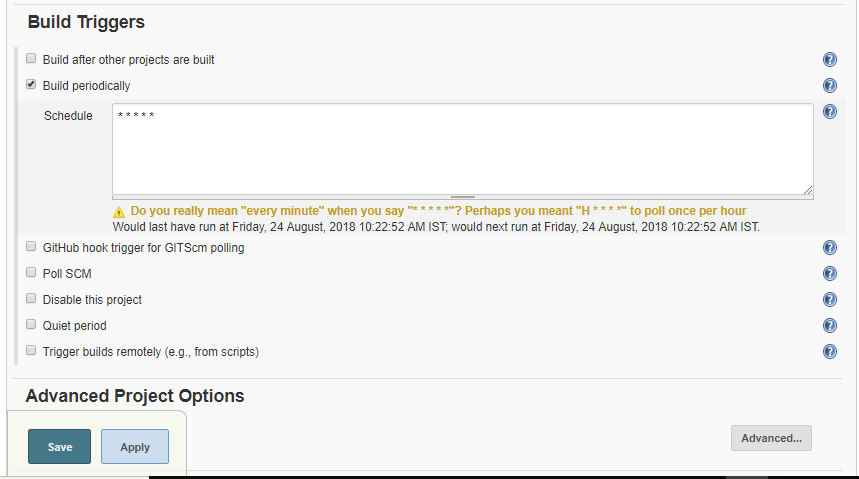
On the Build Triggers tab and configure a trigger schedule.
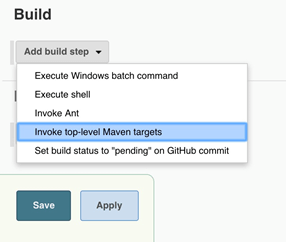
On the Build tab, add a build step.
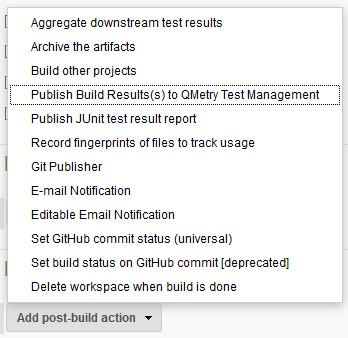
Next step is to add Post-build Actions. Here, add the QMetry Test Management Plugin”.
Under Post-build Actions, select Add post-build action, then select Publish Test Result to QMetry.
Fill in the required fields. For more information about each field, select the Help icon next to it.
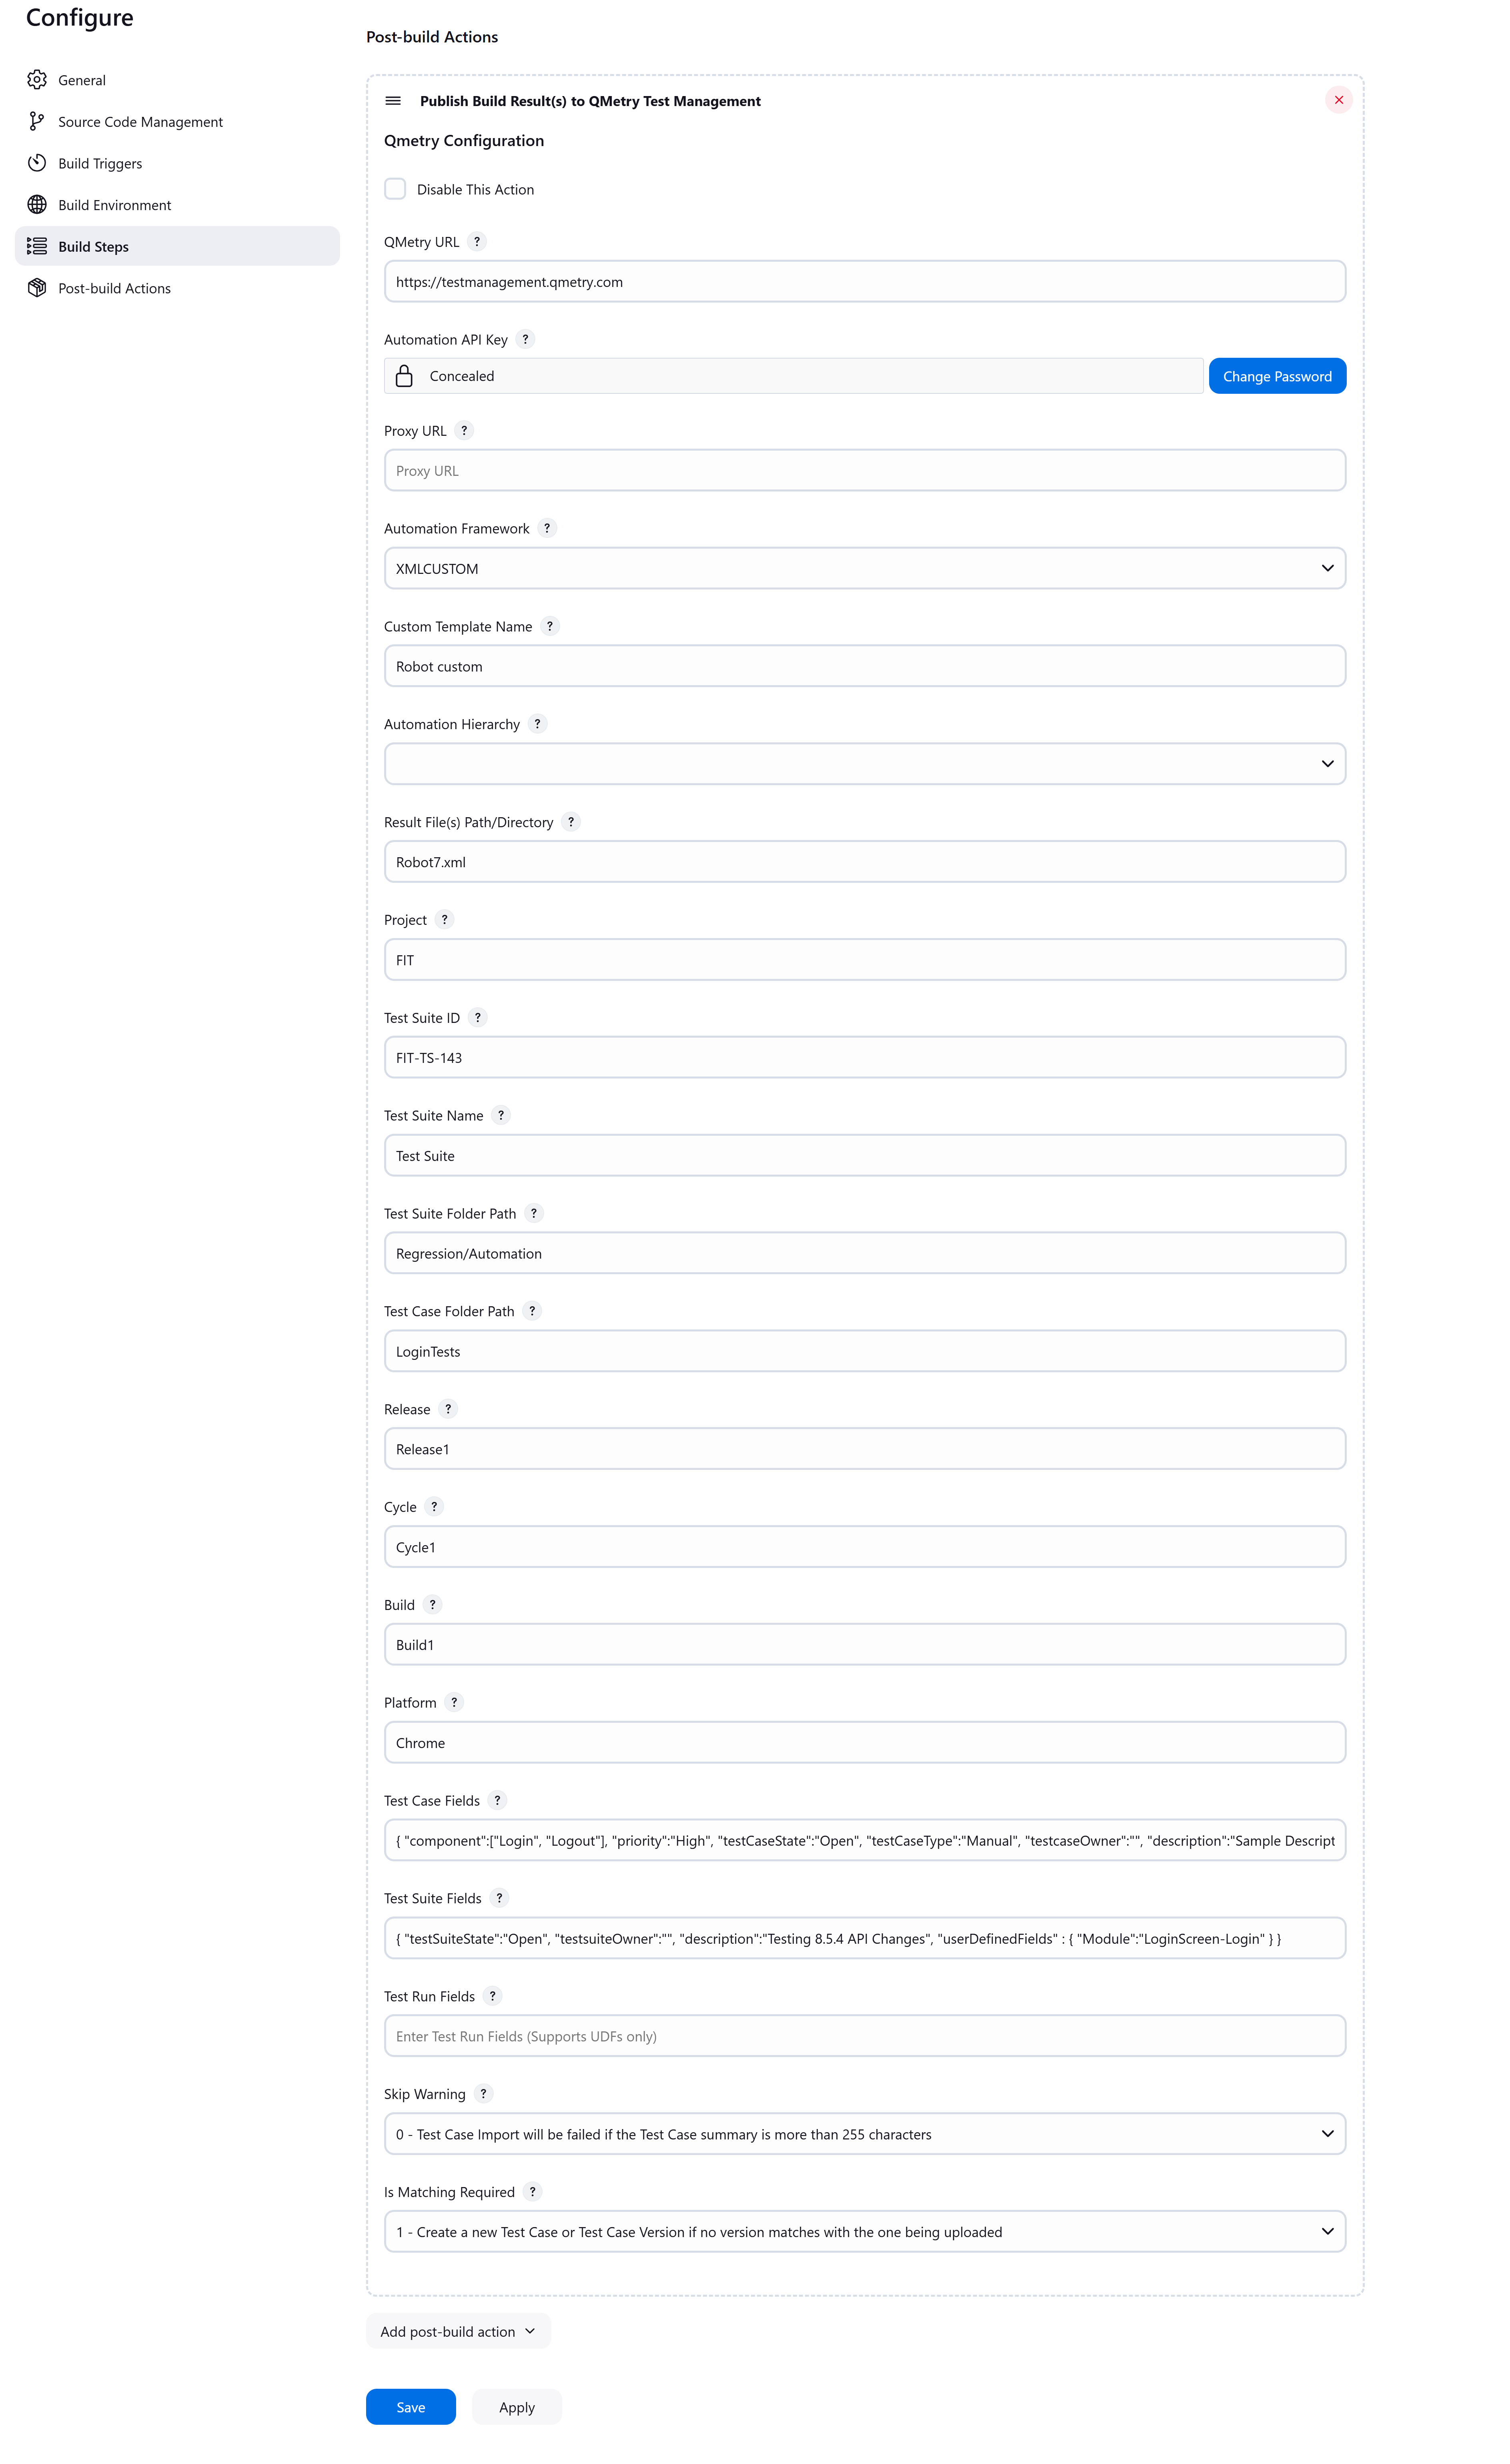
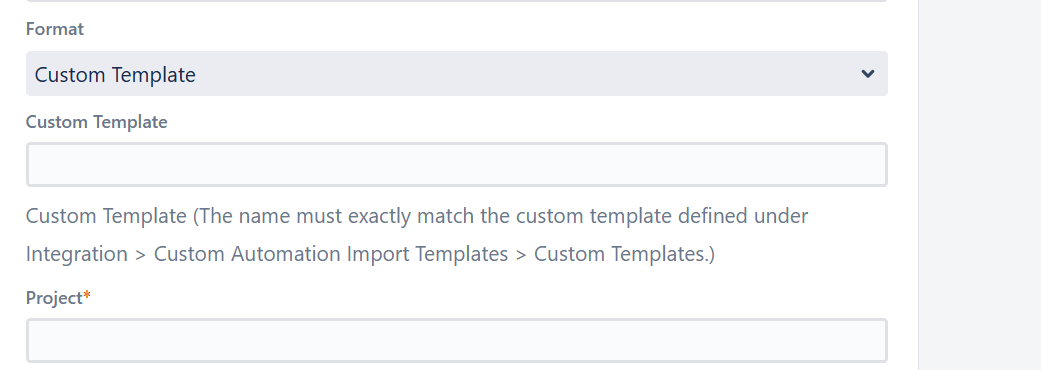
If you are importing an XML automation result file using a Custom Automation Import Template, select Custom Template under Automation Framework and enter the template name.
Select Save.
Using a Custom Automation Import Template
In addition to the built-in automation frameworks, the QMetry Bamboo Integration task supports XML automation results using a Custom Automation Template defined in QMetry.
A Custom Automation Template is a reusable, instance-level mapping (stored as JSON) that defines how elements and tags in an XML result file are converted into QMetry test cases, steps, test suites, execution statuses, and other fields. This is useful for custom or unsupported report formats and for mixed (JUnit-style) XML files.
Pre-requisites
Create the template in QMetry under Integration in Custom Automation Template, and note its exact name.
Ensure you have a valid Automation API Key for the project (the same key used for standard automation imports).
Ensure your result file is in XML format.
Configuring the Task to use a Custom Template
In the QMetry Bamboo Integration task configuration, under Automation Framework, select Custom Template.
In the Custom Template Name text box that appears, enter the template name exactly as defined in QMetry.
Provide the required parameters (QMetry Base URL, Automation API Key, Test Result File or Directory Path, Project, and Release.
Save the task and run the plan.
On execution, the plugin validates that the custom template exists, then uploads results using the field mappings defined in the template’s JSON.
Note
The template name must exactly match a template defined in Custom Automation Templates under Integration.
The uploaded file must be in XML format only.
Custom Template selection is supported for both Freestyle and Pipeline projects.
What changes when you use a custom template
When Custom Template is selected, the plugin sets the underlying Automation API entityType to XMLCUSTOM and passes the template name through the customTemplateName property (accepts template name or ID). The following parameter behaviors change:
Parameter | Behavior with a Custom Template |
|---|---|
Automation Hierarchy | Ignored. The template's JSON already defines the parsing hierarchy and field mapping. |
Format | Only XML formats are valid. |
Test Suite Name | Auto-generated if not provided. Ignored if the template maps Test Suite Summary. |
Test Suite Id | Can still be used to link results to an existing Test Suite. |
Freestyle Project Parameters
The following table describes the parameters available in the QMetry configuration for a Freestyle project. Use it as a reference when you fill in the post-build action fields.
Parameter | Type | Required | Description |
|---|---|---|---|
| string | Yes | QMetry Test ManagementURL |
| string | Yes | QMetry API Key. The result is imported for the project associated with the API Key. Go to Integrations. Select Automation API. Click Generate. |
| string | No | Enter Proxy URL if you have configured any Proxy. |
| string | Yes | Format of result file to be imported. Supported formats: Cucumber, TestNG, JUnit, QAS, HP UFT, Robot, XMLCustom. |
(ignored when you use a Custom Automation Template) | string | No | Hierarchy used to parse test result files on QTM. Supported formats are:- JUnit Use current Hierarchy in which JUnit Testcase is treated as TestStep and Testsuite is treated as Testcase (default) JUnit File Type 1: Wherein testsuite "name" matches the test case "classname".
JUnit File Type 2: Wherein testsuite "name" does not match the test case "classname".
2. Use Junit Testcase as Testcase and link all those (from all testsuites and all files of Junit) to one Testsuite 3. Create Multiple Testsuites and then link their respective testcases in corresponding Testsuites TestNG 1. Use class 'name' as Testcase and test-method as TestStep (default) 2. Use test-method as Testcase 3. Use test 'name' as Testcase and test-method as TestStep |
| string | Yes | Path wherein you need to upload the result file. Supported file extensions: .json, .xml and .zip (zip file must contain files of the format given in the 'Automation Framework' param). If your automation generates multiple result files of the supported format in a folder then provide the absolute path till the folder name(It should not be the path till workspace). QMetry plugin will zip all supported format files and upload them to QMetry. |
| string | No | Key of the test suite exists in QMetry. In the absence of Key, a new test suite will be created. Note: If for Junit - 3 - Create Multiple Testsuites and then link their respective testcases in corresponding Testsuites - is chosen, then the parameter Test Suite ID will be ignored. |
| string | No | If existing Note: If for Junit - 3 - Create Multiple Testsuites and then link their respective testcases in corresponding Testsuites - is chosen, then this parameter will be ignored. For custom templates, ignored when the template maps Test Suite Summary. |
| string | No | New test suites are created in a specified test suite folder while importing automated test results. If the folder does not exist, it gets created. This parameter will be ignored if the test suite is being reused. |
| string | Yes | ID, Key, Name of the Project within which the test suite will be created. |
| string | *No | ID, Name of the Release in which the test execution will be created. If Release is not mentioned, then Default Release will be considered. |
| string | No | ID, Name of the Cycle in which the test execution will be created. If Cycle is not mentioned, then Default Cycle will be considered. |
| string | No | Build Name/Id. In the absence of a value, it will create the default build. |
| string | No | Name of Platform on which test run to be executed. |
| JSON | No | Mention system defined fields and user defined fields for test case as shown in Test Case JSON format below. All the mandatory fields other than Summary should be mentioned in this parameter. |
| JSON | No | Mention system defined fields and user defined fields for test case as shown in Test Suite JSON format below. All the mandatory fields other than Summary should be mentioned in this parameter. This parameter will be ignored if existing Test suite Id is used to upload results. |
| JSON | No | User-defined fields for the test case execution in JSON format. Applied on every import. All mandatory execution UDFs must be provided or the import fails. See Test case execution UDF fields in JSON format below. |
Skip Warning | string | No | Skip Warning while uploading test result file(s) to QMetry. Supported values are: 0 - Test Case Import will be failed if the Test Case summary is more than 255 characters. (default) 1 - Test Cases can be imported by ignoring the warning about summary length. If the test case summary is longer, it will be truncated to 255 characters. |
Is Matching Required | string | No | Create a new test case version or reuse the already created version while uploading test result file(s) to QMetry. 1 - Create a new test case or test case version if the test summary and steps of any of the test case versions do not match with the test case in the result file. (default) 0 - Reuse already linked test case version in test suite or auto link the existing latest version of test case to test suite, if the test case entity key OR test case summary matches with the test case in the result file. The execution status of the linked test cases will be updated. This parameter is not supported for server edition of QTM now and if specified, it will be ignored. |
customTemplateName | string | Required only when Format is XMLCUSTOM. | Exact name of the Custom Automation Template defined under Custom Automation Templates. |
Import Behaviour for Test Run UDF Values
The following table describes the import result based on whether the UDF is mandatory, whether auto-create is enabled for list values at the project level, and whether the UDF value already exists.
Is System Field/UDF Mandatory? | Is Auto-Create Enabled? | Does UDF Value exist? | Import Result |
|---|---|---|---|
No | No | No | Fail |
No | No | Yes | Success |
No | Yes | No | Success |
No | Yes | Yes | Success |
Yes | No | No | Fail |
Yes | No | Yes | Success |
Yes | Yes | No | Success |
Note
If you do not provide a value for an optional UDF, the existing value is retained. If you provide a value, the existing value is overwritten.
Pipeline
QMetry Test Management supports the Jenkins Pipeline for implementing and integrating continuous delivery pipelines into Jenkins. To create a standard Pipeline job, perform the following steps:
On the Jenkins menu, select New Item.
Enter a name for your job, select Pipeline, then select OK.
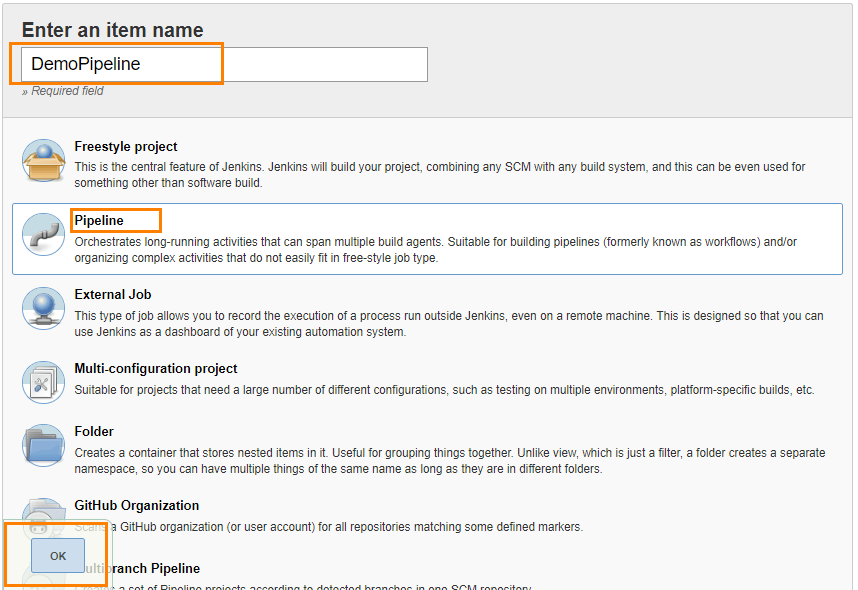
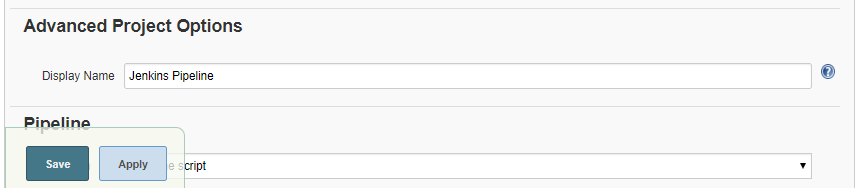
On the configuration page, configure the job by category: General, Build Triggers, Advanced Project Options, and Pipeline.
On the Build Triggers tab, add a periodic trigger, for example, a schedule of * * * * *. (Optional)
In Advanced Project Options, enter a Display Name to replace the name you gave the Pipeline project. (Optional)
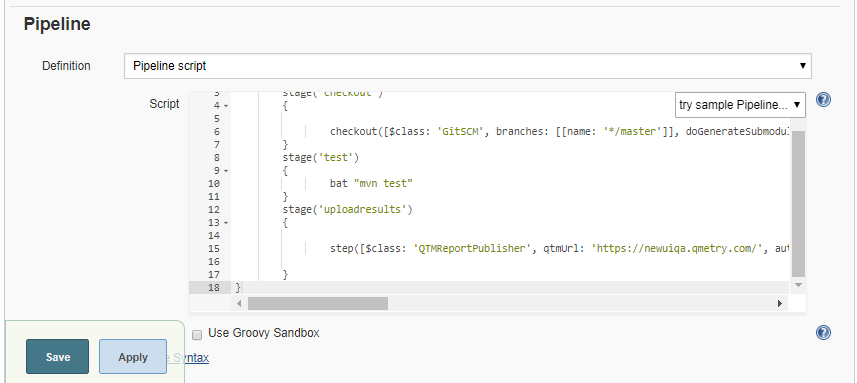
In the Pipeline script, define your code repository, generate the test result, and upload the result to QMetry Test Management.
Use the following step to publish results to QMetry from the Pipeline script:
{
	"project": {
		"script": [
			"",
			""
		],
		"actions": "",
		"description": "",
		"keepDependencies": "false",
		"properties": {
			"hudson.model.ParametersDefinitionProperty": {
				"parameterDefinitions": {
					"hudson.model.FileParameterDefinition": {
						"name": "output-robot7.xml"
					}
				}
			}
		},
		"scm": {
			"_class": "hudson.scm.NullSCM"
		},
		"canRoam": "true",
		"disabled": "false",
		"blockBuildWhenDownstreamBuilding": "false",
		"blockBuildWhenUpstreamBuilding": "false",
		"triggers": "",
		"concurrentBuild": "false",
		"builders": "",
		"publishers": {
			"com.qmetry.QTMReportPublisher": {
				"disableaction": "false",
				"qtmUrl": "https://qtm8-qacloud.qmetry.com",
				"qtmAutomationApiKey": "{AQAAABAAAAAwcQ+3Z1zR4hSmuW3JmirReQrOa6PgTzT4r29nf87t1KxBWDGgplTZpEvjWYhjErv4fnSlC9gWUTpbiGpk1FeXJw==}",
				"proxyUrl": "",
				"automationFramework": "XMLCUSTOM",
				"automationHierarchy": "",
				"testResultFilePath": "output-robot7.xml",
				"buildName": "Build 8.27.0",
				"testSuiteName": "R82-TS-2",
				"testSName": "Jenkins Build Test Suite",
				"tsFolderPath": "",
				"tcFolderPath": "",
				"platformName": "Chrome",
				"project": "R82",
				"release": "Production Release",
				"cycle": "Production Cycle",
				"testcaseFields": "",
				"testsuiteFields": "",
				"testRunFields": "",
				"customTemplateName": "Robot7 Template",
				"skipWarning": "0",
				"isMatchingRequired": "true",
				"_plugin": "qmetry-test-management@1.16-SNAPSHOT"
			}
		},
		"buildWrappers": ""
	}
}
Note
testSName is "Test Suite Name" and testSuiteName is "Test Suite ID" of the test suite.
The automationFramework value accepts the following syntax:
CUCUMBER
TESTNG
JUNIT
QAS
HPUFT
ROBOT
XMLCUSTOM
For the remaining parameters, see Freestyle project parameters. On successful completion, the console output displays a success message for the uploaded result file. Finally, review your test run results on the test execution page in QMetry.
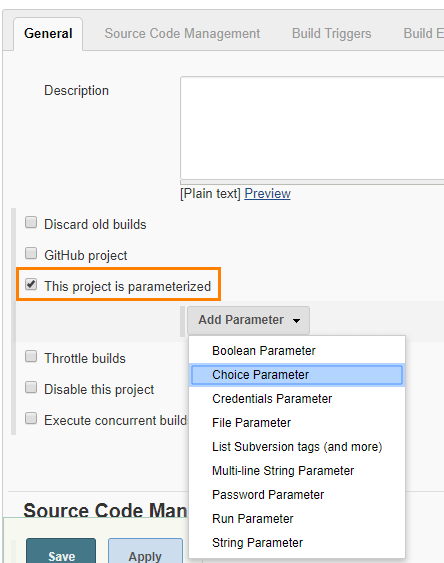
Define Parameters
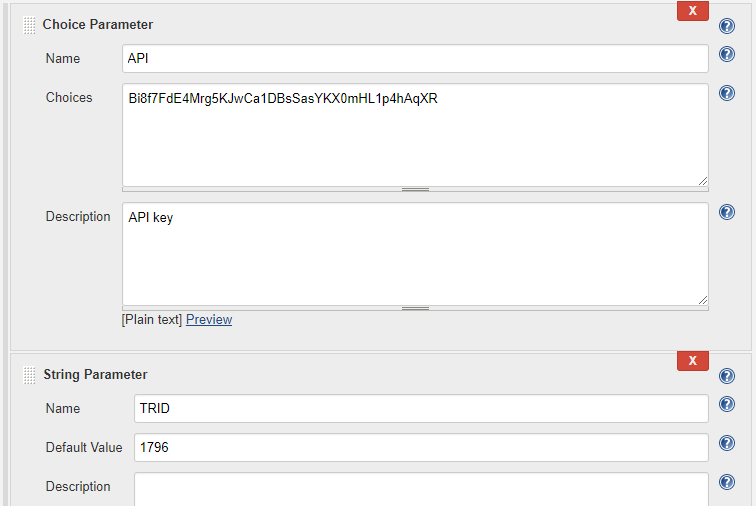
To define parameters for your job, select the This project is parameterized check box. The Add Parameter drop-down is enabled with the list of parameter types. Use it to add as many parameters as you need.
 |
Enter field values using the syntax ${ParameterName}. QMetry parses the parameters dynamically at run time. For example, for a parameter named API and a parameter named TRID, enter the field values as ${API} and ${TRID}. You can also change the values before you trigger the Jenkins build.
Field and UDF reference
Supported Fields
Field Name as mentioned in QMetry >> Customization >> Manage Fields >> Field Name.
For Look up list and multi lookup list fields.
If the value does not exist in Project and Auto Create value feature is on for Project, the value will get added in the list and it will be assigned to the test case.
If the value does not exist in Project and Auto Create value feature is off for Project, the value will not be added in the list and Test Case field will be blank or have default value in it.
If a new value is added to Multi Look Up List, the older value will remain unchanged and the new value will be added to the list.
List values are added to the same version of the test case.
The following table describes each supported field with an example:
Field | Example | Test Case | Test Suite | Notes |
|---|---|---|---|---|
"component" | "component" : ["Label1, "Label2"] | Yes | No | Old values will persist and new value will get set e.g., L1 and L2 are set and L3 is assigned, then the updated values for component will be L1, L2 and L3. |
"priority" | "priority" : "Minor" | Yes | No | As mentioned for Look Up and Multi Look Up lists above. |
"testCaseState" | "testCaseState":"Open" | Yes | No | |
"testCaseType" | "testCaseType":"UI" | Yes | No | |
"testcaseOwner" | "testCaseType":"John" | Yes | No | userAlias should be passed in request. Owner will not be set if the requested user is not found or the user doesn't have right for the Test Case module. |
"description" | "description":"Sample Description." | Yes | Yes | This will be set as requested. |
"estimatedTime" | "estimatedTime":6 | Yes | No | This will be set as requested (in minutes). |
"testSuiteState" | "testSuiteState":"Open" | No | Yes | A new Status value will be added if it does not exist in the project. |
"testsuiteOwner" | "testsuiteOwner":"lizamathew" | No | Yes | userAlias should be passed in request. Owner will not be set if the requested user is not found or the user doesn't have right for the Test Suite module. |
User Defined Fields
The following table describes each user-defined field type, its validation rule, and an example:
Custom Field Type | Validation Rule | Example | Notes |
|---|---|---|---|
STRING | It accepts text in a single line | "tagName": "Sample test asset." | The field value will be set as requested. |
NUMBER | It accepts any number with decimal | "executionTime": 4 | The field value will be set as requested. |
MULTILOOKUPLIST | It accepts comma separated multiple values | "langaugePreference": ["English",Portuguese"] | Multi Lookup will be set as requested if its list value exists.
|
LOOKUPLIST | It accepts a single value on the list | "country": ["United States"] | Lookup type will be set as requested if its list value exists.
|
LARGETEXT | It accepts text in multiple lines | "additionalComment": "this is a sample test asset" | The field value will be set as requested. |
DATEPICKER | It accepts the Date format that has been set in user profile | "reviewedDate": "08-30-2019" | The field value will be set as requested. |
Test Case Fields with UDFs in JSON format
The following example shows test case fields with user-defined fields in JSON format:
{
"component":["com1", "com2"],
"priority":"High",
"testCaseState":"Open",
"testCaseType":"Manual",
"testcaseOwner":"lizamathew",
"estimatedTime":60,
"description":"Sample Description",
"userDefinedFields" :
 {
 "reviewedDate": "08-30-2019",
 "executionTime": 40,
 "tagName": "Sample test asset.",
 "additionalComment": "This is a sample test asset"
 "country": ["United States"]"langaugePreference": ["English",Portuguese"]
 }
}
Test Suite Fields with UDFs in JSON format
The following example shows test suite fields with user-defined fields in JSON format:
{
"testSuiteState":"Open",
"testsuiteOwner":"lizamathew",
"description":"Testing 8.5.4 API Changes",
"userDefinedFields" :
  {
  "reviewedDate": "08-30-2019",
  "executionTime": 40,
  "tagName": "Sample test asset.",
  "additionalComment": "this is a sample test asset"
  "country": ["United States"]"langaugePreference": ["English",Portuguese"]
  }
}
Test Run UDF fields in JSON format
The following table depicts probable import result according to the scenario.
Use the testRunFields parameter to set user-defined field values for test case executions at the time of import. These values are applied on every import run.
All field names must match the Field Name values configured under Customization, Manage Fields for the Test Case Execution module.
Cascading fields are supported.
{
  "userDefinedFields": {
   "testcaseexecution_singleselectlist": "Open",
   "testcaseexecution_largetext":
   "Testing API changes.",
   "testcaseexecution_string":
   "Testing UDF API changes.",
   "testcaseexecution_number": 40,
   "testcaseexecution_multiselectlist": ["Hindi","English"],
   "testcaseexecution_cascading": ["US", "Nevada"],
   "testcaseexecution_date": "08-30-2019"
  }
}
Robot Framework
Robot Framework result files can be of multiple hierarchy structures. The structure of these files depends upon the libraries that are used to generate the automation results.
The following table describes how QMetry maps each Robot Framework tag.
Robot File Tag - Structure & Hierarchy | Tag that is created as QMetry Test Suite | Tag that is created as QMetry Test Case | Tag that is created as QMetry Test Case Step |
|---|---|---|---|
suite>test case>steps | <suite> tag will be created as Test Suite. | <test> tag under the <suite> tag will be considered as Test Case. | <kw> tag under the<test> tag will be considered as Test Case Step. |
suite>(sub/inner) suite>test case>steps | <(sub/inner) suite> tag under the <suite> tag will be considered as single Test Suite. Multiple test suites will be created each (sub/inner) suites. | <test> tag under the <(sub/inner) suite> tag will be considered as Test Case. | <kw> tag under the <test> tag will be considered as Test Case Step. |
suite>test case>steps>sub steps | <suite> tag will be considered as Test Suite | <test> tag under the <suite> tag will be considered as Test Case. | <kw> tag under the <test> tag will be considered as Test Case Step. <kw> tag under the <kw> tag (i.e. sub steps) will be ignored and will not be imported into QMetry. |
Console Output
On successful completion of the process, you can see the console output. It displays success message for uploading the result file.
Finally, check test execution page in QMetry and review your test run results.
QMetry Configuration for Specflow
Specflow by default generates the output results in Specflow JSON format. QMetry can consume it as Cucumber JSON format. The following solution will generate the output result in Cucumber JSON format in parallel and the result could imported to QMetry.
Part A : Make the following changes in your Specflow Project to generate result file format as Cucumber JSON
Step 1 : Add Dependencies
https://www.nuget.org/packages/SpecNuts/
https://www.nuget.org/packages/SpecNuts.Json/
Step 2 : Add the below code in .cs of feature file
[BeforeTestRun]
public static void BeforeTestRun() {
    SpecNuts.Reporters.Add(new JsonReporter());
     SpecNuts.Reporters.FinishedReport += (sender, args) => {
         String pathName = "specflow_cucumber.json";
         System.IO.File.WriteAllText(pathName, args.Reporter.WriteToString());
         Console.WriteLine("Result File: " + System.IO.Directory.GetCurrentDirectory().ToString() + System.IO.Path.DirectorySeparatorChar + pathName);     };}
Step 3 : Open Text Explorer in Visual Studio by Test >> Windows >> Test Explorer >> Choose Run All
Step 4 : In Visual Studio console, select show output from Test and open Report File as path given in Console
Part B : Make the following Configurations in Jenkins
Configuration Steps
 |
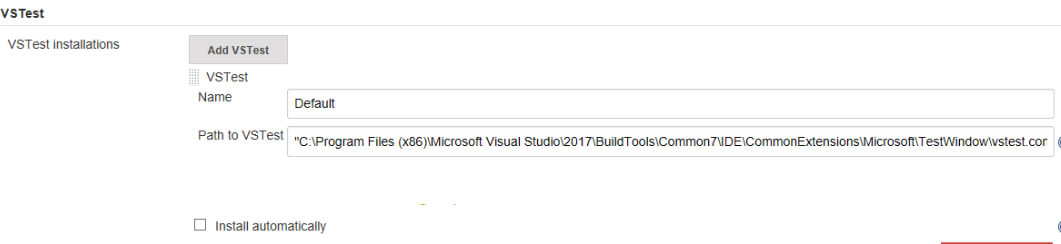 |
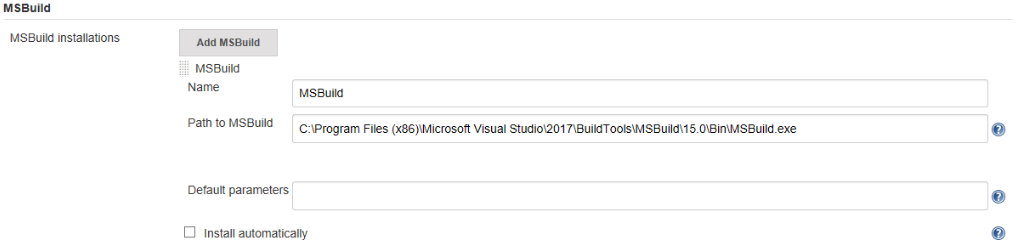
Install "MSBuild Plugin" and "VSTest Runner Plugin"
Install Visual tools and Set path for MSBuild.exe and vstest.console.exe files in Manage Jenkins >> Global Tool Configuration
Configure the following parameters in the Jenkins Job
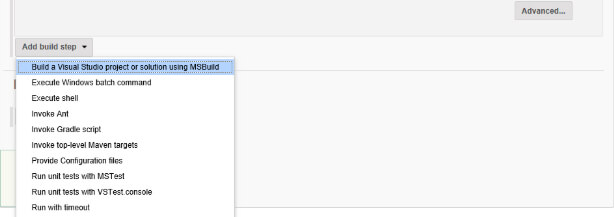
Step 1 : In the Build Step >> Choose - Build a Visual Studio project or solution using MSBuild
 |
Step 2 : Provide the MsBuild Version and relative path to solution file
Select "MSBuild Version" which is configured in Global Tool Configuration.
Specify the relative path for solution file in "MSBuild Build File".
Step 3 : Select a build step for VSTest in Build Section - Run unit tests with VSTest console.
Select "VSTest Version" which is configured in Global Tool Configuration.
Specify the relative path to your VSTest compiled assemblies in "Test Files"
Step 4 : In post build action setup QMetry Test Management plugin
Choose "Cucumber" format to upload.
Relative Path to result file "specflow_cucumber.json"
Choose other relevant parameters