Step-by-Step QMetry Implementation Guide
This implementation guide walks you through seamlessly implementing QMetry within the organization, aligning with standard QA processes for optimal efficiency.
Note
This documentation is particularly useful for the QMetry administrators, managers and end-users.
Step 1: Organizational Planning and Preparation
As you prepare to implement QMetry in your organization, follow these steps to ensure a smooth setup.
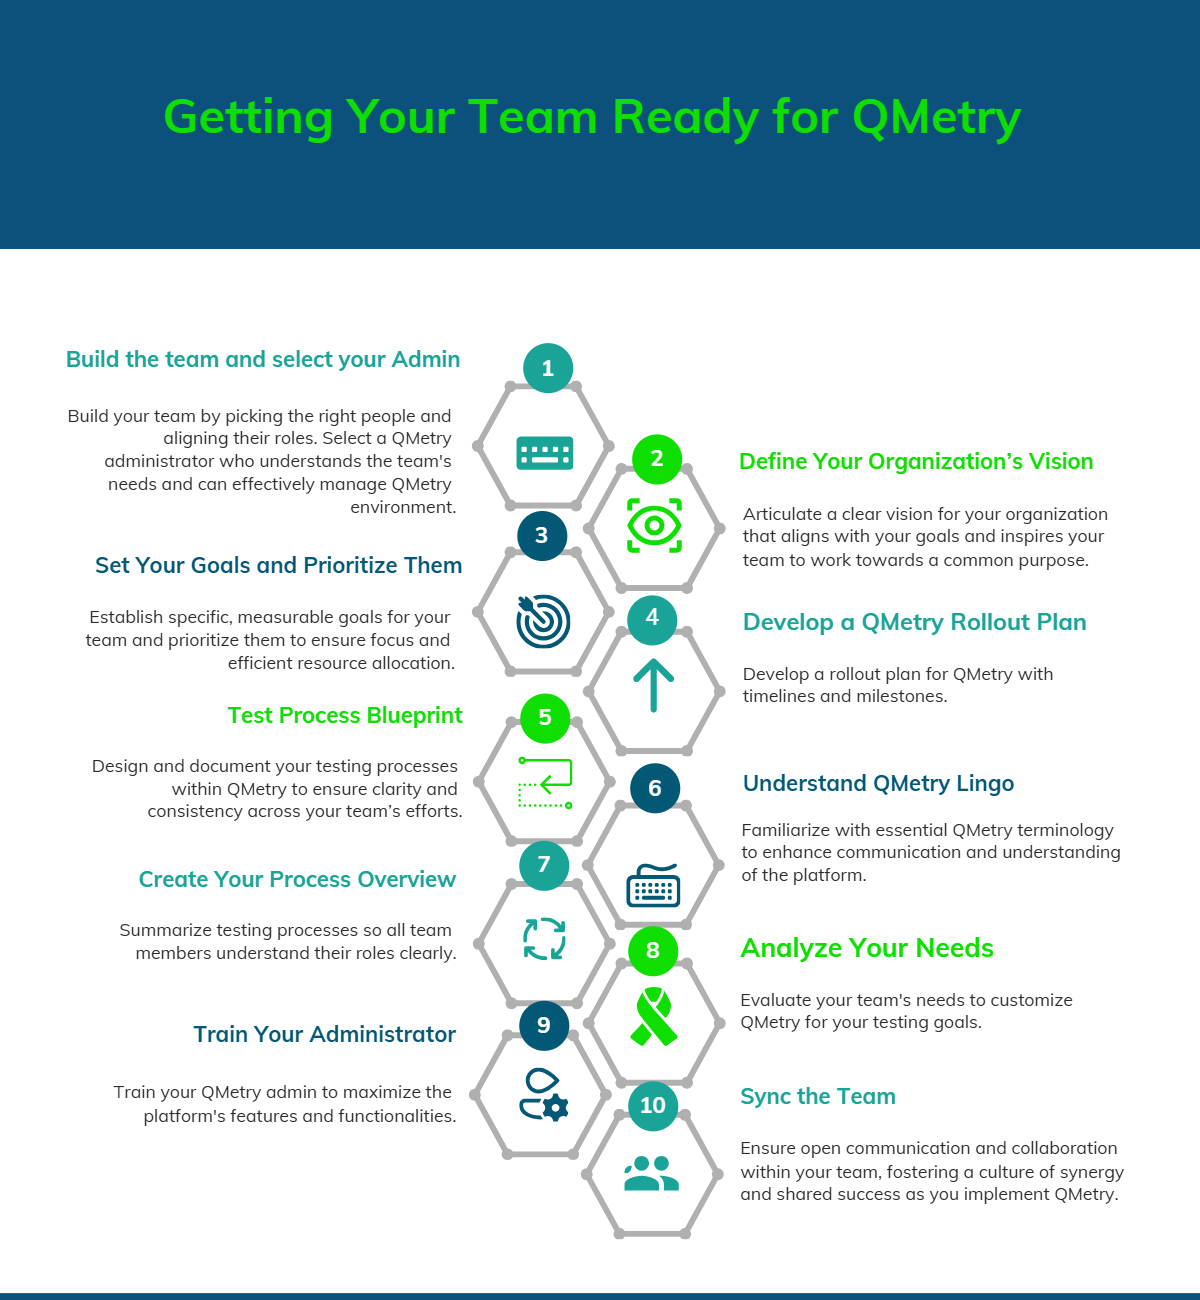
Build your team and chose the right QMetry administrator
Build your team by bringing the right stakeholders on board. Users in QMetry can assume one or more roles across different projects within the application.
The key roles include:
Admin: Admin holds complete control over the entire QMetry application, with the ability to assign roles and rights to other users.
QA Manager: The QA Manager oversees a team of testers and is responsible for managing project related tasks.
Tester: The Tester role is focused on creating, managing and executing the testing aspects of the project.
Note
The admin role cannot be modified or deleted. The admin can create, update, and remove other user roles as needed.
The administrator is crucial to the successful implementation of QMetry within your organization. Key qualities to look for in an administrator include:
Deep understanding of business processes and organizational structure
Strong leadership skills
User advocate
Analytical approach
Define Your Organization’s Vision
Understand the benefits of implementing QMetry and clarify the objectives you aim to achieve. Engage all key stakeholders in the process and establish clear communication to ensure they understand and align with the process.
Set your Goals and Prioritize them
Establish well-defined goals to create a structured approach for breaking down the testing process into manageable steps. Since different stakeholders have varying objectives, ensure their involvement in the planning process.
Example 3.Testers aim to enhance task allocation and streamline test execution.
QA Managers seek better visibility into testing activities and access to insightful reports.
Admins focus on efficiently managing and controlling processes to ensure compliance with QMetry.
Develop a QMetry Roll out Plan
A phased roll out strategy ensures a smooth implementation of QMetry. Start by introducing essential features that users need for their daily tasks, allowing them to get comfortable with the platform. Additional functionalities can be introduced gradually in later phases for a seamless learning experience.
Example 4.QMetry implementation can be structured in two phases:
Phase 1: Core QMetry features for fundamental test management.
Phase 2: Customizable QMetry apps for enhanced functionality.
Get the Blueprint for Your Test Process
For seamless implementation of QMetry Test Management, it is very essential to analyze your existing testing workflow.
Identify key aspects of your organization's business processes.
Create a visual representation of the test process.
Define test expectations, test data, assignments, and evaluation criteria.
Map your business processes to QMetry’s workflow
Understand Key QMetry Terminology
Requirements: A Requirement is a documented need of what a particular product or service should be or perform. It is a statement that identifies a necessary attribute, capability, characteristic, or quality of a system in order to have value and utility to a user. Requirements show what elements and functions are necessary for the particular project.
Test Case: A test case is a set of conditions or variables under which a tester will determine whether an application or software system is working correctly or not. It is a specific executable test that examines all aspects including inputs and outputs of a system and then provides a detailed description of the steps that should be taken, the results that should be achieved, and other elements that should be identified. The Test Case module allows you to create Test Cases for manual and automated tests.
Test Suite: A Test Suite contains a set of the test cases that should be run together, often in a specific order. A test suite must be executed against a platform.
Issue: Issue, in other terms, Defect or Bug, is logged when actual result deviates from the expected result as an outcome of testing activity.
Test Execution: The Test Execution module in QMetry contains only those test suites which have at least one Release, Cycle and Platform linked with them. QA team can perform Manual Testing and schedule test for Automation Testing.
Project: It is referred as the top level of scope and can be considered your central repository or library since all test assets are held within it.
Release: Release is the default nomenclature for the second level of scope. The release is most often used to define requirements and test cases needed for an internal and/or external release of software and/or hardware.
Cycle: It is short form of Test Cycle and is the lowest level of scope. The cycle is used for test planning and execution. The results from one cycle do not affect other cycles.
Build: A build is another term used by organizations for a drop, often it refers to a combination of multiple software and/or hardware builds and/or configurations.
Platform: In QMetry a platform is any hardware and/or software that is tested against. This could be as simple as a browser, or complex like a computer with specific configuration of hardware and/or software. A platform can have multiple attributes (like BIOS, browser, carrier, CPU, OS, resolution, etc.).
eSignature: If the organization wants to have restricted workflow, the eSignature feature helps them regularize the Approval Workflow of test cases and test executions.
Create Your Process Overview
Most of the organizations follow the testing process with the following key aspects.
Requirement Study: Define requirements or specifications in the Requirement module.
Test Case Design and Implementation: Design test cases and assign them to develop further or to execute. Create test suites from test case itself.
Test Case Execution: Execute test suites against Platforms that are set as environment and linked to test suites.
Defect Management: Raise defect against the executions and retest them post closure.
Test Closure with Report: QMetry provides various reports that sync with the latest application data and produce reports.
The goal of this step is to come up with a visual overview of your test processes. The following is an example of a testing process.
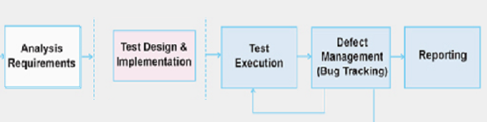
You can discuss the sample process with your product/project team and modify it to suit your organization. If you don't have a defined test process, QMetry implementation is a good time to set one up.
Analyze your Needs
Custom Fields and Integrations: Map your testing processes to QMetry by configuring custom fields to align with your workflows. Identify the ideal Requirement and Bug Tracking integration tools for seamless connectivity.
Reports and Insights: Leverage QMetry’s system reports to gain valuable insights into test activities and results. Create custom reports tailored to your specific requirements.
Train your Administrator
Administrators play a key role in managing both projects and users within test projects.
Sync the Team
Foster open communication within the team, include all stakeholders to ensure a smooth implementation of QMetry in your organization.
Final Checklist
Tick off each item on the checklist to ensure a seamless implementation.
Task | Completed |
|---|---|
Building a Team and Choosing an Admin | |
Defining Organization Vision | |
Setting Goals and Prioritizing them | |
Deciding QMetry Rollout Plan | |
Creating a Process Overview | |
Analyzing your Needs | |
Training for Administrator | |
Syncing with the Team |
Step 2: Set Up QMetry Application
Once your team is ready, it's time to explore the tool. Follow below sequence of tasks to get started:
Project Setup
Adding users
User access and permissions
Customization
Importing data
Integration with Jira
Project Set Up
For setting a new project go to Projects and perform the following actions:
Add Projects
Create a new project by entering project details and configuring project related settings.
Learn More- Help Document on Managing Projects
Define Release/Cycle
The create project operation auto-creates a default release and cycle in the new project. You can modify the release and cycle based on the project structure.
Learn More- Help Document on Managing Releases/Cycles
Define Builds
Define Builds based on your development cycle. It can be defined as product version names or iteration details.
Learn More - Help Document on Managing Builds
Define Platforms and Platform Attributes
Define Platforms and Platform Attributes based on your testing environment
Learn More- Help Document on Managing Platform
Define Labels
Define Labels that would be used to identify test assets or group them.
Learn More - Help Document on Managing Labels
Creating and Adding Users
When setting up QMetry for the first time, the super admin needs to create new users and assign them roles corresponding to their rights and responsibilities.
Automatic password is generated for new users (other than LDAP/SAML users) which is then sent to their respective email address. LDAP/SAML users are automatically created after their first login into the QMetry.
Create User has 3 main steps:
Add User details: It includes user details like Username, Alias, First Name, Last Name, Email, Time zone, Language Preference.
Select Authentication Type:
QMetry: QMetry database is the default Authentication Type unless it is changed to LDAP/SAML. So, whenever a user logs into QMetry, the credentials are verified against QMetry database.
LDAP/SAML: LDAP/SAML users get created automatically, however in case they are created manually, admin needs to set the Authentication Type as LDAP/SAML and set it to “Active” from LDAP/SAML under System Settings. Whenever a user logs into QMetry, the credentials are verified against LDAP/SAML.
Assign Project and Role: Admin can assign Projects and Roles to the user that is being created.
Learn more: Help Document on QMetry Users
User Access and Permissions
There are some key components that determine a user's access to data and the operations they can perform within QMetry. You can set user’s Role and Rights from Customization.
Understanding User Roles
QMetry includes four default roles -
Admin - This is an Administrator role for the entire QMetry instance of the organization.
QA Manager - QA Manager acts as Project admin.
Tester - User with basic authoring and execution rights.
Read Only - Use with view only access to the QMetry instance for assigned projects.
In addition to the default roles, the super admin can also define custom roles based on the organization processes. For example - Technician, Vendor, QA Lead, Offshore QA, Business Analyst etc.
Learn More: Help Document on Roles
Understanding Rights
Each role is associated with a set of rights and permissions granted to users assigned to that role.
Rights can be categorized into:
Module Specific: Module specific rights are defined as per QMetry Modules. Actions related to the Module Specific Rights are Create, Delete, Export, Import, Execute, Link, Copy, Versioning.
System/Project Specific: The System rights should be with Administrators and Project Specific rights should be with the QA Managers.
Rights
Description
Role
Allow users to create/modify role
Project
Allow users to create/modify Project/Release/Cycle
Build
Allow users to create/modify builds
Platform
Allow users to create/modify Platforms and Platform Attributes
Label
Allow users to create/modify Labels
Integration
Allow users to create/modify Integrations
Automation
Allow users push automation results to QMetry
Report
Allow users to view reports.
Notification
Allow users enable/disable notifications for roles/users
Customization
Allow users to customize fields/list.
Custom Reports
Allow users to create Custom Reports
Audit Compliance
Allow users to modify Audit Settings
Actions related to the System/Project Specific Rights:
View
Modify
System Settings
General Settings
Page Limit: Maximum number of records displayed per page.
Login Limit: Maximum incorrect login attempts before a user is locked out of QMetry.
Reactivation after: Time after which a locked-out user gets reactivated in QMetry.
Expiry Time: Password expiry period.
Manual Edit of last executed date time: Allowed/Disabled.
This can be done in General Settings under System Settings.
Learn More - Help Documentation for General Settings.
Customization
Customization allows you to customize your QMetry's General Settings, Lists, System and Custom fields, Email Notifications and SMTP settings. Below is a quick overview of the settings you can modify under each section:
Execution Status: Default Execution Statuses available in QMetry are:
Blocked
Failed
Not Run
Passed
Not Applicable
In addition to the above you can create your customized Execution Statuses as required in your QA Processes, for e.g. Passed with Exception, Omitted, etc.
Learn More - Help Documentation for Execution Status
Custom Fields
All the modules in QMetry have pre-defined system fields that help you to manage your default asset data. However, when your QMetry Project is mapped to the processes / workflows in your organization, you might require additional fields to be created in QMetry to add your data.
These fields are the custom or user-defined fields in QMetry. This section mainly contains the system fields and the fields you add (or have added). By Default, the System Fields are hidden. The fields shown are specific to the Project chosen.
Learn More - Help Documentation for Manage Fields.
Lists
This section contains all the existing lists and list values available across different modules like Requirements, Test Cases, Test Suites and Issues. You can create your custom lists and their list values which you utilize in the custom fields which you create in QMetry.
Learn More - Lists
Notifications
You can configure email notifications for users based on the roles. Default settings follow best practices, but you can customize them by selecting specific roles and users.
Module | Actions |
|---|---|
Requirement | Add, Update, Delete |
Test Case | Add, Update, Delete |
Test Suite | Add, Update, Delete Assign Tester from Platform View Assign Tester from Test Execution Screen |
Issue | Add, Update, Delete Assign |
Project | Update, Delete Archive, Unarchive Project Add Project Clone Add, Update, Delete Release Add, Update, Release Cycle |
User | Deactivate, Delete |
System | Add, Update, Delete a user role |
Learn More - Help Documentation for customizing notifications.
Customization Tips and Tricks
By default, QMetry includes basic and pre-defined settings as per the industry wide best practices. We recommend that users stick to the default settings available in QMetry unless there is a need to customize the Notification Settings, Fields and Lists for the best experience with QMetry Application.
Jira Integration
Jira can be configured with QMetry modules as an external system and based on it, users can perform module wise activities. If Jira is configured with QMetry, the Issues module will not be available in QMetry.
If Jira is configured with the Issue module in QMetry, then users can -
link issue with test cases (from Execution screen)
create issue from test case run (from Execution screen)
If Jira is configured with the Requirement module in QMetry, then users can sync Jira stories as requirements in QMetry.
Resources: Integration of QMetry with Jira
Configure Jira Integration in QMetry
Install Add on: "JIRA Integration - QMetry Enterprise".
Configuring JIRA add-on with QMetry Admin.
Enable QMetry Test case and BDD panels for Jira Projects.
Verify the QMetry - Jira Integration is Active
Install Jira Add-on
The Jira Integration – QMetry Enterprise add-on, which is available on Atlassian Marketplace, should be installed in your Jira Instance. Administrator login is required to be able to install the add-on.
Learn More : Install QMetry 's Jira Integration Add-On
Link QMetry and Jira Project
To set up Jira Integration - Go to Projects.
Open Project details by clicking the project name.
Open the Jira Integration tab on the project detail page.
Select Jira instance from the Jira Integration drop-down on the screen.
Jira Project: The Jira Project drop-down lists all your Jira projects. Select a project from the list to integrate it with your current QMetry project.
Once the Project is selected, select Jira Issue Types for QMetry Modules - Requirements and Issues. The Jira issue type is a multi-select list. It is mandatory to map Issue module with at least one Jira Issue Type.
Click Save & Active to sync the issues.
Learn More: Map Jira projects, Issue type and Fields with QMetry Project
Import Data
This feature allows you to import test assets into QMetry from Excel or Jira. This feature helps you to import bulk of requirements and test cases.
Import from Excel
QMetry provides Import utility to import test assets in QMetry that are stored in traditional Excel format or comma separated format (CSV).
Import from excel is available for below entities:
Requirements
Test Cases
Issues
Learn More: Help documentation for Import from Excel
Sync Requirements and Issues from Jira:
QMetry supports integration of Jira. Users can sync Jira issues as requirements and issues in QMetry.
Flow of Import from Jira:
Configure Jira within QMetry. Explained above in Jira integration steps.
Map Jira projects, Issue Types and fields with QMetry project.
Once Jira Issue Type is mapped with QMetry modules, Jira issues are synced into Requirements and Jira Issues are available to link on Execution screen in QMetry.
Learn More: Sync Requirements & Issues
Checklist: Set Up QMetry
In this section, you learned how to define the basic QMetry settings for your company, including the company profile, the organization-wide defaults, and the role hierarchy.
Task | Completed |
|---|---|
Project Set up | |
Define User Role and Rights | |
Customization | |
Add Users | |
Import Data | |
Jira Integration |
Step 3: Engage
You've done your due diligence to follow a clear plan, set up and customized QMetry to fit your needs, and scrubbed and added/imported your data. Now it’s time to focus on training your users and driving adoption.
Develop a Training Strategy
The training strategy summarizes the overall plan. It captures business objects, documents key requirements and pain points, identifies challenges, and outlines the types of training as well as the actual training delivery schedule.
By developing a training strategy, you will provide users with clear direction on what is expected and how they’ll use the QMetry Application.
Right before training, you'll need to generate usernames and passwords for everyone who will attend.
To generate usernames and passwords, admin can add users and assign them roles corresponding to their rights and responsibilities from User Management. Automatic password is generated for new users (other than LDAP users) which is then sent to their respective email address. New users have to provide the same username and password on their first login.
Understand Your Audience
Knowing your audience is critical to the success of training. Different kinds of users will have distinct roles and perform different tasks in QMetry, so it’s important to focus your training based on their roles.
For example, you should train your management or admin team separately from your end users/testers, since they will interact with the application in different ways. This also applies to different lines of business.
Provide Relevant Content
Your users will be more engaged with the training if it’s relevant to them. Be sure to incorporate scenario-based training using real data so that users walk through examples they face in their daily lives. Start with an audience analysis to make sure you develop the right materials for the right users.
Always keep in mind the burning question that your users will have: “What’s in it for me?” Your curriculum should answer that question. Your materials should match the learning style of your users. The following materials are tried and-true approaches:
Facilitator guides: Include detailed instructor notes on what to emphasize, details of timing, and so on. Be sure to map these guides to your participant guides.
Participant guides: Provide end-to-end, detailed training documentation. Interactive, hands-on exercises are a great way to provide realistic training.
Quick reference cards: Give users something to use when they’re on the job. Use the cards during training for reference and consider publishing them online later.
Slide shows: Use such presentations to give your users the big picture. And remember: Keep it simple!
Encourage User Adoption
The key to increasing user adoption is supporting users and being responsive to their needs, tracking usage trends over time, and actively encouraging adoption. Understanding what works and what doesn't is critical, both immediately after going live and over the long term.
Here are some key steps you can take to increase adoption:
Support users: Supporting users is an ongoing process. It involves getting user feedback, providing ongoing training, and identifying user champions who'll help their co-workers day to day.
Measure adoption: Before you can improve adoption, you have to measure it. The most common measurement of adoption is the login rate, number of test cases created, and executions carried out.
Encourage adoption: Create a communication plan to establish an ongoing dialogue about future training sessions, process changes, and upcoming QMetry features.
Step 4: Extend
Now that you're up and running with QMetry, you're ready for the next steps to make it a blowout success and take your test process to the next level.
Here's what to do next:
LDAP/SAML Setting
SMTP Setting
Audit Configuration
LDAP/SAML Setup
LDAP Setup: QMetry supports LDAP (Lightweight Directory Access Protocol) integration to import users into application.
To set up LDAP go to LDAP/SAML. The LDAP should be “Active” to define the authentication type as LDAP.
Assign a default role and default project for them to login. Once the integration is done users can login to QMetry and their QMetry accounts would be auto created.
Learn More: Help Documentation for LDAP Setting
SAML Setup
QMetry Supports SAML Authentication. Security Assertion Mark-up Language (SAML) is an XML-based standard for exchanging authentication and authorization data between an identity provider and a service provider.
SAML is used for single sign-on to eliminate application wise passwords. QMetry Admin can integrate SAML for authentication to allow QMetry Users to login using single sign on. Currently, QMetry supports only Okta as an SAML provider.
To set up SAML go to SAML under System Settings.
Assign a default role and default project for them to login. Once the integration is done users can login to QMetry and their QMetry accounts would be auto created.
Learn More: Help Documentation for SAML Setting
SMTP Setup
QMetry provides a way to configure Simple Mail Transfer Protocol settings for outgoing mail transport from QMetry. Users receive email notifications e.g. test case creation, requirement creation, etc. from the account configured in SMTP Settings.
To set up SMTP go to SMTP under System Settings.
Learn More: Help Documentation for SMTP Setting
Audit Configuration
QMetry Audit Log displays events like Create, Update, and Delete of test assets. Admins can configure the number of days they require to retain information of Audit and Changelog within QMetry. They can download the logs for the days configured here.
To set up notification settings go to General Settings & Audit under System Settings.
Learn More: Help Documentation for Audit Compliance