Importing Requirements from Excel
Use this feature to import requirements from Excel and create new test assets, or re-import them to update existing ones. Accepted file formats are: CSV, XLS, and XLSX.
The imported file size cannot exceed 10MBs.
Pre-requisites
Download the Import template.
Convert the data into the above format for fresh imports.
Use comma-separated values for fields with multi-lookup lists.
Get Link permissions for Test Cases and Requirements across all relevant projects from Roles.
Map the columns in the Excel file with system fields manually. For unmapped columns, create a User-Defined Field in Manage Fields.
 |
Importing Assets from Excel
To import assets from Excel, perform the following steps:
Open the specific module.
Click Cog (⚙️) and select Import.
Upload Source File
Click Choose File to browse and upload the file to import. Select at least one sheet from the Excel file.
Note
If an “Invalid file” message appears while uploading an Excel file, open the file in Microsoft Excel. Save it as an “Excel Workbook” with a new name, and then try importing the new file.
Select XLS Sheet: Choose the sheets to import. Select at least one sheet that contains the requirements.
Importing Multiple Sheets: The first selected sheet defines the field columns for mapping. All sheets must share the same columns and format.
Header Row: Enter the row number to set it as the header row. The system imports all rows below it.
Mapping the Fields
Map each Excel field to the corresponding QMetry field. The system marks all mandatory fields in red.
Click Save Map, enter a name, and save the mapping.
Saved mappings appear under My Mappings and can be reused in future imports.
Save Mapping
Select one of the following to save the mapping:
Auto Map: Use Auto Map to automatically match columns to system and custom fields by keyword.
My Mappings: The drop-down displays all mappings saved by the logged-in user during requirement imports. The selected map name indicates the mapping currently in use.
Click Next to proceed.
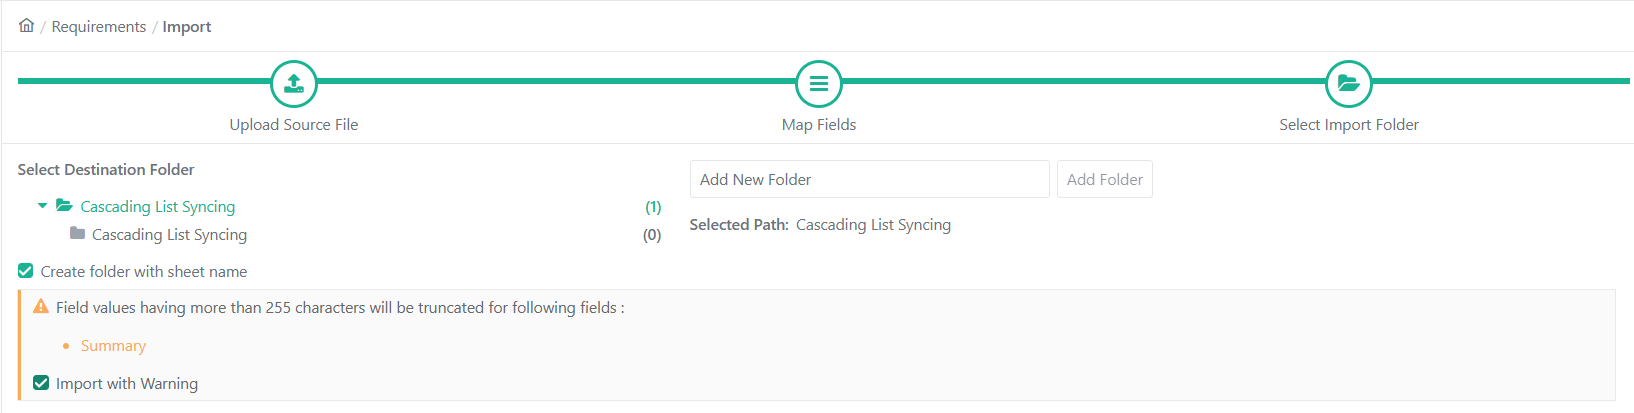
Select Import Folder
Select the destination folder for import.
To create a new folder, select a parent folder, enter the folder name, and click Add Folder.
Create folder with sheet name: Enable Create folder with sheet name to automatically create one folder per sheet.
Import with Warning: Enable Import with Warning to truncate requirement summaries longer than 255 characters instead of failing the import.
Click Finish to start the import. Track Progress in the application header.
Re-importing Requirements from Excel
Export requirements from QMetry and update them in Excel. Then re-import the file following the same steps as import to apply bulk modifications.
Each re-import updates the requirements and increases its version by one.
Note
If the re-imported requirements include issues imported from Jira, those issues are not updated during the re-import process.
Linking Test Cases During Import
Link test cases to requirements during import to save time and reduce manual effort.
To automatically link test cases to requirements at import time, add a Linked Test Cases column to your import file and include the relevant test case keys.
Setting Up the Column
For each requirement, enter one or more test case keys in comma-seperated format.
Pro1-TC-1, Pro1-TC-2, Pro1-TC-3
Note
You can add up to 25 test case keys per requirement.
QMetry links only the latest version of Test Case.
Mapping the Fields
In the QMetry Fields list, select Linked Test Cases: Entity Keys.
Note
The system Imports the test cases in the same order as their keys appear in the Excel file.
You can link test cases from other projects when importing requirements. Ensure you have Link permissions for both Test Cases and Requirements in the current and target projects.
Note
To save this mapping for future imports, see Step 3: Save Mapping.
Fresh Import
When importing new requirements, if the Linked Test Cases column is present, QMetry links the requirement to the latest available version of the corresponding test cases.
Re-importing Requirements with Linked Test Cases
You can link test cases to requirements while re-importing requirements. Re-import with test case linking is applicable only for Internal Requirements.
Note
Jira or Azure Requirements are not supported in Import.
The following table describes how QMetry handles existing requirement-to-test-case links when you re-import requirements with a Test Case Key column. Re-import is non-destructive: QMetry never breaks existing links, and it skips any record it cannot process and logs a warning.
Scenario | Behavior | Scheduled Tasks |
|---|---|---|
Test Case Key column is mapped. Keys not present. | Existing requirement and test case linkages remain unchanged. | - |
Test Case Key column is mapped Keys are present Test case key is not linked to existing requirement (on any version) | QMetry creates a new requirement version and links it to the latest available version of the test case. | - |
Test Case Key column is mapped. Keys are present. Test case key is already linked to the requirement (on any version) | QMetry Test Management skips linkage and continues processing. | Warning Message: "Requirement key was found linked with one of the existing test case versions. Use Sync Latest Version of Test Case to link the latest version." |
| QMetry Test Management skips that key and continues processing the remaining records. | Warning message logged in scheduled tasks. |