Managing Projects
Manage projects within QMetry with a comprehensive suite of tools for creating new projects, managing user access, tracking progress, collaborating with team members.
Create, clone, archive, or delete projects. Configure general project settings, link releases and cycles, add users, and perform various other actions.
Pre-requisites
Ensure you have the following before managing projects in QMetry:
Role and rights: You must have a role with project module rights assigned under Customization. To clone a project, your role must include Clone rights. To archive a project or its releases and cycles, your role must include Modify rights.
Optional packages: The Mandatory Build Selection and Risk-Based Testing features require the Customization package and Advanced Features pack respectively.
Integrations (optional): To use LDAP or SAML single sign-on, configure the integration before adding users to a project. To use Jira issue statuses for the Default Resolved Status setting, configure the Jira integration first.
Creating New Project
Note
The create project operation auto-creates a default release and cycle in the new project, even if the user does not have the Create Rights for Release and Cycle.
To add a new project, perform the following steps:
Go to Projects and click New.
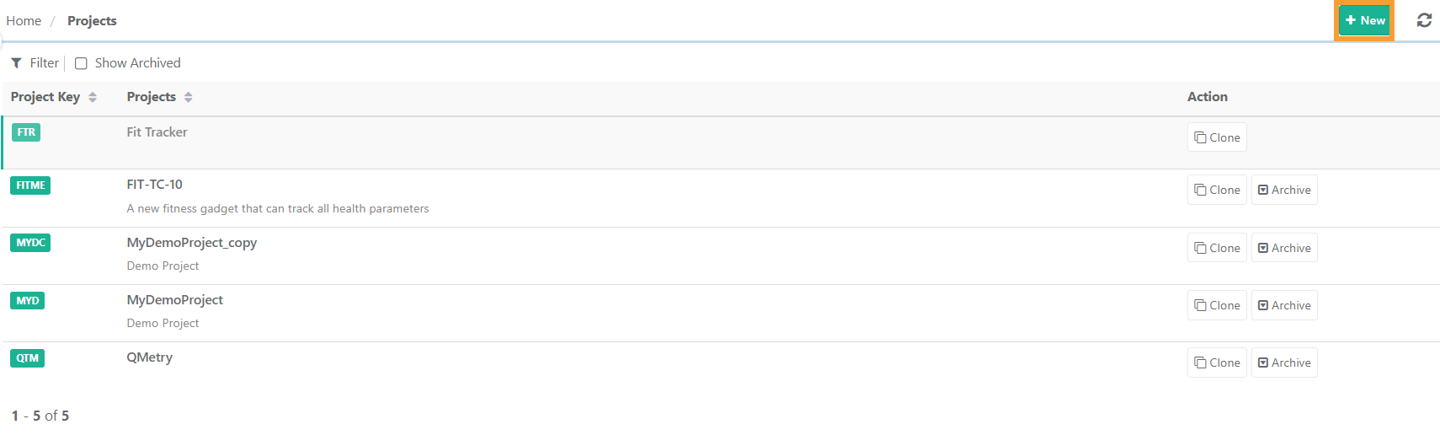
Enter the project name and key.
Provide a description summarizing the project.
Configure the project settings as required.
Click Create.
Note
Rules for creating Project Name and Project Key
Special characters are not supported in the project name:
\ / : * ? < > |.A project name can include alphabets, numbers, and supported special characters.
Project key is a short-hand reference of the Project Name used as a reference within the project's test assets.
A project key can be of 10 characters.
The project key can’t be edited once it is created.
A project key can include alphabets, numbers, and supported special characters and numbers in it.
Only new projects can be added with the key maximum up to 10 characters.
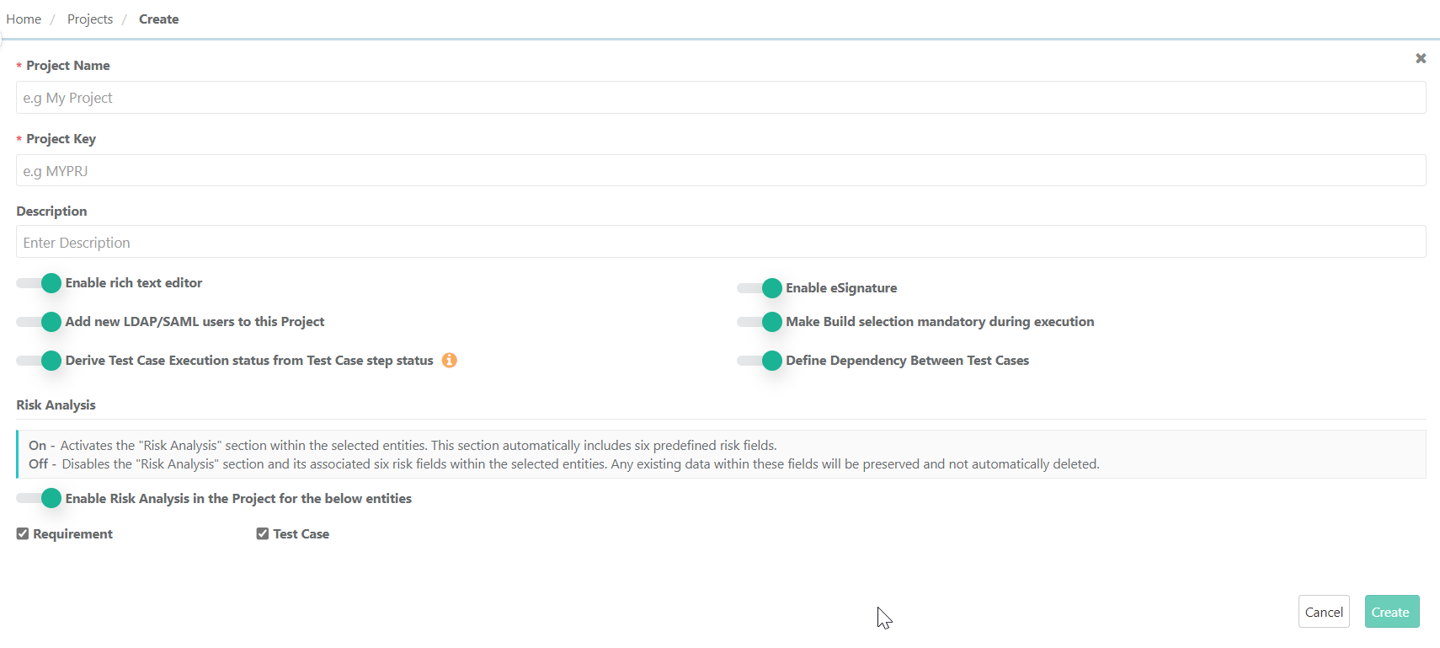 |
When creating or editing a project, configure the following settings as needed:
Rich Text Editor
Project description field supports rich text formatting, enabling users to include bold, italics, lists, hyperlinks, images, tables, and code snippets for enhanced clarity and presentation.
To use this feature, toggle the Rich Text Editor switch.
Add new LDAP or SAML users
LDAP and SAML user allows seamless integration with existing directory services and single sign-on (SSO) for streamlined user authentication and management.
To use this feature, toggle the Add new LDAP/SAML users to this Project switch.
Derive Test Case Execution Status from Test Case Step Status
Deriving test case execution status based on the individual test case steps statuses ensures that the final status accurately reflects the results of its constituent steps.
To use this feature, toggle the Derive Test Case Execution status from Test Case step status switch. By default, this setting is enabled.
When Enabled
The test case execution status is automatically derived from the status of the test case steps.
When Disabled
Users can manually set the test case execution status.
Enable eSignature
The e-signature functionality ensures that approvals and validations are formally recorded and can be securely tracked.
To use this feature, toggle the Enable eSignature switch.
Make Build Selection Mandatory during Selection
Note
Mandatory Build features are visible only if you have purchased Customization package.
Making Build selection mandatory during execution ensures that every test run is associated with a specific build version, thereby enhancing traceability and accuracy in testing results.
To use this feature, toggle the Make Build selection mandatory during execution switch.
If you have Make Build selection mandatory during execution enabled, the tip “Build is set as Mandatory during execution” is shown on the Build grid.
Bulk execution on the Bulk Execute screen (the Test Execute tab in a test suite) does not require build selection. The system runs all bulk executions from this screen with the None build.
The system maintains audit logs for changes made to the Make Build Selection Mandatory During Execution setting.
If build selection during execution is mandatory and no build is selected, the system shows a “Select Build” message on the execution screen.
Define Dependency Between Test Cases
Test Case Dependency feature enables you to set successor and predecessor dependency among test cases, wherein the execution of the successors depends on the successful execution of the predecessors.
To use this feature, toggle the Define Dependency Between Test Cases switch.
Risk Analysis
Risk Analysis feature helps testing teams prioritize efforts by identifying and managing risks associated with requirements and test cases.
To use this feature, toggle the Enable Risk Analysis in the Project for the below entities switch.
Note
The Risk Based Testing feature is only available with the Advanced Features pack of QMetry.
After creating a project, configure the following project settings by clicking the project key:
General Settings
Release/Cycle
Users
Integration
BDD Configuration
Automation Tool
General Settings
To access the general settings, go to Project Management and select the specific project. Go to General Settings.
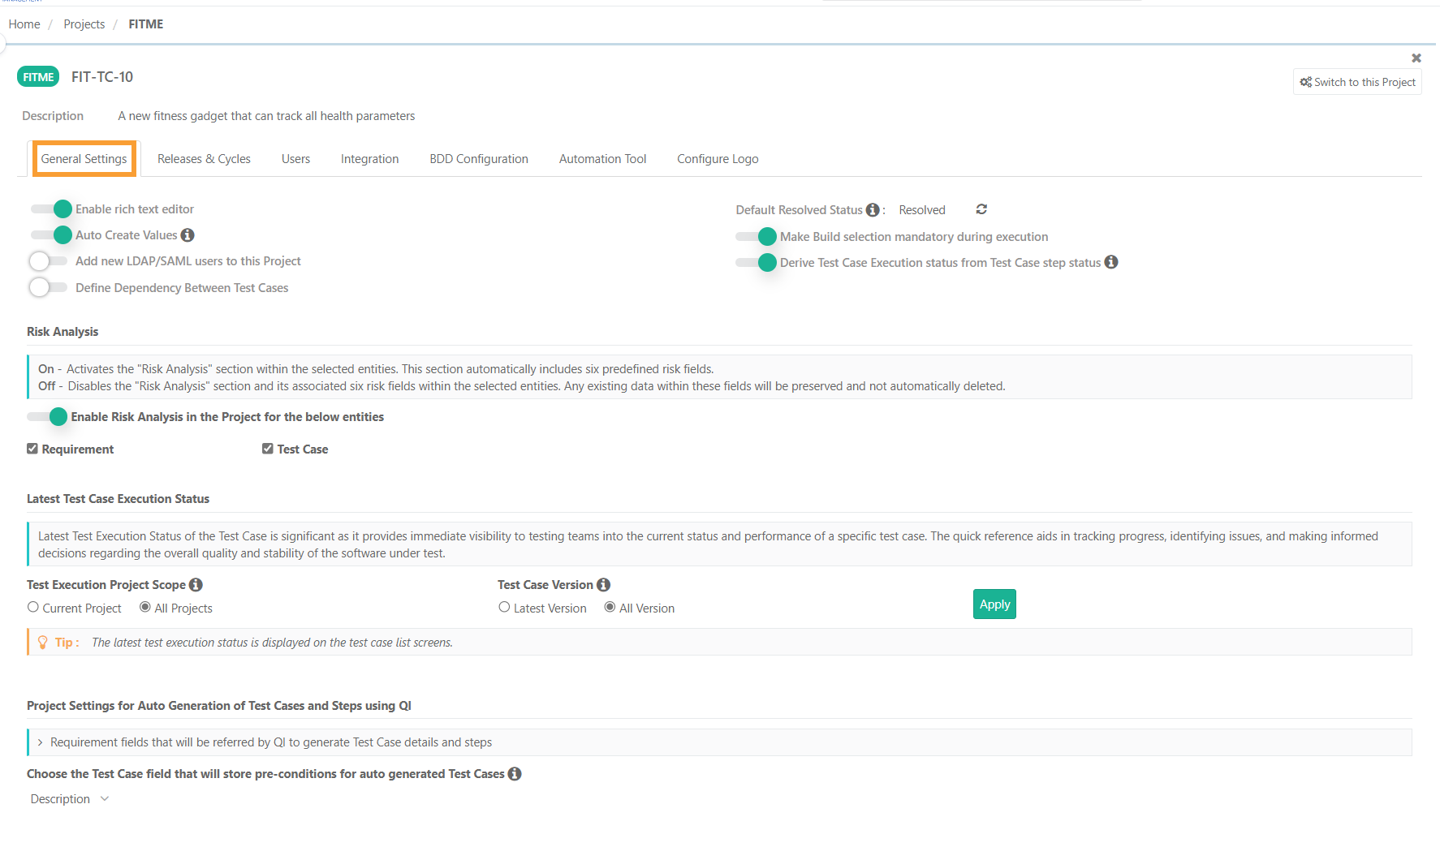 |
Reset configuration values, such as rich text editor, test case dependencies, mandatory build selection, test case execution status, and risk analysis.
In addition, configure the following features:
Auto Create Values
During Excel import, the system automatically creates list values only if they do not already exist in the system or custom lists.
Note
Keep the flag disabled to prevent adding junk list values.
Use Case: Suppose the admin has defined three priority levels as Critical, Major, and Low, according to business rules and wants to prevent users from adding other values. By disabling the Auto Create Values flag during Excel imports, users are restricted from adding junk notations like P1, P2, P3.
Default Resolved Status
After creating a project, you can view the Default Resolved Status on the Project General Settings page.
The Default Resolved Status drop-down displays Issue Status values containing - System default values as well as Custom values for the Issue Status field and Jira list values.
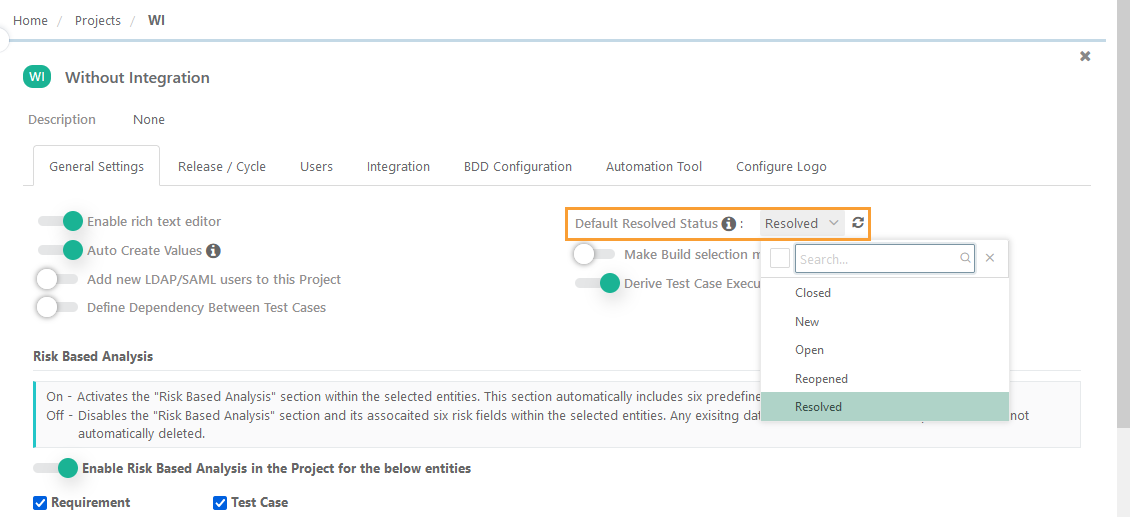
By default, Resolved is set as the Default Resolved Status. Users can change this to Closed, Open, or Reopened, but the field cannot be left blank.
This configuration affects the following reports:
Resolved Issue Verification (under Issue Analysis Report).
Issue Created vs. Resolved (under Issue Trends Report).
Note
When you have not configured Jira, the Default Resolved Status dropdown shows QMetry issue statuses. Select a status to mark issues as resolved.
Archived Issue Status: Archived Statuses are shown disabled on the Default Resolved Status drop-down. Users can select the status to show Issues having archived status on the report.
Issues linked across Projects: The records are displayed as per resolved status configuration.
Latest Test Case Execution Status
The latest test execution status shows how a test case performs, helping users track progress, identify issues, and assess software quality and stability. You can view this status in the list view of the Test Case module.
Configure test case execution status for both the - project scope and test case version.
Note
To configure the latest test case execution status, enable the "Derive Test Case Execution Status from Test Case Step Status" setting for the project.
You need project “Modify” rights to set configurations at the project level.
Test Execution Project Scope
Select whether to calculate the latest test execution status based on test executions from the current project or all projects:
Current Project: Only test executions from the current project are considered.
All Projects: Test executions from all projects are considered.
Test Case Version
Select whether to calculate the latest test execution status based on the latest version or all versions of a test case:
Latest Version: Only executions of the latest version are considered.
All Versions: Executions of all versions are considered.
Release and Cycle
Add a Release and Cycle to a project for organizing and managing test activities.
Adding Release
During project creation, the system assigns a default release. Perform the following steps to add a new release:
Go to the Release and Cycle tab and click the + icon.
Select Add Release.
Enter the release name, release start date, and release completion date in the respective fields, then click Add.
Adding Cycles Under a Release
Add cycles within respective releases. During project creation, the system assigns a default cycle. You can add a new release to the project by following these steps:
Click the + icon and select Add Cycle.
A blank row appears for entering cycle details.
Select the Release.
Enter the Cycle Name, Cycle Start Date, and Cycle Completion Date in the respective fields, ensuring that the cycle dates fall within the Release Start and End Dates.
Click Add.
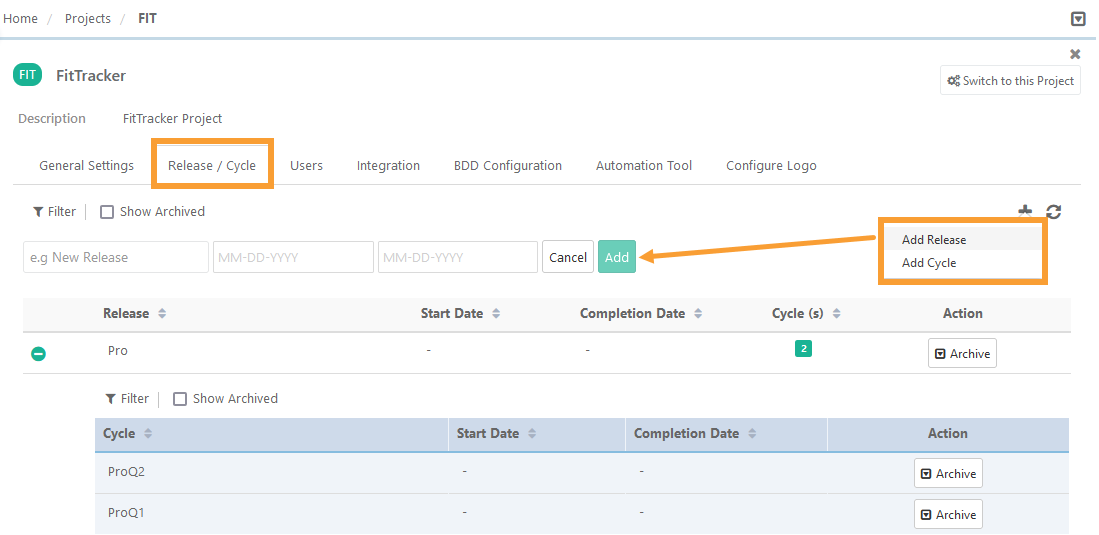
Expand Release to view Cycles added under it.
Note
You cannot archive or delete the system's default release or cycle.
Users with project rights assigned to their role can access the project.
Editing Release and Cycle
Update the release and cycle of a project. These are the steps to edit release and cycle.
Hover the mouse over the field values and the Edit icon becomes visible.
Click Edit and make necessary changes.
Save individual values after editing.
Archiving Release or Cycle
Archive release or cycle that are no longer needed.
Archiving a release or cycle requires Editing Release or Cycle Permissions.
Deleting a Release and Cycle
Follow these steps to delete a release and cycle:
Archive the Release and Cycle: Click in the Action column of the respective grid to archive the release or cycle.
Confirmation and Archival: After confirmation, the release or cycle gets archived. Archived releases or cycles cannot be edited.
Action Options: Once archived, the Action column displays and for the archived release or cycle.
Delete the Release or Cycle: To delete, click Delete. You must archive a release or cycle before deleting.
Note
Archiving a Release archives all the Cycles under the Release.
Editing a Project
You can modify the project name, description, and reset project settings on the Edit Project page.
To edit a project, follow these steps:
Go to .
A list of projects for which the user has access rights gets displayed.
Click the project name to open the project detail page.
Hover over the Project Name and Description fields to reveal the Edit icon.
Click the Edit icon to update the respective values.
Configure settings for the available options as needed.
Archiving Projects
Archive projects that are no longer needed. Archiving hides the project without deleting it or its data.
Here are the steps to archive a project:
Go to .
Click for the project to Archive.
Users can also archive project from project detail page. Open the project detail page and click the Archive icon at the top right corner of the screen.
Note
Only users with "Modify" Project rights are authorized to archive projects, as well as Releases and Cycles.
Archived Releases and Cycles are hidden on the respective lists across all modules.
Once a project is archived, the project name does not appear on the Project list.
Archived projects cannot be edited.
Cloning a Project
Clone a project to create a new project similar to an existing one. After creation, the new project can be independently modified. Users can choose to clone either just the folder structure or both the folder structure and associated data.
Note
You need Clone rights to clone a project.
To clone a project, perform the following steps:
Go to Projects.
Click Clone for the project to clone.
On the project clone screen, the Project Name and Project Key fields are set by default by adding the suffix ‘_copy’. Users can modify these fields as needed.
Select either of the options:
Folder Structure: Copies the folder structure along with releases and cycles. It does not copy assets within the folders. This also clones all Test Run UDFs, including:
UDF definitions, linked to the newly cloned project.
Associated lists and list values (Normal and Cascading Lists).
Default Values.
Folder Structure along with Data: Clones project meta-data and requirements, test cases, test suites, test executions within folders along with releases cycles.
UDF definitions, linked to the newly cloned project.
Associated lists and list values (Normal and Cascading Lists).
Default Values.
Test Case Executions, along with their corresponding UDF values.
Click 'Yes' to proceed or 'No' to postpone the action for later.
Note
The amount of time project clone runs depends on the amount of data in the project.
When a project clone is initiated, the source project gets locked in a read-only mode, and no operations can be performed on the project. Run the clone during off-peak hours.
Other users who attempt to access the project during cloning will see it in read-only mode. No changes can be saved until the clone completes.
Once the clone operation is initiated, it cannot be terminated.
If cloning fails, the scheduler displays an error.
If cloning gets stuck, the job will be automatically terminated, and the project lock will be released after 8 hours.
View Cloning Progress
Monitor the progress in the notification window on the application header.
For the completed Clone activity, users can view details such as Activity Executed By, Source Project, and Destination Project.
Cloning a project auto-creates the release and cycles in the new cloned project, even if the user does not have the Create, Modify and Delete Release and Cycle Rights.
View Scheduled Tasks
To view scheduled tasks, perform these steps:
Click the Scheduled Task icon.
The Scheduled Task icon turns Orange in color whenever any of the following actions is initialized.
All bulk operations
Import - IS, TC, TS, RQ
Export - IS, TC, TS, RQ, Test execution
Project clone
The icon color changes to original as soon as you click on it to view the task status.
Deleting Projects
Users can delete a project only if it is archived. Here are the steps for deleting a project:
Archive the project.
Select the Show Archived check box on the Project list view.
Click the cog icon for the archived project and select .
Unarchiving a Project
To unarchive a project, follow these steps:
On the Projects screen, select Show Archived.
Click the Unarchive button to restore the archived project.
Assign Project to Users
Project admins can link users to a project and assign their permissions.
To manage users for a project, follow these steps:
Go to Projects and click the project name.
Go to the Users tab to view all user details associated with the project.
To view the list of available users, click .
Select the users and assign their roles for the project.
To link a single user, click the Link icon next to the user’s name.
To link multiple users, select the users and click .
Perform the following operations:
Add a New User: Click the Create New User link located beside the Link button.
Remove User Role Mapping: Click Unlink next to the user.
Unlink Multiple Users: Select the desired users in the grid and click the .