Auto-Generate Details and Steps in Existing Test Cases
Generate test case details and steps for an existing test case using a requirement or user-provided description, with the option to update the existing test case or create a new version.
Super Admin Configuration: The super admin needs to turn on the Enable users to generate details and steps in an existing test case by either updating the current version or creating a new one feature from AI Configuration under Customization.
Permissions: You must have permission to create test cases.
Auto-Generating Details and Steps in Existing Test Cases
Auto-Generate Test Cases (AGT): Generate test case descriptions, preconditions, and test steps within an existing test case. You can either update the current version of the test case or create a new one.
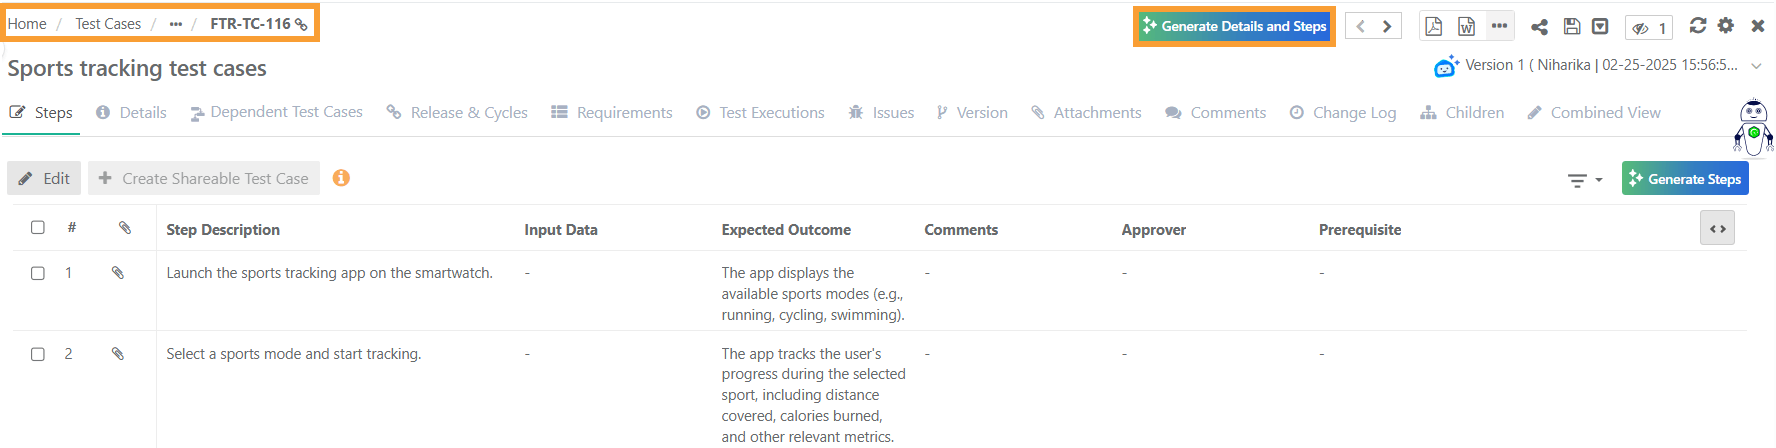
Go to the Test Cases module and click the test case entity key to open the detail view.
 |
Generating Details and Steps using QI
Use QI to modify an existing test case or create a new version with updated steps. This allows you to refine test cases based on changes in requirements or testing needs. Simply provide the existing test case and specify the modifications required.
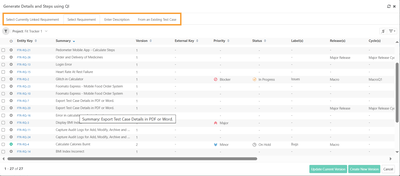 |
To auto-generate test steps and details from an existing test case, click Generate Test Cases.
Select one of the following options:
Select Currently Linked Requirement
New Requirement
Enter Description
From an Existing Test Case
Generating Test Steps and Details from a Requirement
To create test cases from a requirement currently linked to the test case, perform these steps:
Select a tab:
Currently Linked Requirement (to use an already linked requirement).
Select Requirement (to choose an existing requirement from the current project or another project).
Select a requirement from the list. (You can select only one requirement at a time.)
Click Update Current Version or Create New Version.
Generating Test Steps and Details from a Description
To create test cases for a new description, follow these steps:
Open the Enter Description tab.
Enter a description (between 30 to 8000 words) to define the expected test steps.
Click Update Current Version or Create New Version to apply the changes.
Generating Test Steps and Details from an Existing Test Case
Open the From an Existing Test Case tab.
Select one of the following options:
Use Current Test Case: Enter a description explaining the changes expected in test steps.
Use Other Test Case:
Select the project.
Select the test case.
Enter a description defining expected updates.
Note
You cannot use the Current Test Case, if it has no steps.
You cannot update the Current Version, if it has existing steps.
Click Update Current Version or Create New Version.
Warning
Using QI for test case generation or modification may replace or update the test case description, preconditions, steps, attachments, parameters, or shared steps.
Test Case Processing in QI
QI helps in generating and modifying test cases based on the provided description and structure. If the Generate Test Cases button is disabled, here is how to proceed:
Select a relevant test case for QI to refer.
Enter a description between 5 and 100 words for accuracy.
The selected test case must have sufficient steps to generate a new test case.
Best Practices for Writing User Description:
Give clear instructions for enhancing test steps.
Write each instruction in a new line for multiline descriptions.
Use complete sentences with proper punctuation.
Start with action verbs like 'Add', 'Update', 'Change', or 'Remove'.
Specify the entity you want QI to modify, such as description, precondition, or steps.
For multiple changes, maintain the sequence of test case content:
Description: Provide changes first.
Precondition: List modifications next.
Steps: Detail updates last.
Note
Currently, QI processing does not support rich text and tables.
Content may lose formatting after the model processes it.
AI treats shared steps as steps of a simple test case.
AI does not retain metadata of shared steps.
Currently, the word limit for a test case (including description, precondition, and step details) is 1500 words.
Test Case Versions
You have the option to either update the current test case version with newly generated test steps based on the linked or newly entered requirements or descriptions, or create a new test case version.
Update Current Test Case Version
The Update Current Test Case Version feature allows you to replace and regenerate the existing test case description, steps, and attachments.
This ensures that the test case reflects the most recent changes. However, this also results in the permanent loss of current details. Hence, back up your data before proceeding.
Clicking Update Test Case Version triggers the auto-generation of test steps and details. You can review, edit, accept, or delete these steps as needed in the Steps tab. The Details tabs allow you to add both system-defined and custom field parameters to the test case.
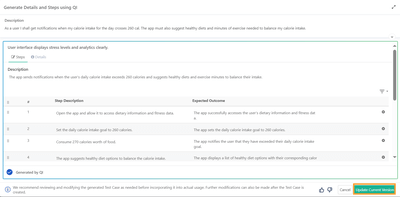 |
Clicking Update Current Test Case Version replaces the existing content with QI-generated test case steps and details.
Clicking Update Test Case Version follows the same process as Create New Test Case Version. You can also cancel the operation by clicking Cancel.
Create New Test Case Version
Clicking Create New Test Case Version triggers the automatic generation of test steps and details. You can review, edit, accept, or delete these steps as needed. Add system defined or custom defined field parameters in the Details tab.
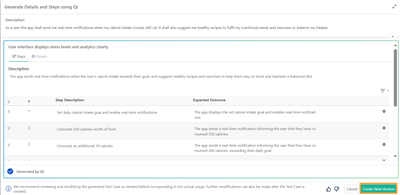
Click Create New Test Case Version to generate a new test case with QI-generated steps while retaining the previous version. Here, the bot symbol signifies that the test case is AI-generated, updated, or versioned, enabling you to track AI-generated test case versions.
Generating Test Steps and Details using QI
The Generate Test Cases and Test Steps using QI screen appears after you click Create New Test Case Version or Update Current Test Case Version. Use this screen to review and edit AI-generated steps and details, then save or update the test case.
Note
Create New Test Case Version creates a new version of the test case with the AI-generated steps.
Update Current Test Case Version overwrites the current version with the AI-generated steps.
Screen Layout
This screen has two panels:
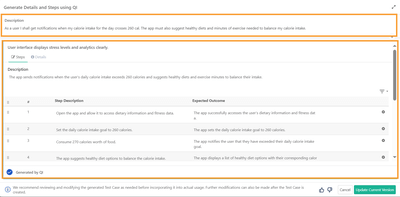 |
Top Panel: Displays the requirement description from which the test steps are generated. Expand this section to view the full description.
Bottom Panel: Displays the test steps and details associated with the test case.
Editing Steps
The Steps tab shows the test case description at the top, followed by step description, expected outcome, and input values. Edit steps, add or delete steps, reorder or duplicate steps, and insert shareable test cases.
Use the following operations to edit steps:
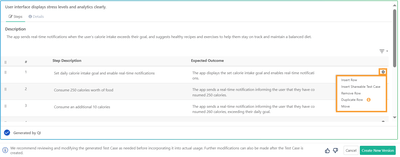 |
Operation | Description |
|---|---|
Insert Row | Add a new step to the test case. |
Insert Shareable Test Case | Insert a shareable test case as a step. See Insert Shareable Test Case below. |
Remove Step | Delete unnecessary or redundant steps. |
Duplicate Step | Copy a step for reuse within the test case. |
Move | Change the position of a step within the test case. |
Edit Text | Modify the test case description, step description, expected outcome, or other fields. |
Accept or Decline | Accept or decline the test case based on its relevance |
Note
Navigate between test cases using the left and right arrows near the Accept and Decline buttons
Insert Shareable Test Cases
In the Link Shareable Test Case screen, use filters to locate the relevant shareable test cases. Click Save & Apply to save the applied filters. You can also filter by folder path. The folder tree reflects the selected project.
Note
The system saves the applied filters per user for each project.
Enable Include Entities from Sub Folder to display STCs from the selected folder and all its sub-folders. Disable it to show STCs from the selected folder only. This option is enabled by default.
Editing Details
Click the Details tab to set system-defined and user-defined field values for the test case.
 |
Saving the Test Case
After reviewing and editing, click Create New Version to save the changes as a new version, or Update Current Version to overwrite the existing version. Further modifications can be made after saving.
Note
We recommend reviewing and modifying the generated steps before saving. Further modifications can also be made after the test case is created.