eSignature and Approval Workflow
Security and Audit compliance are critical for regulated enterprises.
The eSignature and Approval workflow helps your organization meet audit and compliance requirements. eSignatures confirm that test cases are documented correctly and approved at different levels before execution.
Requirement reviews verify imported requirements and link them to the correct test cases. They also help management track test case changes and assess how to integrate those changes into test executions.
When a test case is approved, reviewers mark that version of the test case as ready for execution. When a test execution is approved, QMetry authenticates the execution and prevents users from making further changes to the run.
QMetry supports a multi-level approver workflow, which helps organizations that need pre-approval before the final approver signs off.
Note
The Approval Workflow is available only with the eSignature package and can be enabled per project.
Key Rules as a Glance
Only approved test cases are available for execution, and execution requires authentication.
You can't modify approved runs.
You link test suites only to approved test cases.
For example, a test case might require approval from the QA Lead, QA Manager, and Project Manager before execution.
Enable the e-Signature Feature
Note
Once you enable the eSignature flag, you can't disable it.
To enable the eSignature feature, follow these steps:
Click the eSignature feature on the tree.
Enable the eSignature feature for the project.
In the confirmation message, click Yes to proceed.
After you enable the feature, click Approval Access on the tree to assign Test Case Approvers, Test Run Approvers, and Test Run Closers.
Approval Workflow and Mechanism
Approval Workflow Levels
Manage Approval levels from Approval/Closure workflow levels and users section under System Settings > General Settings and Audit.
You can add a maximum of 5 levels for the approval workflow.
Customization Modify rights are required to add or remove levels.
In the project's General Settings, the admin can define the frequency for notifying reviewers, approvers, and closers of a pending level.
Admins can also enable or disable individual event notifications from Notifications tab under Customization module.
Add a level only after assigning reviewers or approvers to the current level.
Each level can have multiple approvers; approval from any one moves the entity to the next level.
When assets are reviewed or approved, QMetry notifies the reviewers or approvers of all levels except the one who reviewed/approved the assets and to Created By, Watchers, Owners of those assets.
Approval Rules
An entity remains in In-review state until it's approved at all levels.
The entity moves back to In Review state if rejected at any level.
Any changes to an entity during the approval process resets it to the first level; all previous approvals are revoked.
QMetry notifies the "Created By" user when a reviewer, approver, or closer rejects an entity with Request Change.
Refer to Approval Access to know more.
Reviewing Requirements
Review requirements to ensure they meet the documented specifications. For external trackers, review the requirements imported into QMetry and link them to the appropriate test cases.
Note
Requirement rejected at any level resets to the first level of review, with an In Review status.
Editing a reviewed requirement resets it to the first level of review.
The following table narrates scenarios for internal requirements and requirements from the external tracker.
Requirement Type | Sync | Entities edited in | Status in QMetry | Is the "Request Change" option available? |
|---|---|---|---|---|
Internal | - | QMetry | In Review and Pending at Level 1 | Yes |
External | Imported for the first time in QMetry | - | Reviewed | No |
Manual Sync | - | Reviewed | ||
Auto Sync | Jira (for Jira Fields) QMetry (for System Fields) | In Review and Pending at Level 1 |
To review a requirement, perform the following steps:
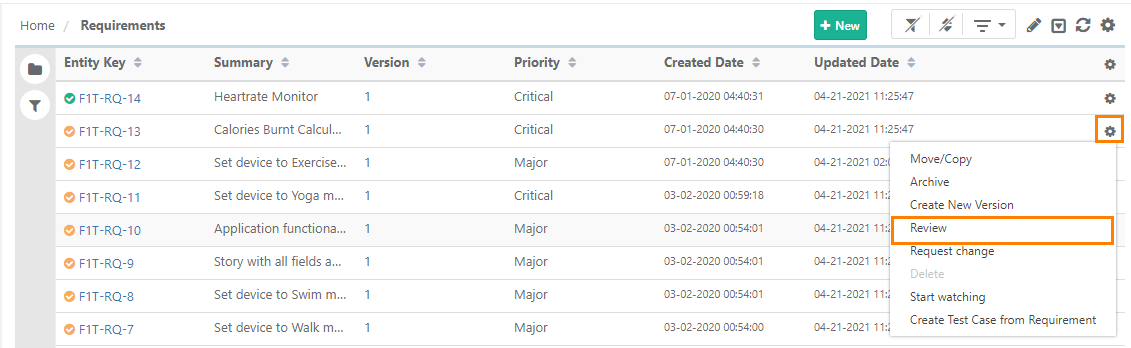
Go to Requirements.
Click the Cog icon for the requirement and select or .
Note
Changing the status to Review sends an email notification to the next reviewer.
Requirements imported from external trackers do not include the Request Change option.
Add remarks while approving or requesting change for reference.
Review at Level 1
Review a requirement in either of these ways:
On the requirement list view, open the Cog icon for the requirement and select Review.
Open the requirement detail page and click Review at the top.
Two options are available — Request Change and Review:
Request Change: For modifications, click Request Change. The system sends the requirement back to the creator with suggested modifications.
Review: Enter remarks and click Review. Approve the requirement and forward it to the next approver.
Note
Request Change is not available for requirements imported from external trackers such as Jira.
Changing the status to Review sends an email notification to the next reviewer.
Add remarks while you approve or request a change, for reference.
Review at Next Level
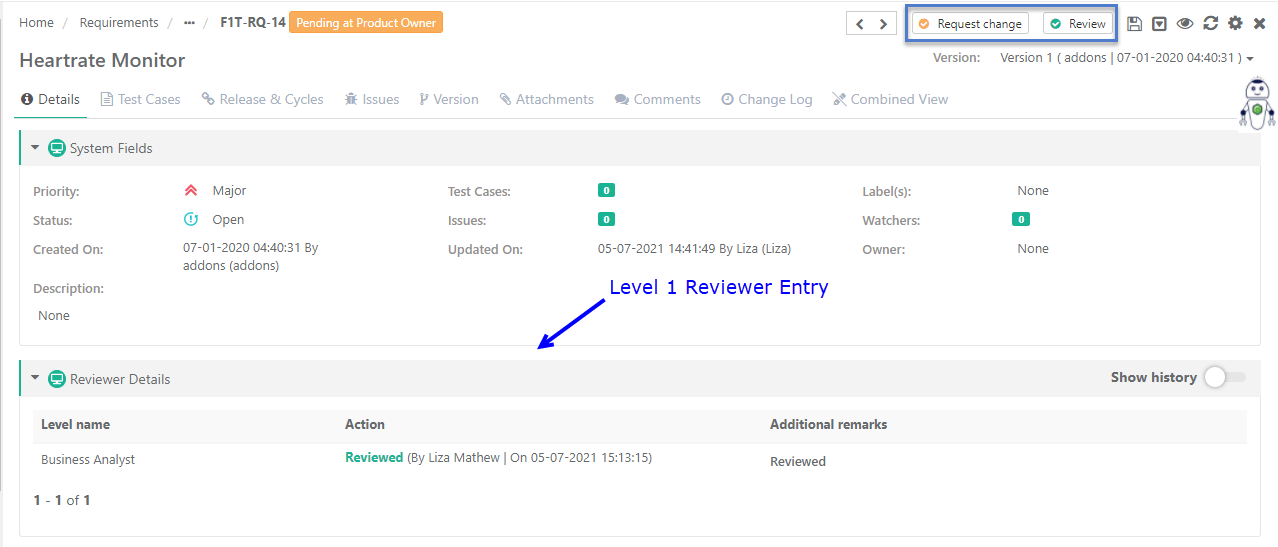
The requirement reviewed at Level 1 moves to the next level for further validation. The reviewer has two options:
Review — Behaves the same as Level 1. The requirement is marked Reviewed at the next level.
Request Change — Click Request Change to ask for modifications. A change request returns the requirement to the first level and restarts the process.
Note
Request Change is not available for requirements imported from external trackers.
QMetry sends an email about the review status and details to the "Created By" user.
 |
To review a requirement at the next level, perform the following steps:
Go to the requirement details page and Turn the Show History toggle "ON".
Check last reviewer details including name and remarks.
Approve the requirement or request further changes. For change request, the requirement returns to first level of review and the process restarts.
Viewing Review Logs
Track requirement review logs from these places:
The Requirement Details page shows the latest reviewer under Review Details.
Hovering over the Requirement Entity Key shows review details.
The Change Log tab on the requirement details page shows approval history.
Approving Test Cases
QMetry manages approvals at the version level, allowing each version of a test case to be reviewed and approved independently. After approval, QMetry locks that test case version from further changes.
To make changes, create a new version of the test case. QMetry automatically assigns the new version the In Review status and requires it to go through the approval process before you can use it for execution.
If eSignature is ON, the system creates shareable test cases in Approved state by default.
Once shareable test cases are created, the system restricts test step editing.
Create a new version of the shareable test case to make edits.
If a test case is pending for approval at the last level and you delete this level, the status changesto Approved.
If a test case is approved at all the existing levels and a new level is added, it shows pending approval for the last level, and the system restricts its execution.
You can link test suites only to approved test cases, which means a test case must reach the Approved state before it can be executed.
Approval Workflow for a Test Case
Rules for Approving a Test Case
Reviewer approves a specific version of a test case.
Approval restricts editing for that test case version.
Create a new version in the In Review state, to make changes.
Link test suites only to approved test cases. Execution is allowed only after a test case reaches the Approved state.
To approve a test case, perform the following steps:
Go to Test Cases List View.
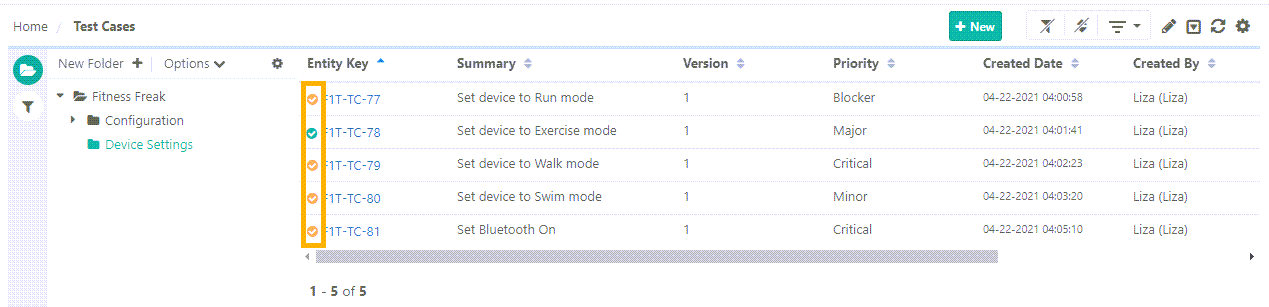
Symbol
Test Case State
Description
When eSignature is enabled later in the Project
Yellow Tick
In Review
The system assigns an In Review State for the new test case by default.
All new test cases are in the In Review State.
Green Tick
Approved
For approved test case, the system marks it ready for execution. Test suites link only to approved test cases.
All the existing test cases have Approved State
Click the Cog icon and select Approve or Request Change.
Alternatively, go to the test case detail page and click Approve or Request Change.
Approval at Level 1
The Level 1 approver approves the test case. A confirmation popup opens; add remarks and click Yes. The system notifies the reviewer at the next level.
Approval at next Level
The entity state changes from “Pending at Level1” to “Pending at Level 2”. The approver at this level can Approve or Request Change to the test case. Approving takes it to the next level and request changes pushes it back to previous level.
Approval at Last Level
On approval at the last level, the test case shows an Approved state.
QMetry locks editing. To make changes, create a new version or clone the test case
Note
The approver may request changes at any level. The test case then returns to the previous level for approval. When this happens, the system sends an email notification with the approval status and details to the "Created By" user.
Viewing Review Logs
Once a test case is reviewed at all levels, you can track its review logs from these places:
The Test Case detail page shows the latest reviewer details under Review Details.
Hovering over the Test Case Entity Key shows Review Details.
The Change Log tab on the requirement details page shows approval history.
How Operations Affect an Approved Test Case
Operations on "Approved" Test Cases | Impact on Test Case State |
|---|---|
Copy | Resets the State to In Review |
Move in the same project. | Preserves the State |
Move in another project. | Resets the State to In Review |
Export | Exports the Approval State |
Re-import | Creates a new version of the test case and resets the State to In Review |
Linking Release, Cycle, Requirement, Test Execution | Does not reset the test case State |
Adding Comments | Does not reset the test case State |
Approving Test Executions
Use the approval workflow to verify that test executions are documented correctly. You can link only approved test cases can to test suites for execution. The system syncs only approved test case versions. New test executions start in the In Review state and must be approved before execution.
Note
When you create a test suite from a requirement, or link test cases to a test suite through a requirement, QMetry links only approved test case versions, in the same order as linked in the requirement.
A requirement in review state doesn't show Create Test Suite from Requirement.
A requirement with only unapproved test cases can't be used to create or link to a test suite.
A requirement with both approved and unapproved test cases links only the approved ones, in order.
For the full steps, see Create Test Suites from Requirements and Link Test Case to Test Suite.
You can approve a test execution from several places in the application:
Test Executions tab in Test Suite.
Test Execution Screen.
Bulk Operations.
Bulk Request Change for Test Executions.
Note
Enabling Auto Approve Test Execution from eSignature skips the Test Execution Approval workflow and auto-approves all test executions. See Auto-Approve Test Execution for details.
When you add a new test execution, it shows an orange tick and is in the In Review state. Click the orange symbol to approve the execution; it turns green. Click the green tick to close the execution; it turns black.
Test Execution States
Symbol | Test Execution State | Description | When the eSignature is enabled later in the Project |
|---|---|---|---|
Orange Tick | In Review | A new test suite is In Review by default. It contains only approved test cases. Click the orange symbol to approve the test execution and the symbol turns green. | All new test suites are In Review. |
Green Tick | Approved | A test suite is approved and marked ready for execution. Click the green tick to close the test execution and the symbol turns black. | Test suites are in Approved state and are available for execution. |
Black Tick | Closed | The test suite is executed. You cannot edit the test execution. | Test Suites should be manually Closed. |
Approving a Test Execution
To approve a test execution, follow these steps:
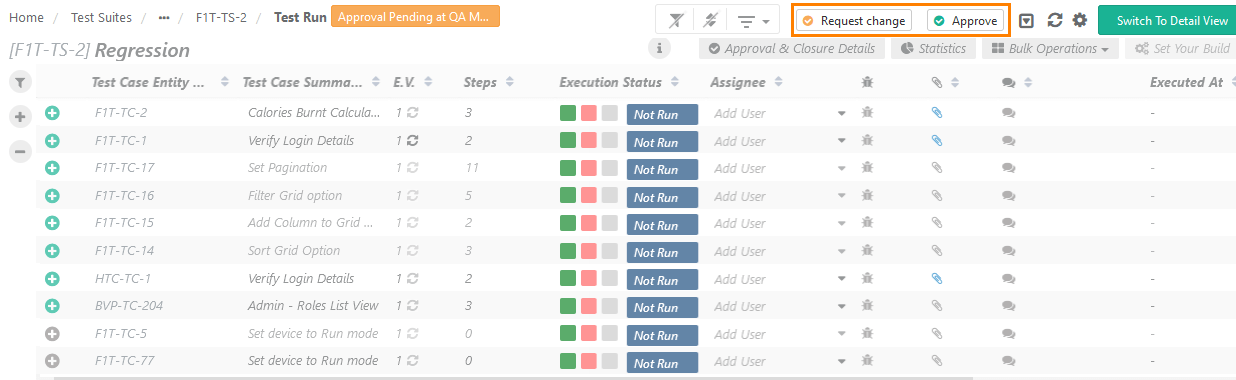
Open the test execution in the In Review State.
Click Approve.
Note
Once approved, it cannot be edited. Execution is disabled until the test execution is approved
Approval Progression
Approval at Level 1
QMetry moves the execution to the next level, updates the status from "Pending at Level 1" to "Pending at Level 2," and notifies all approvers at the next level.
Note
The Test Execution screen appears disabled until you approve the test execution. Once you approve the test suite for execution, the Test Execution screen is displayed in editable mode.
Approval at Level 2 / next level
The state changes from "Pending at Level 1" to "Pending at Level 2." The approver can Approve or Request Change (moves execution back to Level 1 and emails the "Created By" user).
Approval at Last Level
QMetry updates the test case results, moves the test case to the Approved state, and notifies the Owner or Assignee that the execution is ready.
To request modifications in the execution, click Request Change. QMetry moves the test execution back to Level 1 for approval and sends an email notification with the approval status and details to the "Created By" user.
Closing Test Execution
After you execute an approved test suite, a user with test execution closer access can mark the execution Closed. When multiple hierarchy levels are defined for closers, only the final closer can close the test execution.
Use Case
The QA Manager wants to freeze the execution of a test suite once it's executed, to preserve the execution and prevent any modification. Unlinking a release, cycle, or platform from a closed execution would eliminate the execution without a trace. So unlinking is restricted to preserve closed test executions.
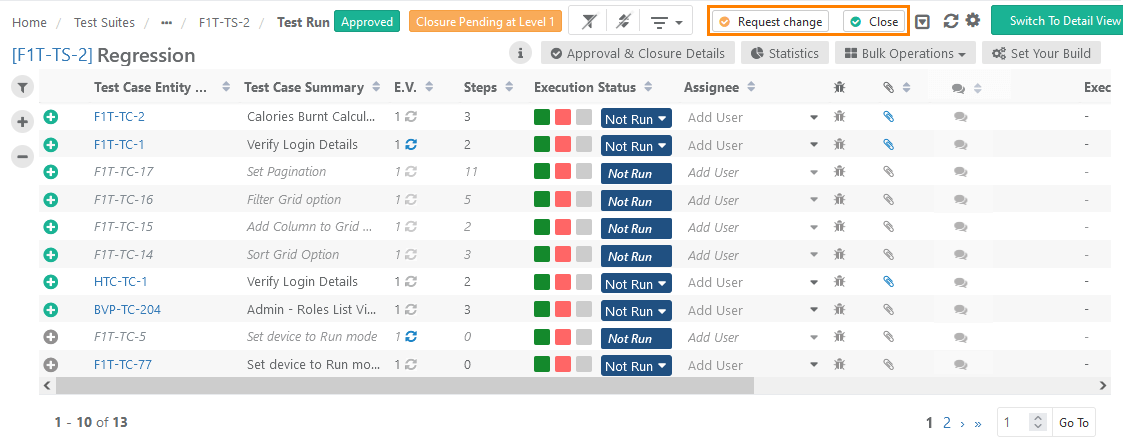 |
Once you close the test execution:
You cannot modify the test case results.
You cannot unlink test cases from the closed test execution.
You can view bugs and download attachments associated with test cases and steps.
You can't unlink associated releases, cycles, and platforms, at any level of closure.
This workflow helps QA Managers freeze a test suite’s execution after completion, preserving the results and preventing modifications. Unlinking the Release, Cycle, or Platform from a closed execution permanently removes it. To avoid this, unlinking is restricted so closed test executions remain preserved.
Business Rules:
Approved but not closed: If the Test Suite Execution is approved and not closed at any level, adding a new approval level changes the status to Pending at {New Level}.
Approved and closure initiated: If the Test Suite Execution is approved and closure has started at any level, adding a new approval level does not change the closure status.
No closure initiated: If closure has not started and a tester needs to change execution details, the approver can use Request Change to reset the status to Approval Pending at Level 1.
Closure initiated: Once closure has started, adding a new approval level does not affect the current closure status.
Closure at Level 1
To start closure at level 1, perform the following steps:
Open the test execution in the Approved State.
Click Close. Once you close the test execution, you cannot edit it further.
Closure Options
Request Change — Click to edit the test case or test suite. The approved status resets to Approval Pending at Level 1, and the full approval cycle repeats. Once the execution is approved again, it's available for the closure cycle.
Close — The execution pending closure shows Closure Pending at Level 1.
Multiple hierarchy for closure — After closure at Level 1, the status changes to Closure Pending at Level 2. The execution is marked Closed only when the closer at the last level completes the closure. Click Approval & Closure Details to view approval details.
 |
View Approval Logs
As the test execution passes through subsequent levels, the corresponding entries are displayed under Change Log.
Approval Workflow for Cross-Projects Linking
The following table shows what you can link from Project B to Project A based on each project's approval workflow:
Approval Workflow in Project A (current project) | Approval Workflow in Project B | Linking assets of Project B to Project A |
|---|---|---|
Enabled | Disabled | Not available (For approval-enabled projects, the Link Test Cases screen shows only those projects which has Approval Workflow enabled) |
Disabled | Enabled | Not available (For Approval Workflow disabled projects, the Link Test Cases screen shows projects without Approval Workflow) |
Enabled | Enabled | Only approved test cases from Project B |
Disabled | Disabled | All test cases from Project B |
Automation Testing
Note
Users must have Automation permissions.
If the eSignature feature is enabled in the project-
Test Cases created or linked through Automation (Automation API, Jenkins, Bamboo, Rest API) are approved automatically.
Test Suite Executions created through automation are in the System Approved State irrespective of the user's permissions for Test Case/Test Suite Execution Approval or Closure. Users do not require test case and test suite execution permissions for the last approval level.
Bulk Operations
Bulk Edit
For Bulk Edit, select either In Review or Approved at a time.
Note
Perform bulk editing on unarchived and non-shareable records.
For approved test cases, you can add or edit linkages (such as attachments, requirements, releases, and cycles) and comments.
Bulk Review Requirements
Note
Bulk review option is available only in the Requirements modules.
Review the In-Review and unarchived test assets in bulk.
To bulk review requirements, perform these steps:
Go to Bulk Operations
Select Review and click Next.
Select the requirements and click Review.
Enter remarks and click Review.
Click Yes.
Bulk Approve Test Cases
Bulk approve is available only in the Test Cases and Test Suites modules. Approve test cases or close test executions in bulk for the e-Signature enabled projects.
To bulk approve test cases, perform these steps:
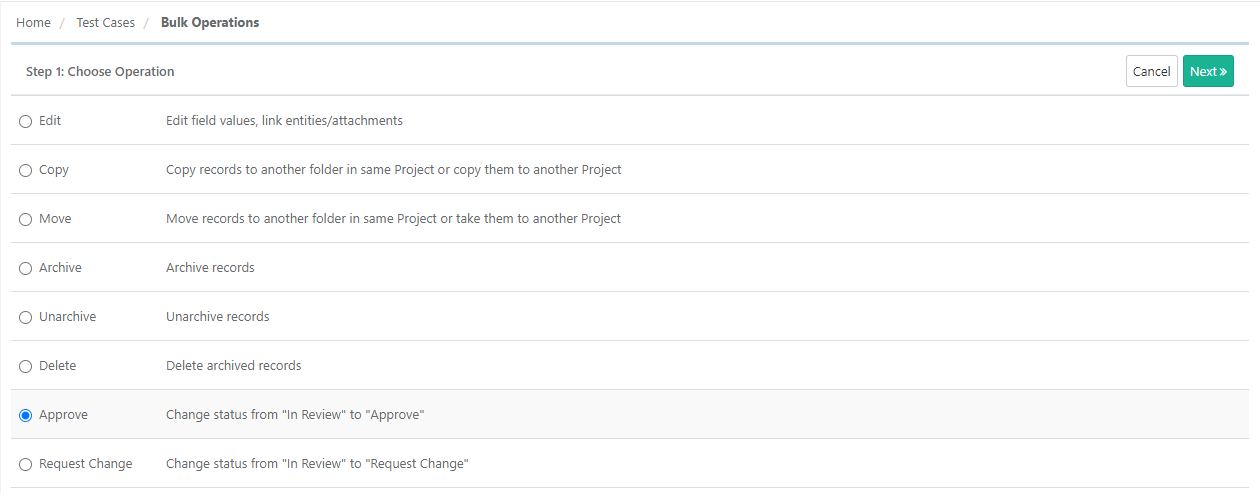 |
Go to Test Cases.
Click the cog icon and select Bulk Operations.
Select Approve and click Next.
Select the records and click Approve.
Bulk Request Change
Apply bulk Request Change to test assets (requirements and test cases) approved at least once in any of the previous levels.
Note
Request Change is not applicable to requirements that are imported from an external tracker like Jira.
To apply bulk request change, perform the following steps:
Go to Bulk Operations.
Select Request Change and click Next.
Select the records.
Add remarks and click Request Change.
Click Yes to confirm.
Bulk Approve Test Suites or Test Executions
In Bulk Operations for the test suite, Approve, Request Change, Approval, Request Change, Closure, and Close options are for test execution.
Bulk Request Change - Revert the test execution's status from "Pending Closure" to "In Review".
To bulk approve test suites or test executions, perform the following steps:
Go to the test suite module.
Click the cog icon and select Bulk Operations.
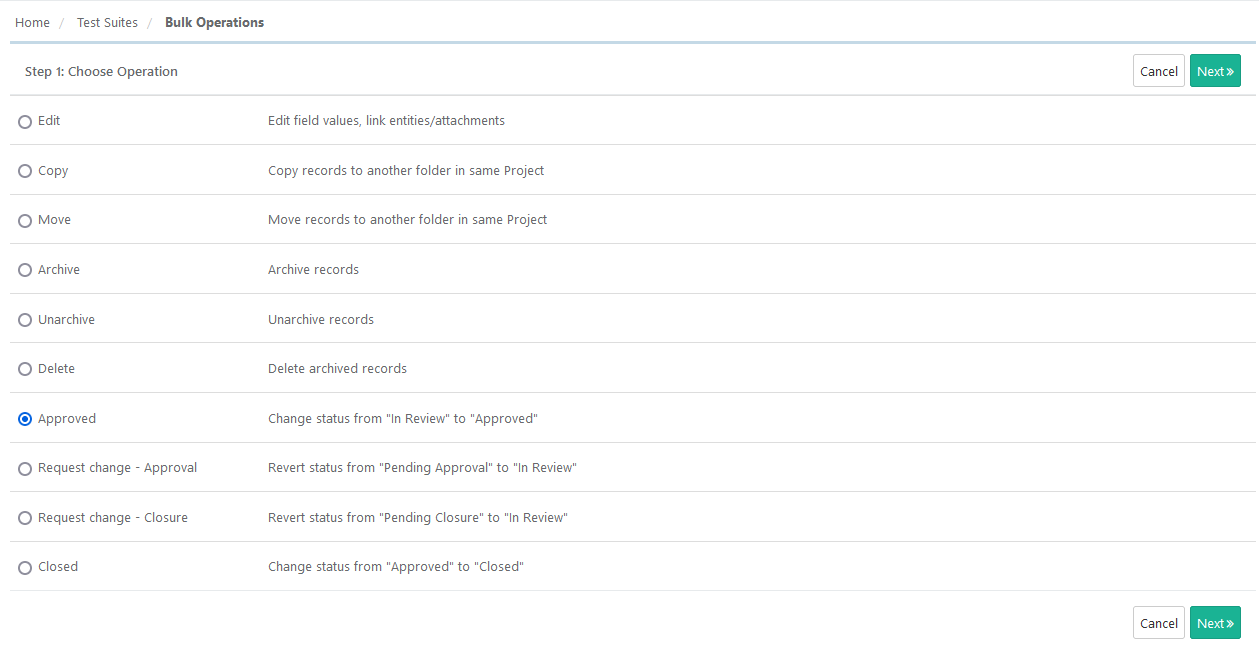
Select the relevant operation and click Next. If the records exceed 1,000, apply filters.
Select records to approve.
Enter the remarks and click Approve.
Bulk Approve Executions when Auto Test Execution is Enabled
If Auto Test Execution is enabled, all options for test execution approval do not appear on the bulk operation list.
The Request Change – Closure action behaves differently in this mode. It changes the status from Pending Closure to Approved instead of In Review.
If you request a change for an approved test execution from the execution screen, the execution reverts to Closure Pending at its previous level. If only one level exists, it remains at Closure Pending – Level 1.
Bulk Request Change – Approval
Apply Bulk Request Change – Approval to test executions pending approval. It reverts the status from Pending Approval to In Review.
Go to Bulk Operations.
Select – Approval and click Next. The screen shows records pending approval.
Select the records, then click Request Change.
Add remarks and click Request Change. Click Yes to confirm.
Bulk Request Change – Closure
Apply Bulk Request Change – Closure to test executions approved at all approval levels. It reverts the status from "Pending Closure" to "In Review."
Go to Bulk Operations.
Select – Closure and click Next.
Select the records, then click Request Change.
Add remarks and click Request Change. Click Yes to confirm.
Bulk Close Test Executions
Closers can change the test execution status from Approved to Closed, and can mark executions as Closed in bulk.
Go to Bulk Operations.
Select Close and click Next. If the records exceed 1,000, apply filters.
Select the records to mark as Closed and click Close.
Click Yes, add remarks, and click Close..
Remove Reviewers, Approvers, or Closers from Project
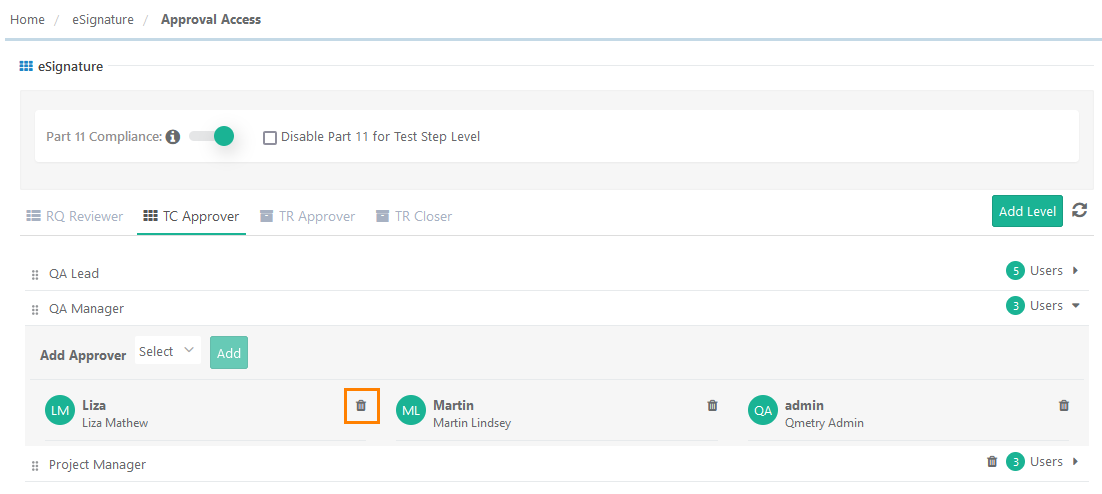 |
To remove reviewers, approvers or closers from a project, perform the following steps:
Go to eSignature.
Click Approval Access.
Select the tab: RQ Reviewer, TC Approver, and TS Approver.
Locate the user and click Delete.
The system revokes the user’s rights to review or approve requirements, test cases, or test suites for the project. Entities previously reviewed or approved by the user remain unaffected.
You can also view the Approval Workflow Report.
Audit Log
QMetry logs all approval workflow activities under Audit Compliance in Audit Log. The audit logs also capture switching the Auto Approve workflow on and off.
Approval Workflow Details
Click Export Test Case Detail on the test case detail page to open the test case detail in PDF.
The Test Case Export Report includes the Approval Status along with other test case details.
If eSignature is enabled for the project, the report includes Approval Workflow details, including approval statuses like In-Review and Approved.