User Provisioning and Deprovisioning with SCIM 2.0
Note
User Provisioning and Deprovisioning with SCIM 2.0 is an advanced feature.
Implementing System for Cross-domain Identity Management (SCIM) 2.0 for provisioning and de-provisioning users provides a standardized and efficient method for managing user identities across various systems and applications. It involves the automated creation, updating, and removal of user accounts across multiple systems.
QMetry supports SCIM 2.0 for automatic user provisioning and de-provisioning, which reduces manual intervention and potential errors. Its other benefits are:
It ensures consistency of user data across multiple systems, reducing the risk of discrepancies or outdated information.
It streamlines the user lifecycle management process, saving time and resources for both IDPs and SPs.
It helps enforce access control policies and maintain data security by promptly removing access for deactivated users.
SCIM settings are configured at the instance level; only the Super Administrator can manage them.
Step 1. Enable SCIM in QMetry
Enabling SCIM in QMetry involves configuring the application to support the SCIM standard and enables communication with an identity provider through the required endpoints and authentication.
Pre-requisites
Before you begin, ensure the following:
SCIM Provisioning is enabled in System Settings.
Only the Super Administrator of the QMetry instance can access and enable the SCIM feature.
Steps to Enabling SCIM
To enable SCIM in your instance, perform the following steps:
 |
Login to QMetry with Super Admin credentials.
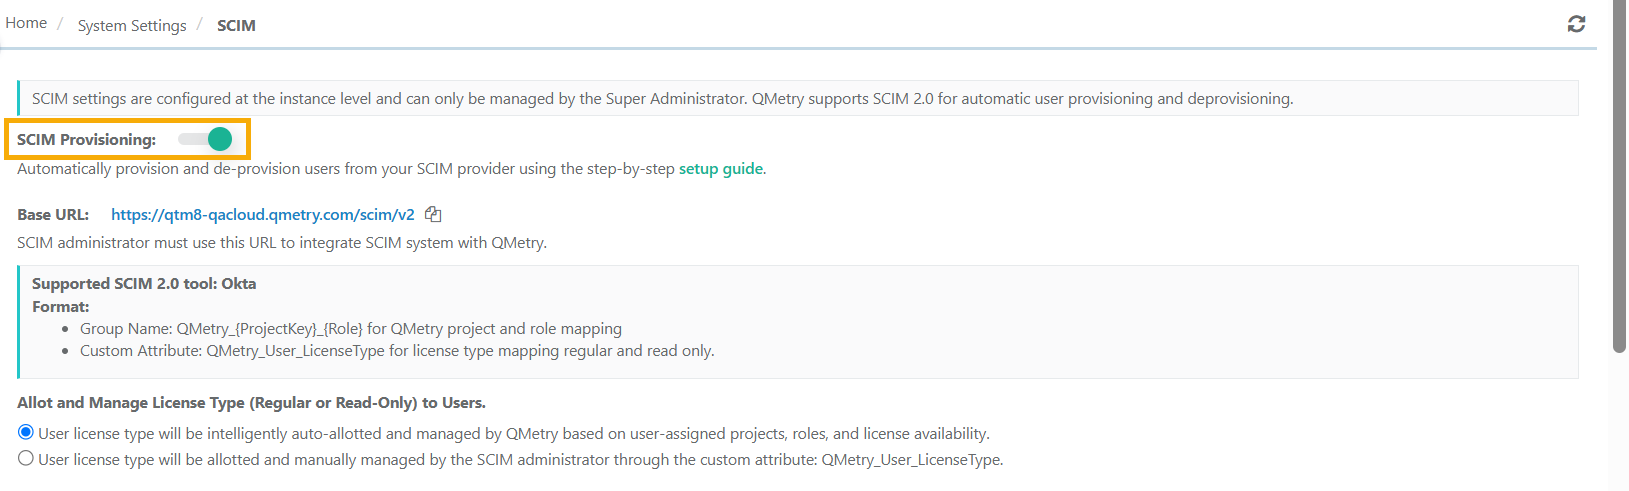
Select System Settings and select SCIM.
Turn on SCIM Provisioning.
Review the following configurations:
Base URL: The QTM instance on which the Okta is configured. For example, https://testmanagement.qmetry.com/scim/v2.
Supported SCIM 2.0 tool: Okta. Use the following syntax for Group Name and Custom Attribute in Okta.
Group Name: QMetry _{ProjectKey}_{Role} for QMetry project and role mapping.
Custom Attribute: QMetry _User_LicenseType for license type mapping regular and read-only.
The confirmation message pops up once you enable the SCIM Provisioning settings.
Allot and Manage License Type (Regular or Read-Only) to Users.
Use this setting to control whether the license type is automatically set or whether your SCIM administrator sets it manually. Refer Licensing for SCIM enabled users to know more.
Note
After enabling the SCIM settings, user provisioning, de-provisioning, and assignment of users to projects will be directly managed through SCIM. Only the Super Admin of QMetry will possess the permissions to manage and assign users from within QMetry. Regardless of their role or permissions, any other user cannot create, update, or assign/unassign users to projects and roles.
Step 2. Create SAML App Integration in Okta
You can create SAML app integration in Okta and enable secure single sign-on (SSO) for your users accessing the application.
To create SAML app integration in Okta, perform the following steps:
Log into the Okta Admin account.
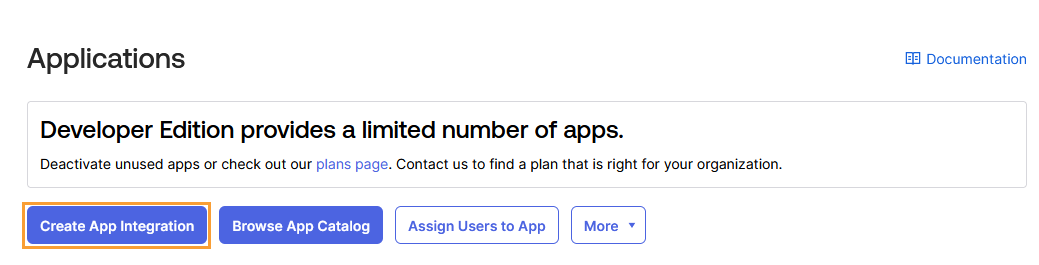
Go to Applications.
Click Create App Integration.
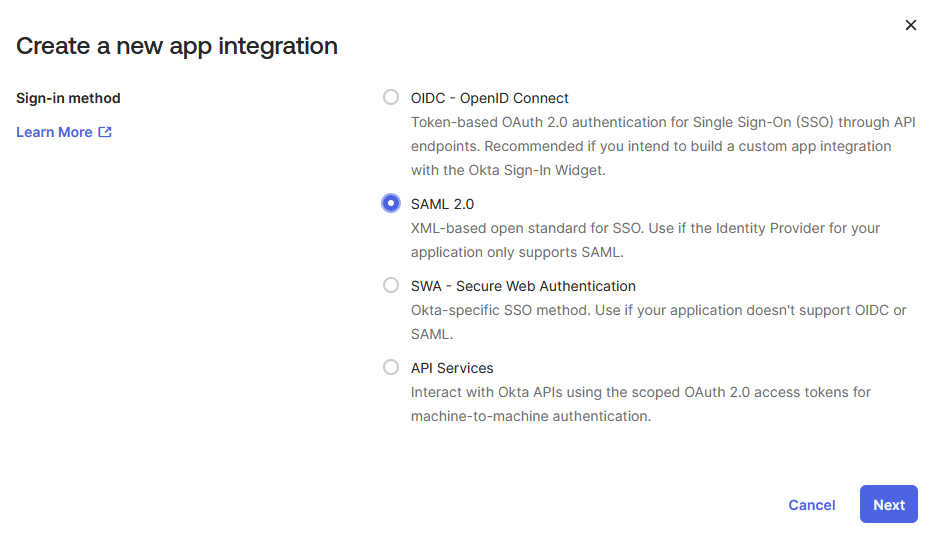
Select SAML 2.0 as the Sign-in method.
Click Next.
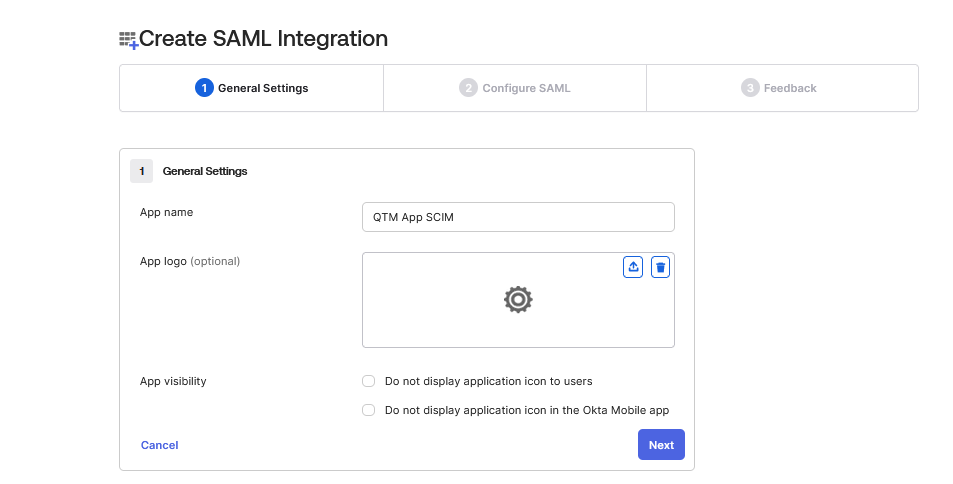
Enter the App Name and click Next.
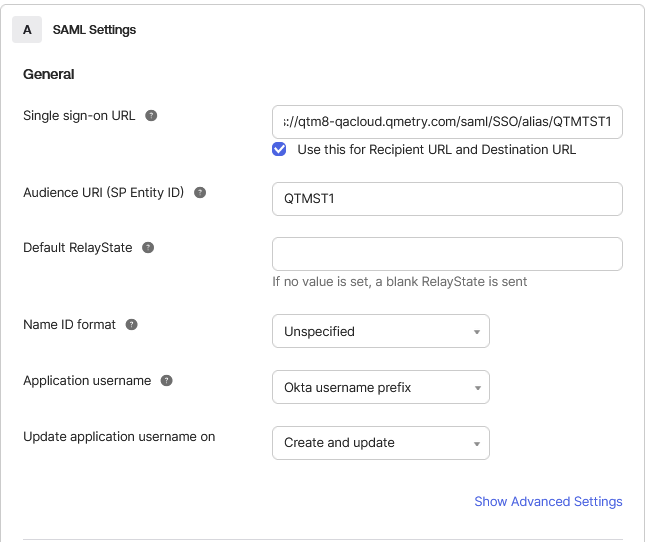
Enter the following details.
Single sign-on URL: Enter URL with the OrgCode
Example 99. Single sign-on URLYour URL: https://testmanagement.qmetry.com
The Organization Code is QTMTST1.
Single sign-on URL https://testmanagement.qmetry.com/saml/SSO/alias/QTMTST1
Select Use this for Recipient URL and Destination URL.
Audience URI (SP Entity ID): Enter your application's Entity ID, i.e., orgcode.
Application username: The default value to use for a user's application username. Select “Okta username prefix” on the list.
Select Next.
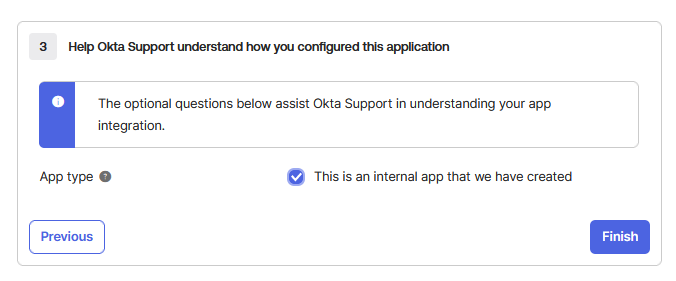
Select This is an internal app that we have created.
Select Finish.
The integration is created in the Okta org. You can modify your integration's parameters and assign them to users.
Step 3. Add SCIM Provisioning in Okta
Add SCIM provisioning in Okta to enable automated user creation, updates, and deactivation between Okta and the QMetry application.
To add SCIM Provisioning in Okta, perform the following steps:
In Okta, open the QMetry application you created earlier.
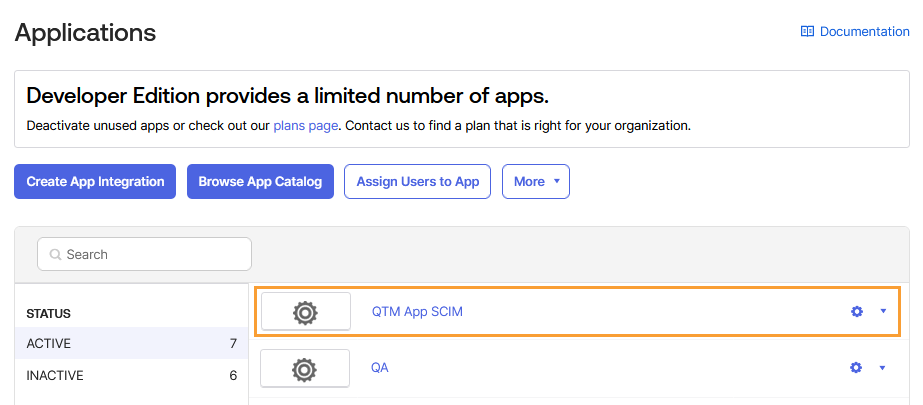
Go to the General tab.
Select Edit under App Settings.
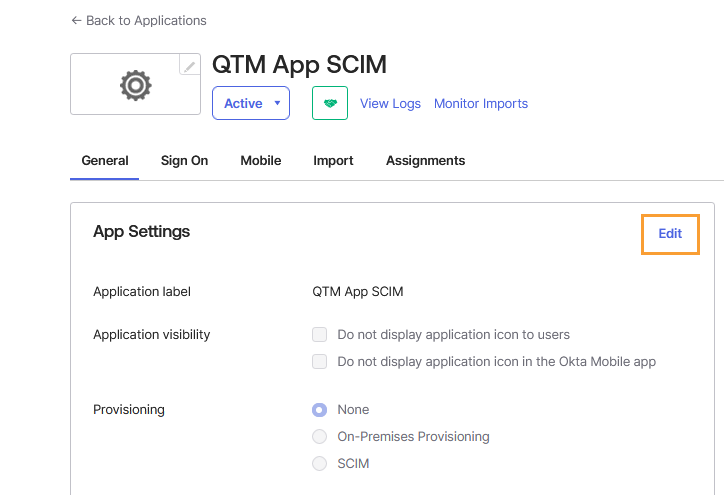
Under Provisioning, select SCIM to enable SCIM-based user provisioning.
Select Save.
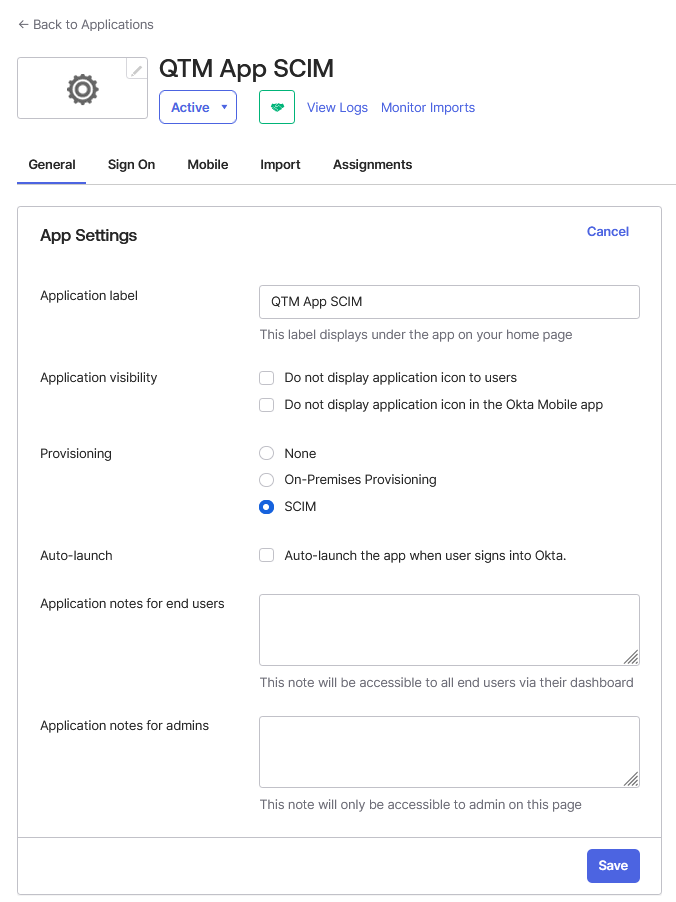
After saving, the Provisioning tab becomes available for configuration.
Step 4: Select Provisioning Options
QMetry supports the following provisioning features.
Push New Users
Push Profile Updates
Push Groups
To select provisioning options, perform the following steps:
On the integration's settings page, open the Provisioning tab. The SCIM connection settings appear in Integration under Settings.
Edit the SCIM Connection settings by clicking Edit button.
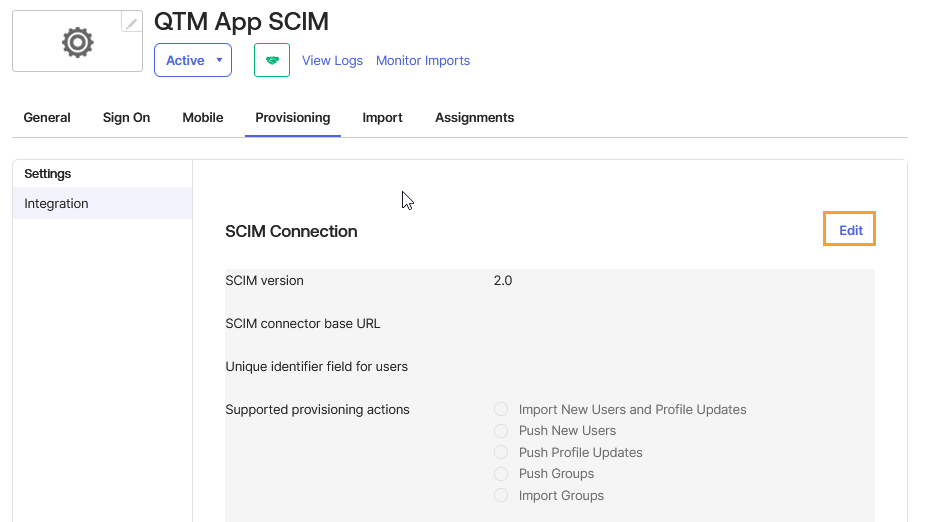
Enter the following details:
SCIM connector base URL: Enter the SCIM connector base URL. You can get the Base URL from Integration > SCIM in QMetry. The syntax for the SCIM connector base URL is {QTM_url}/scim/v2. For example, https://qtmcloud.qmetry.com/scim/v2
Unique identifier field for user: Enter the field name of the unique identifier for the users on the SCIM server. This is a static parameter value. For example, userName.
Supported provisioning actions: Select the provisioning actions supported by the SCIM Server. The following provisioning features are supported:
Import New Users and Profile Updates: This option populates the Settings > To App page and contains settings for importing new users and profile updates from the SCIM app into Okta.
Push New Users: This option populates the Settings > To App page, and contains settings for all the user information that flows from Okta into the SCIM app.
Push Profile Updates: This option populates the Settings > To App page, and contains settings for all profile information that flows from Okta into the SCIM app.
Push Groups: This option populates the Settings > To App page, and contains settings for all group information that flows from Okta into the SCIM app.
Import Groups: This option populates the Settings > To App page and contains settings for importing group information from the SCIM app into Okta.
Authorization Mode: This is the mode you want Okta to use to connect to your SCIM app. Select HTTP Header.
Authorization: To authenticate using HTTP Header, you need to provide a bearer token that will provide authorization against your SCIM app. Enter the Open API Key of the Super Admin of the QTM instance.
Steps to generate the Open API Key
Login to the QMetry
Go to Open API under Integration.
Locate the Generate Open API section and click on Generate to generate Open API Key.
Copy the key and paste it into the Authorization field in Okta.
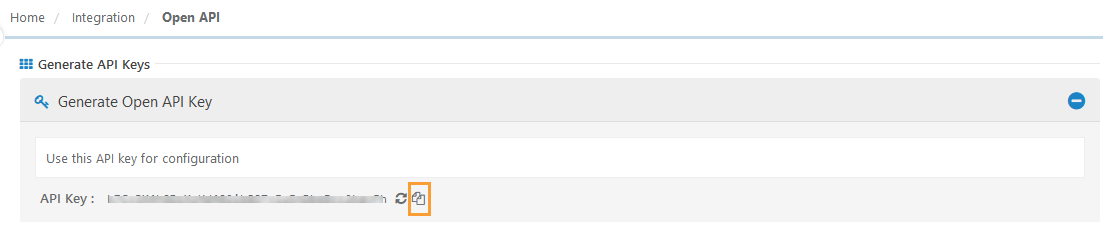
Enter the details in the SCIM Connection window.
Under Supported Provisioning Actions, select and enable all available options.
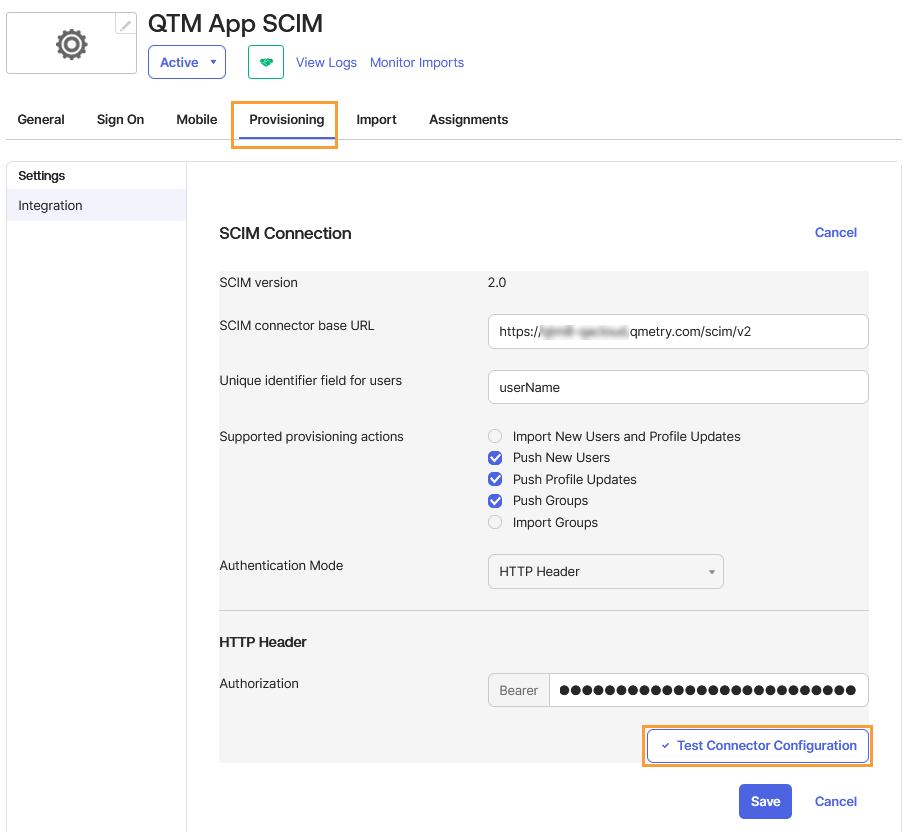
Select Test Connector Configuration.
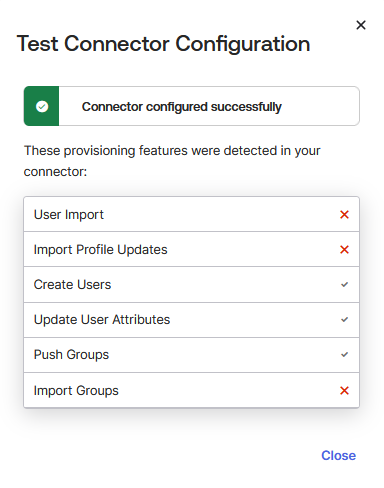
Once the connector configuration is successful, click Save to save the configuration.
Step 5: Configuration Settings for “To App” Provisioning
When configuring To App provisioning in Okta, you'll need to define several settings that enable the synchronization of user data from Okta to the QTM application.
Steps
Log into Okta with an Admin account.
Go to Applications > Applications.
Open the Provisioning tab.
You can see the To App and To Okta tabs along with the Integration tab.
Open the To App tab.
You can configure what is to be copied from Okta to the QMetry app integration.
Click Edit to change configuration settings.
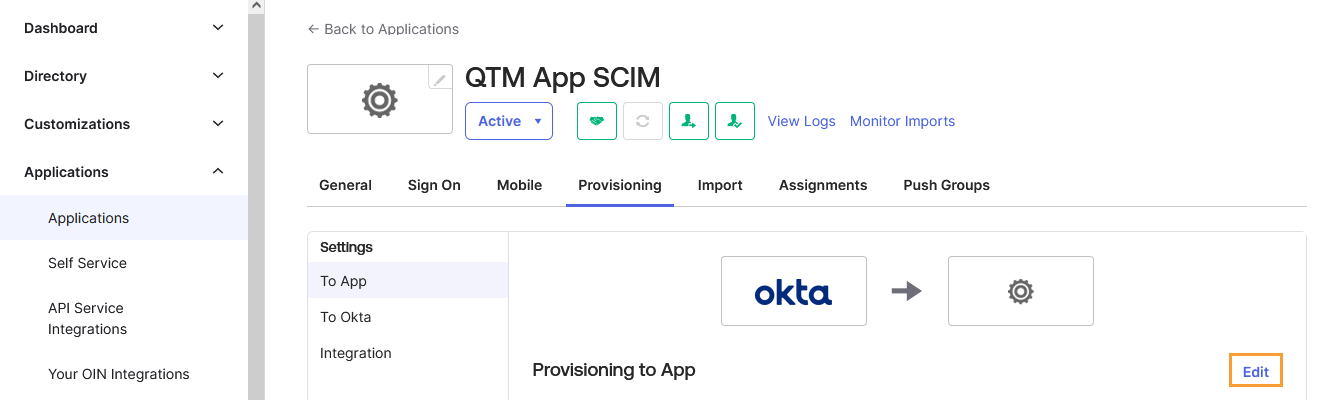
Select the required provisioning to the app.
Create Users: Creates or links a user in the app integration (e.g., QTM App SCIM) when assigning the app to a user in Okta. It assigns a new external application account to each user managed by Okta. Okta sends a random password in its request to create a user.
Update User Attributes: Okta updates a user's attributes in the integrated app (e.g., QTM App SCIM) when the app is assigned. Any attribute changes made to the Okta user profile will automatically overwrite the corresponding attribute value in the integrated app (e.g., QTM App SCIM).
Deactivate User: Deactivates user accounts when the users are unassigned in Okta or their Okta account is deactivated. Accounts can be reactivated if the app is reassigned to a user in Okta.
Click Save.
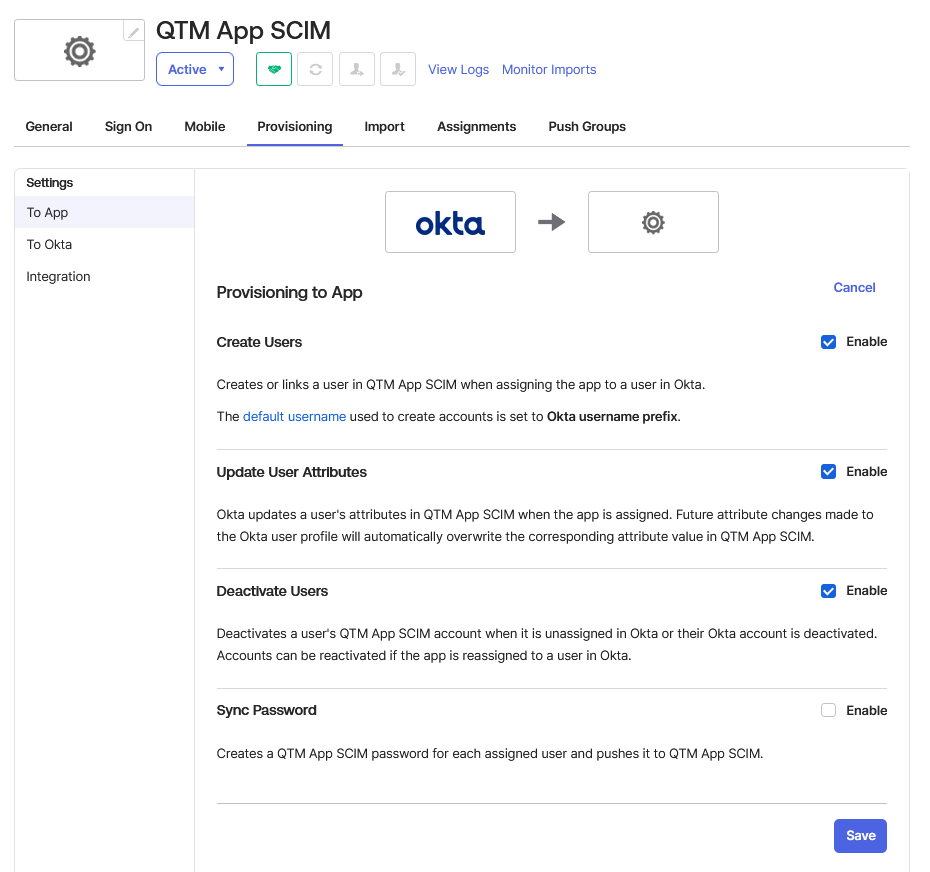
The mappings are enabled.
Step 6. License Type Mapping - as Custom Attribute
Note
If Automatic User License Management is enabled in QMetry, then this step can be skipped.
In Okta, the "Directory" refers to the user profile attributes stored within the Okta platform. The "Profile Editor" allows you to customize these attributes and their mappings. You can tailor user attributes to meet the specific requirements of your organization for seamless integration and data synchronization.
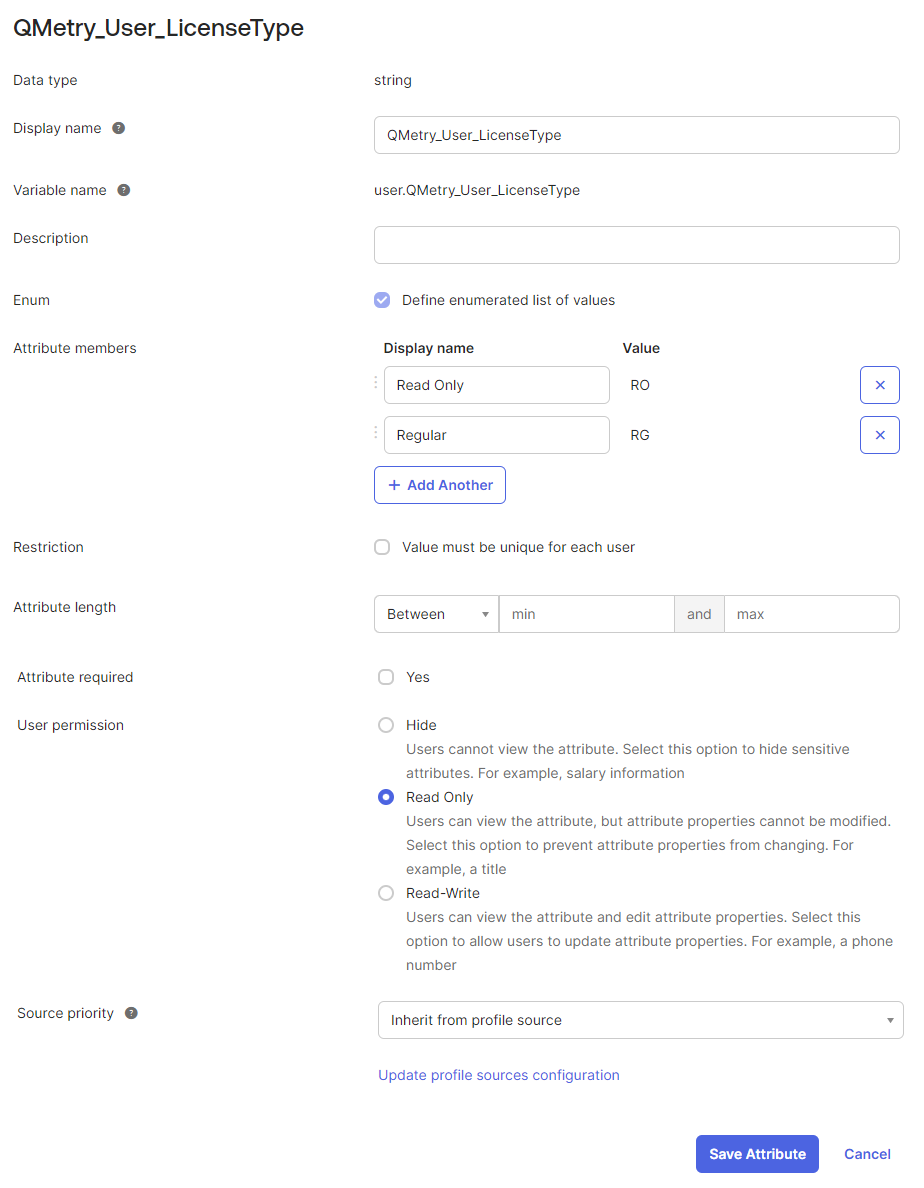
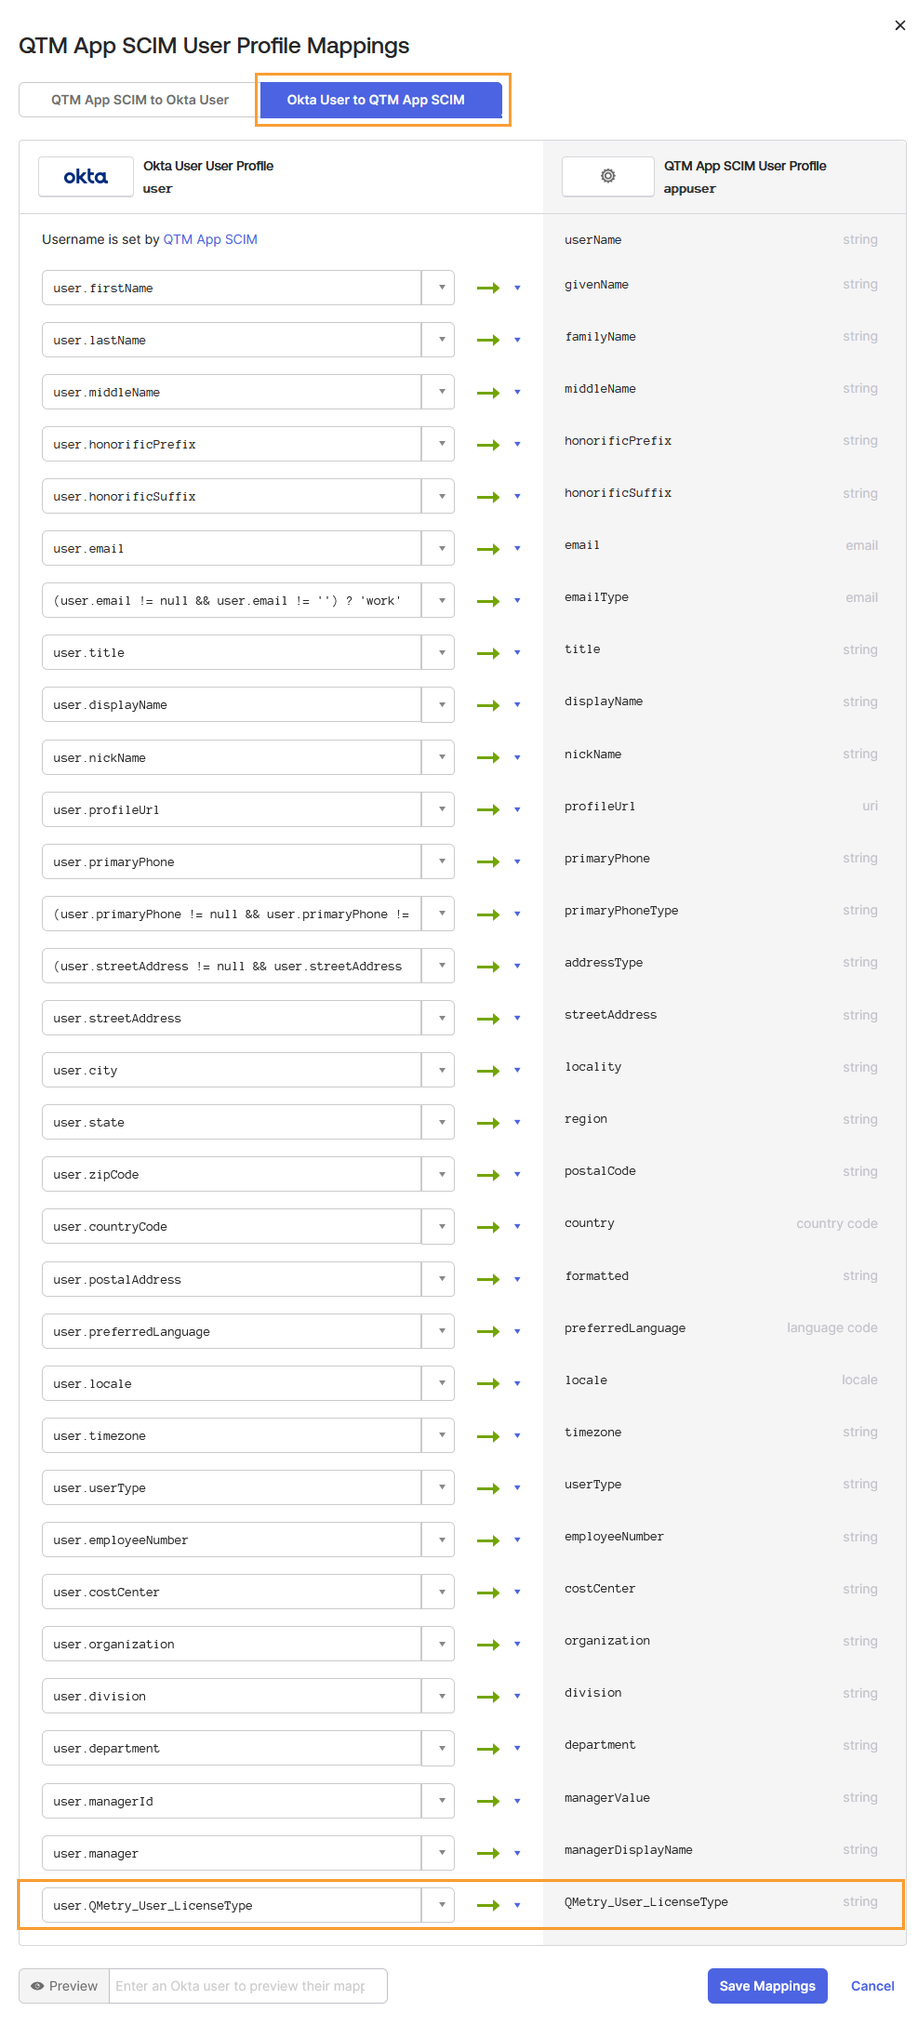
We need to add a custom attribute “QMetry_User_LicenseType” for license type mapping regular and read only.
Note
The user license type can be changed (from Regular to Read-Only and vice versa), without needing to unassign and reassign the projects, only if the user has read-only access to all projects.
Steps to perform attribute mapping in the Directory > Profile Editor are mentioned below.
Steps
Log in to your Okta Admin account.
Go to Directory and select Profile Editor.
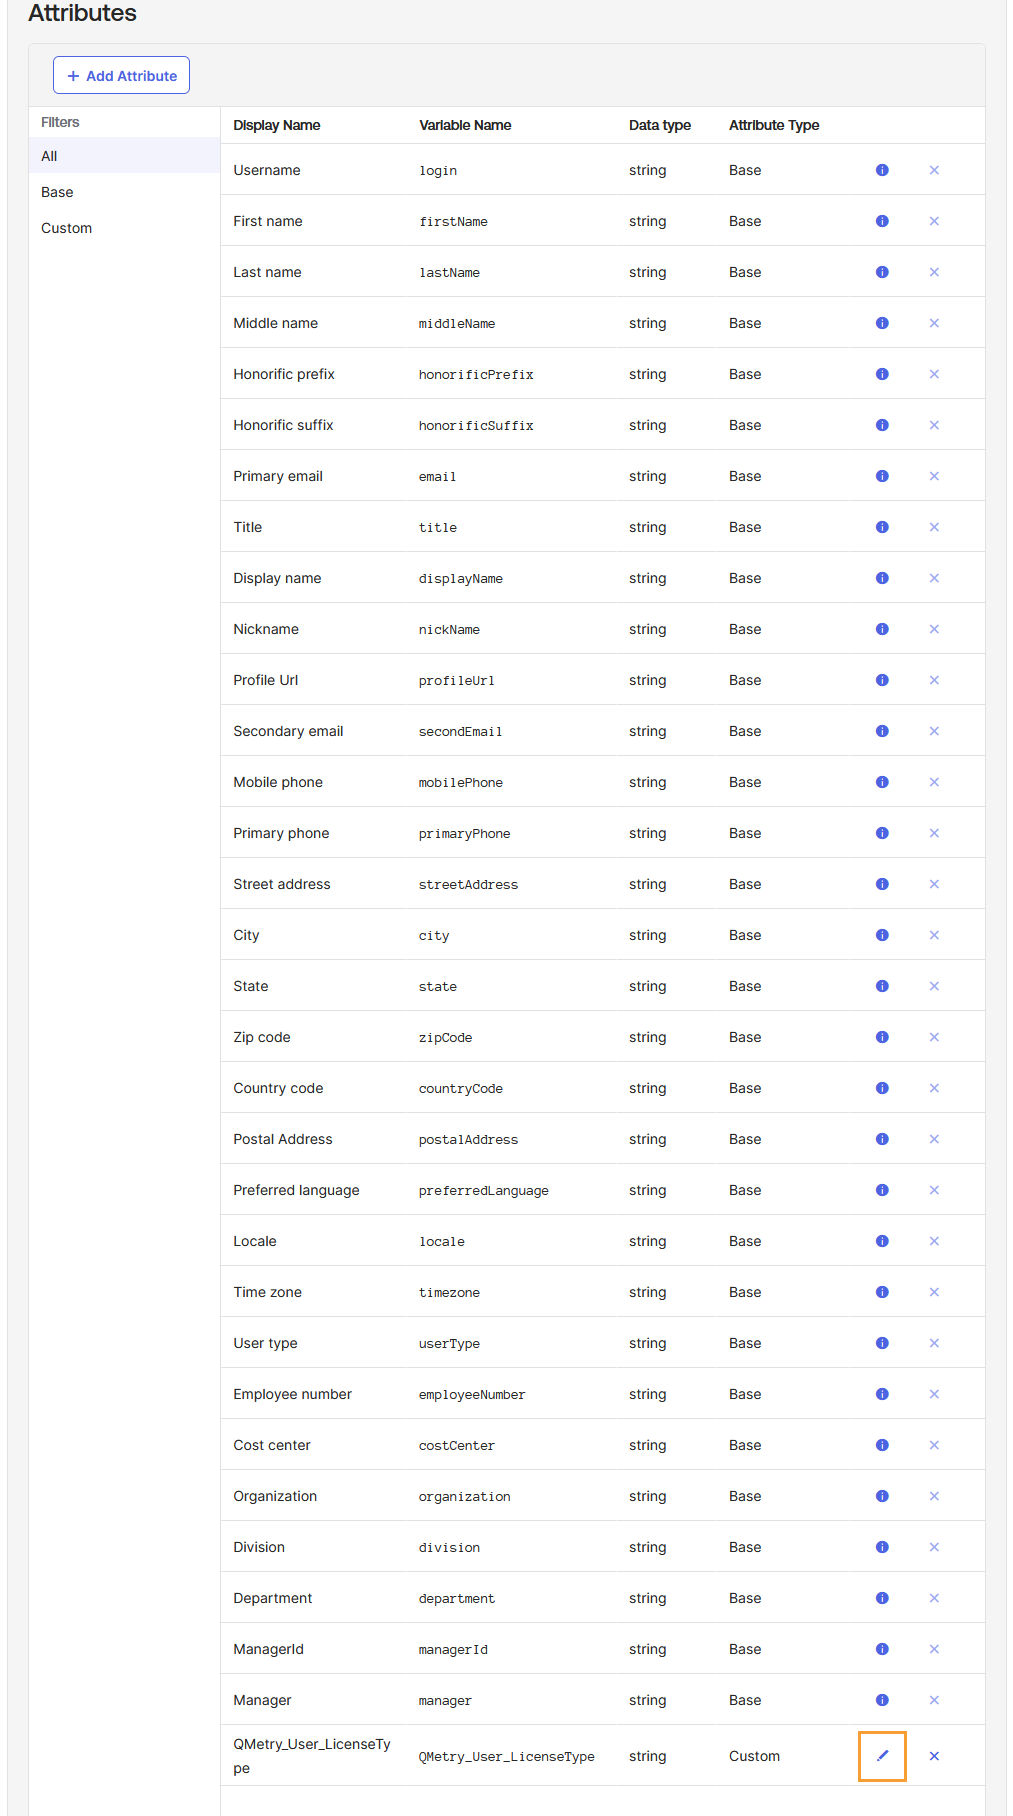
Open the default Okta profile by clicking on it.
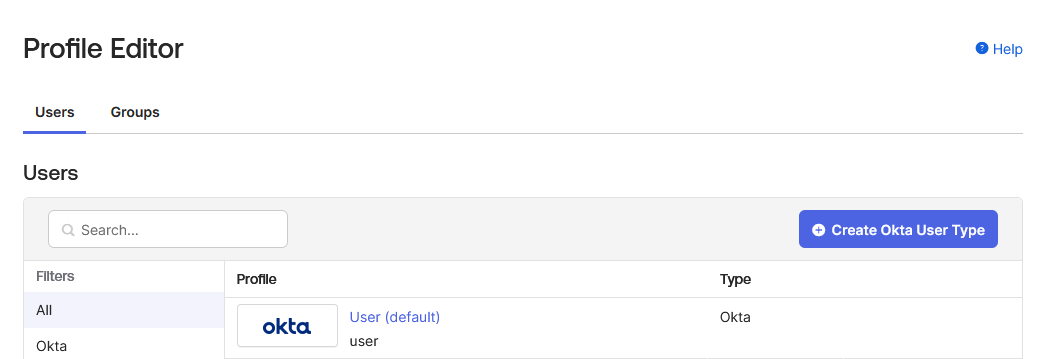
Add a new custom attribute or edit an existing custom attribute “QMetry_User_LicenseType” for license type mapping regular and read only.Add a new custom attribute or edit an existing custom attribute “QMetry_User_LicenseType” for license type mapping regular and read only.
After adding the values, save the attribute.
If the Attribute required parameter is marked as "Yes", the first value will be used as default when people are added to Okta.
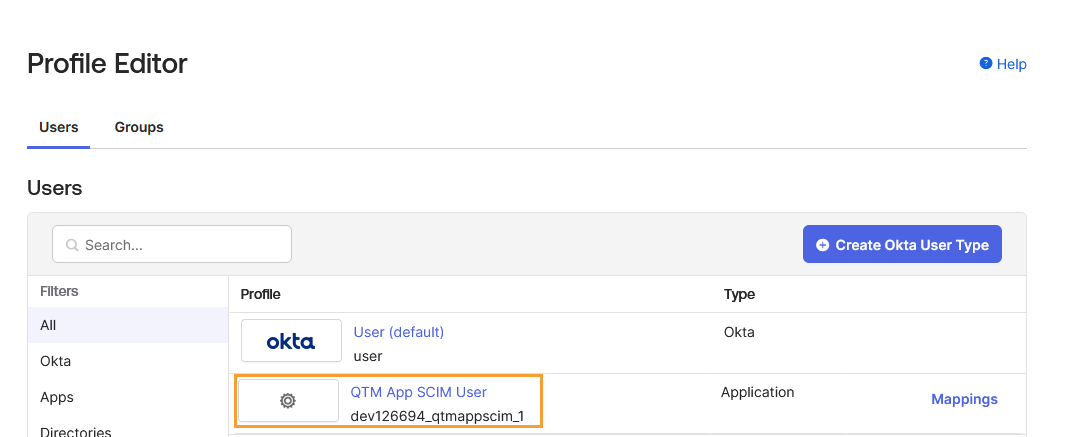
Now go back to Profiles.
Open the QTM application by clicking on it.
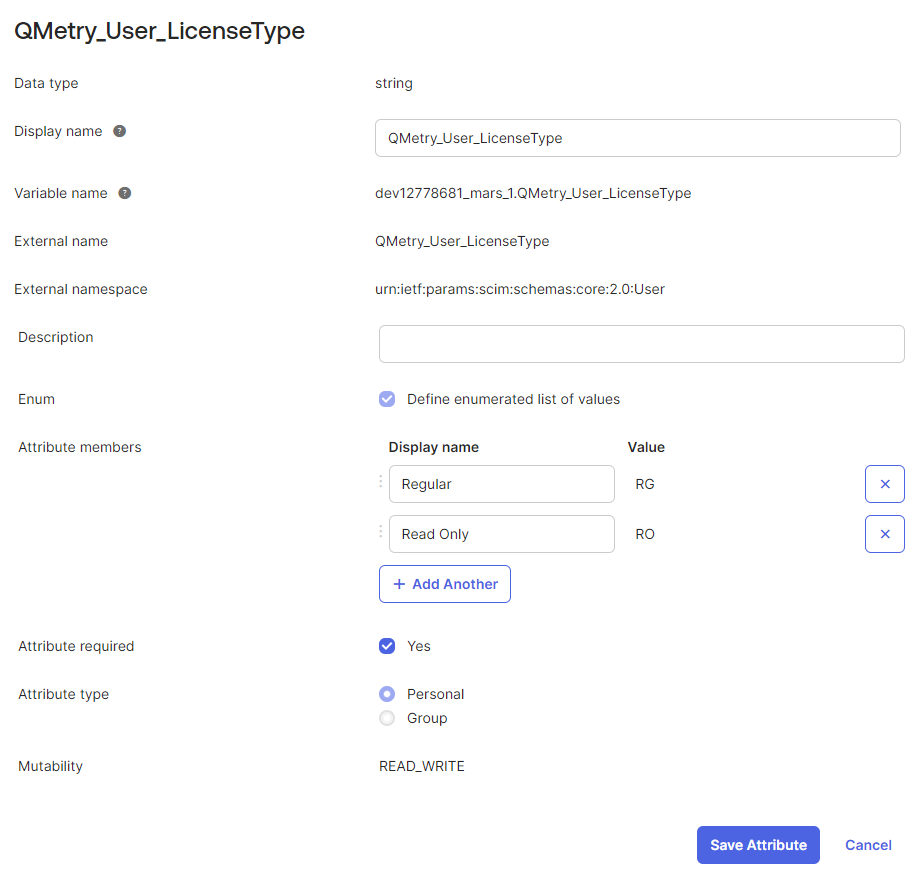
Add a new custom attribute or edit an existing custom attribute “QMetry_User_LicenseType” for license type mapping regular and read only.
After adding the values, save the attribute.
External namespace: While adding an attribute, enter urn:ietf:params:scim:schemas:core:2.0:User as External namespace. The external namespace is used to refer to the namespace in the external system. It allows you to use additional or custom user attributes beyond what is provided by default in SCIM.
Go back to the Profile.
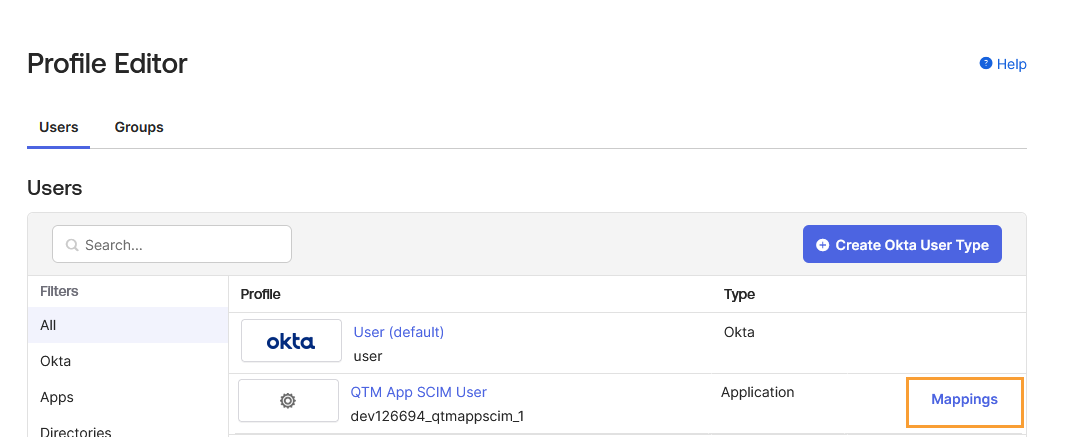
Click Mappings for the user profile.
Select Okta User to {QTM App} tab for mapping the user profile.
Click on the Save Mappings button to save the user profile mapping between the apps.
Step 7. Refresh App Groups
The Refresh App Groups option allows you to manually trigger a refresh of the groups from the external application. This action pulls the latest group information (including group names and memberships) from the QTM application into Okta.
Steps:
Open the Push Groups tab.
Click Refresh App Groups. It brings groups created in the QMetry application into Okta.
It syncs the groups.
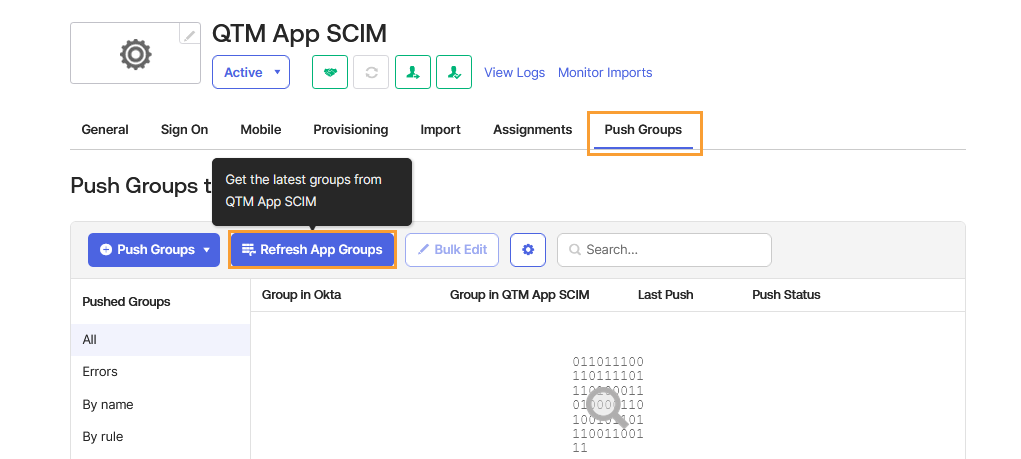
The App group import starts.
You can verify Groups under Directory > Groups.
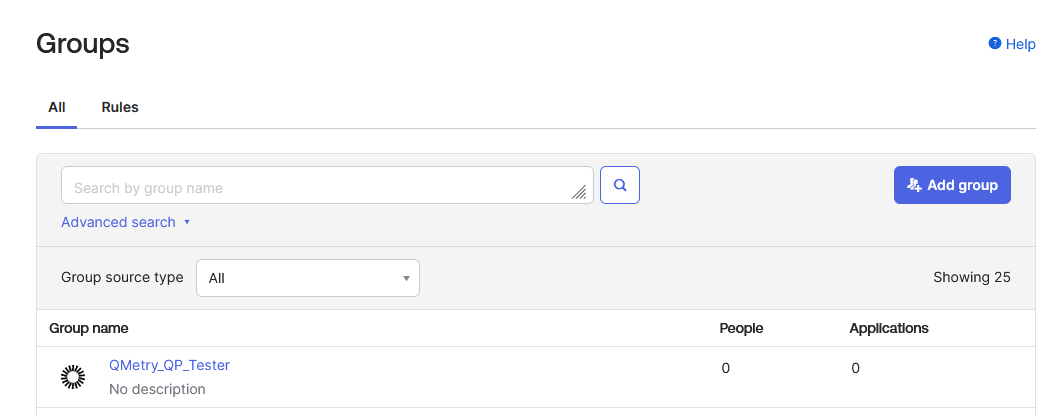
The screen displays Okta groups and App groups. The icon is the differentiator between groups created in QMetry and groups created in Okta.
Groups with the Okta icon are created in Okta, whereas Groups without the Okta icon are created in App.
You can also apply filters on Okta groups and App groups.
Once the QTM app is configured with Okta, all roles or user groups in QMetry will be synced in Okta using the following syntax:
Syntax of Group: QMetry_{ProjectKey}_{RoleName} Example: QMetry_QTM_Tester
This group's membership cannot be modified because the group is managed automatically by Okta.
Step 8. Create a New Group in Okta
You need to create a Group in Okta for the QMetry project and role mapping.
Steps
Go to Directory > Groups.
Click on the Add Group button.Click on the Add Group button.
Enter the Name of the group. The following is the syntax of the Group Name:
QMetry_{ProjectKey}_{Role}Click Save.
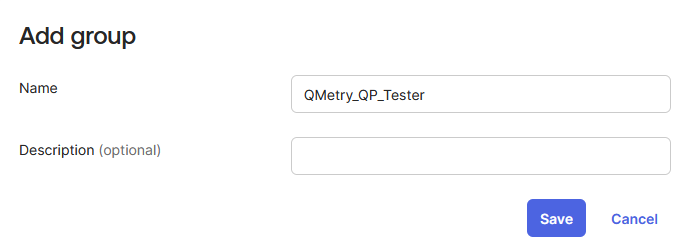
The Group is added to the list.
Step 9. Assign an App Integration to a Group
When app integrations belong to the same group, they are considered "linked." This feature can be particularly useful when there's a need to incorporate provisioning functionality within an SSO-enabled app integration.
Steps
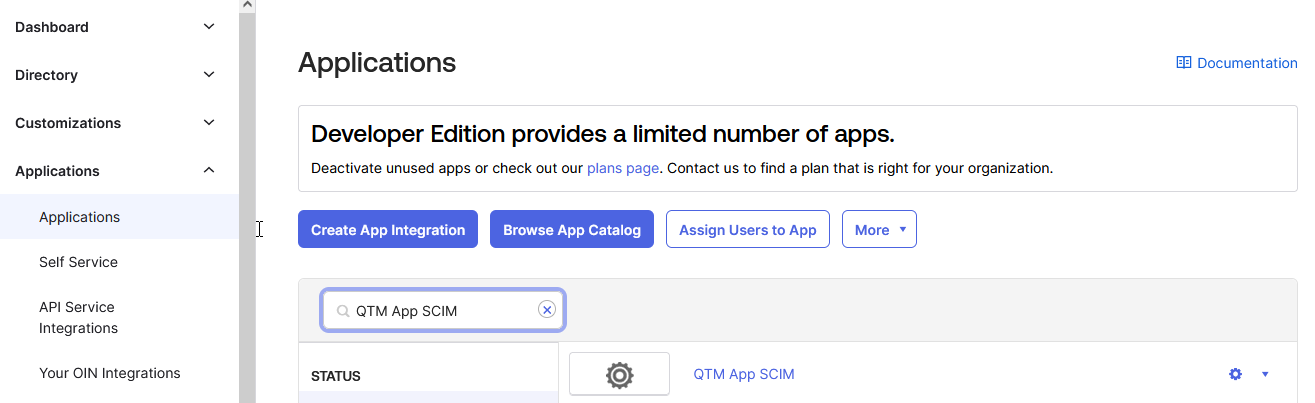
In the Admin Console, go to Applications > Applications.
Locate the app integration on the list. You can search for the app integration using the Search field if the list is long.
Open the app integration once you locate it.
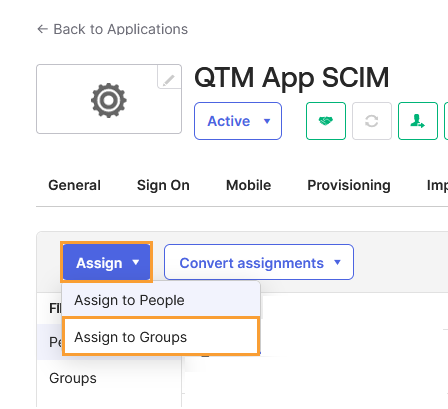
Open the Assignments tab.
Click Assign and select Assign to Groups.
Locate the group to which you want to assign the app integration and click Assign.
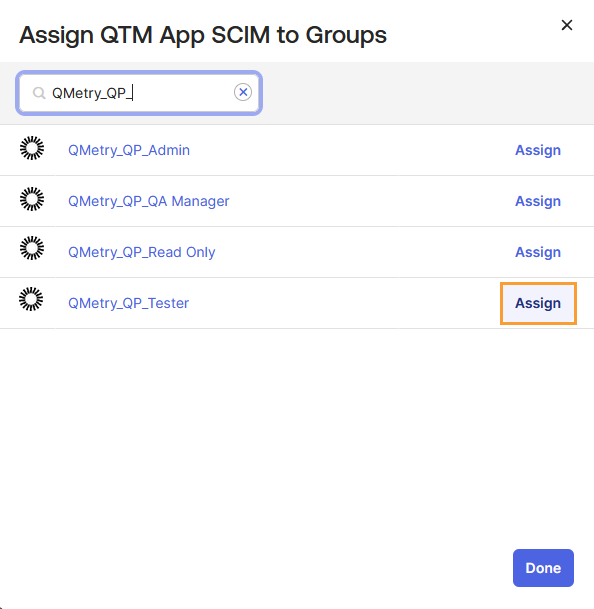
Verify the attributes set on the Assign <application name> to Groups dialog.
Click Save and Go Back.
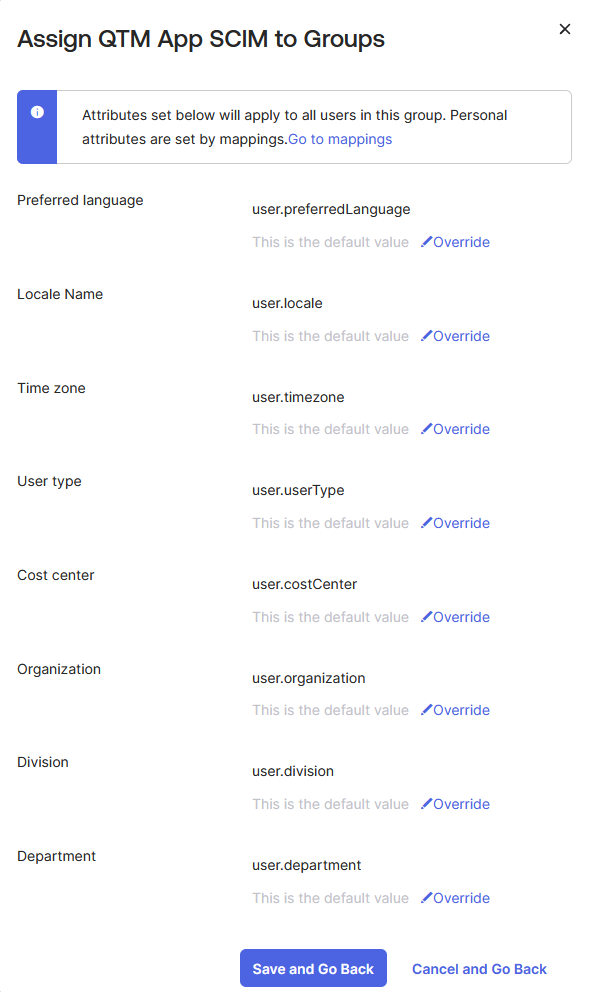
The Assign button transforms into "Assignment" and becomes disabled, signifying that the app integration has been assigned to the group.
Click Done.
The app integration is assigned to the group, and subsequently, it is also assigned to each user within that group. Each user's assignment type for the app integration is categorized as Group, and this information can be accessed from the Assignments tab of the integration.
Open the Groups tab.
You can see the assignment for the group.
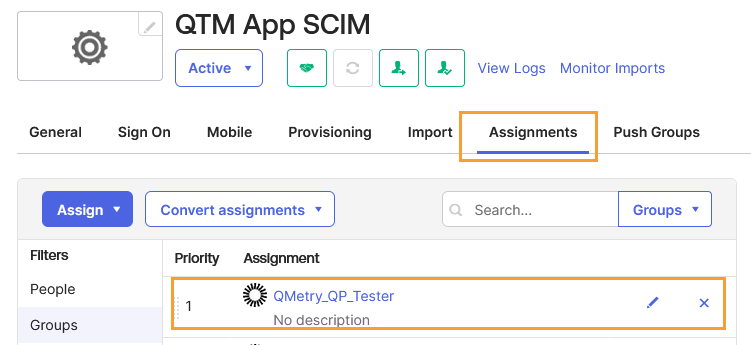
Step 10. Push Groups
You can set up group push in SCIM from Okta to the QTM application, which allows automated management of group memberships across Okta and QTM.
Once SCIM is enabled for your Okta organization and you have configured the SCIM app for the QTM application, you can then configure Group Push.
In Okta, configure group push settings for the SCIM app associated with the QTM application. This involves specifying which groups should be pushed to the application and mapping Okta group attributes to corresponding attributes in the QTM application.
Steps
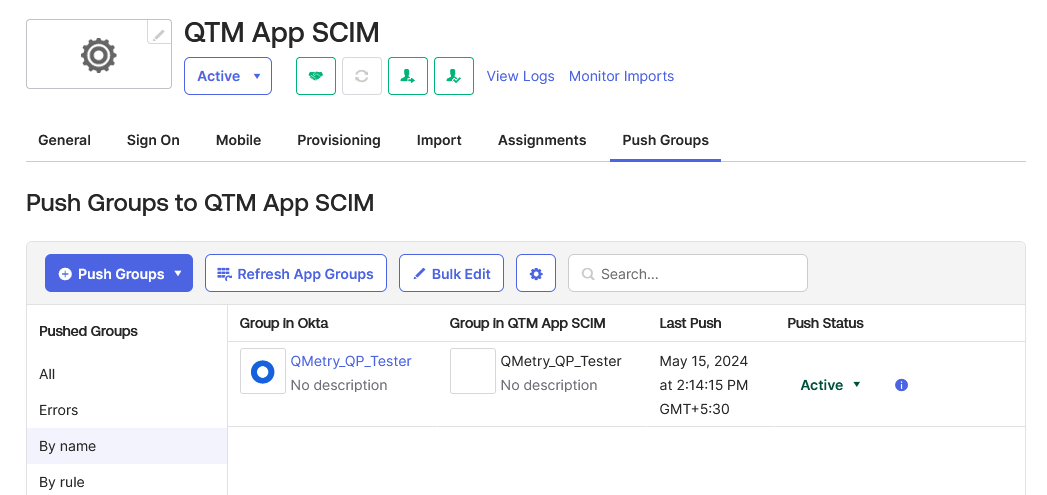
Open the Push Groups tab for the app.
Open the Push Groups drop-down and select Find groups by name.
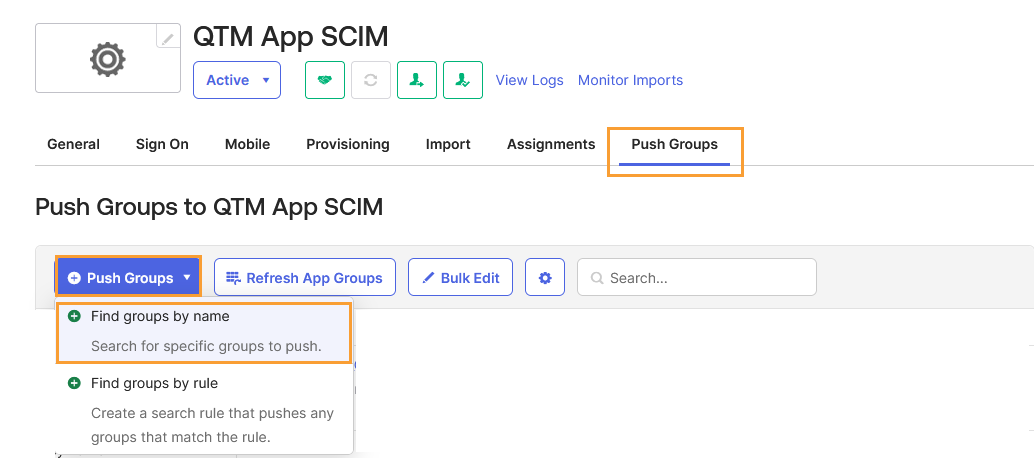
Search the group name.
The relevant names will prompt. Select the applicable one.
Select Push group memberships immediately.
Click Save.
You can see the group created in Okta.
Match result and push action: Select Link Group under this section. If a match is found in the QTM Role, it will get linked to the group.
Click Save to save the settings.
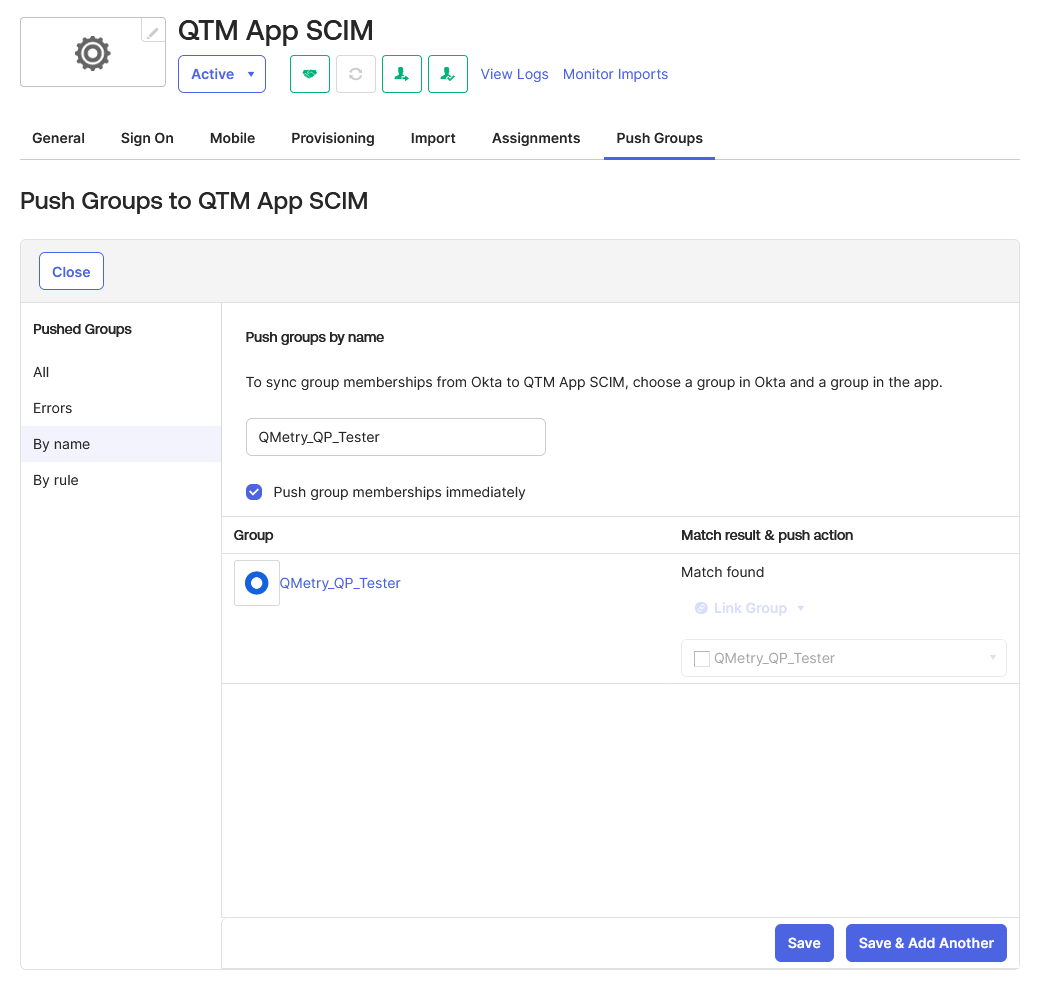
The group gets linked automatically.
Step 11. Assign People to a Group
You can assign people to a group in Okta, which allows you to manage access permissions and group-based policies effectively within your organization.
Steps
Log into Okta with an Admin account.
Go to Directory > Groups.
Locate the group on the list. Search the group name using Search if the list is long. You can also use the Advanced Search.
Open the group by clicking on it.
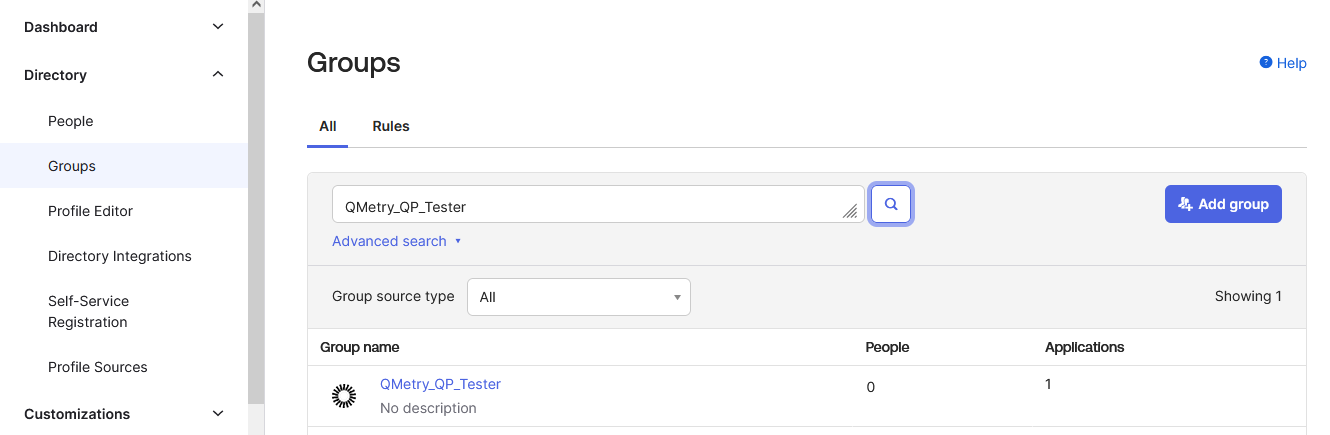
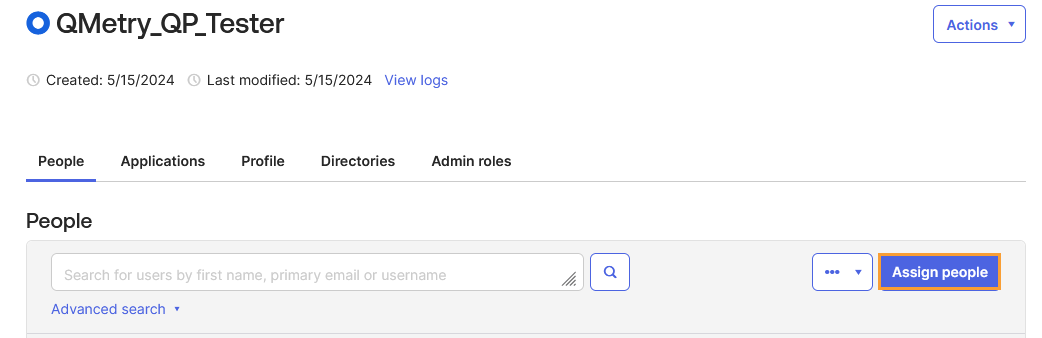
Click on the Assign people button to assign the person to the group.
Click on the “+” icon to add people to the group.
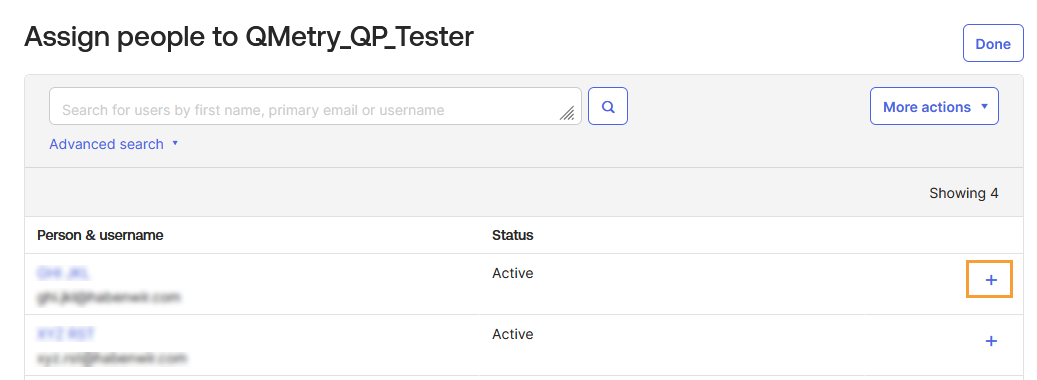
The user is assigned to the group. Once you assign people to the group, their status will show “Assigned”
Click Done to return to the People tab.
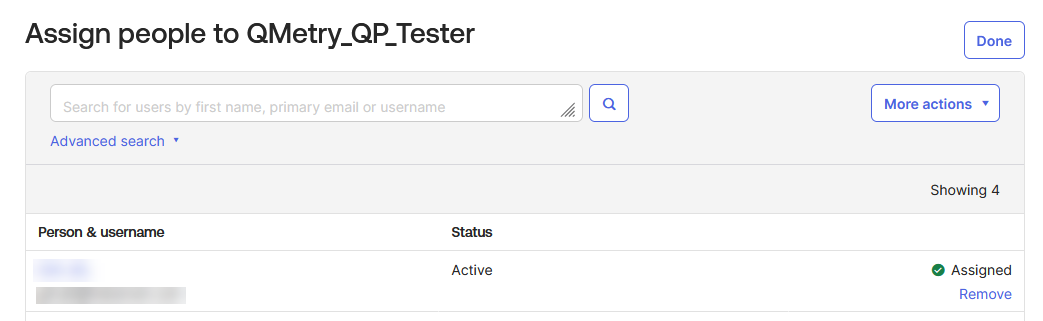
You can verify the people assignment in the group from the Assignments tab > People section.
Step 12. Verify Users in QMetry
Once a group is assigned to a user in Okta, based on the Project Name and Role Name mentioned in the group name, users will be created and assigned in the QTM instance.
Users are created in QTM with their attributes of username, alias, first name, last name, and email.
Users with the “QMetry” Authentication type receive an email with the username and temporary password to log in to QMetry. Users can then reset their password.
When the users in Okta don’t have any groups or the group is not pushed in Okta, on assigning the Okta application to these users will create a user in QMetry without having any projects assigned to them.
As a best practice, the default project and role must be switched off while SCIM is enabled.
Only the Super Administrator can create, delete, update user details, assign a project, unassign a project, activate or deactivate users, and delete users.
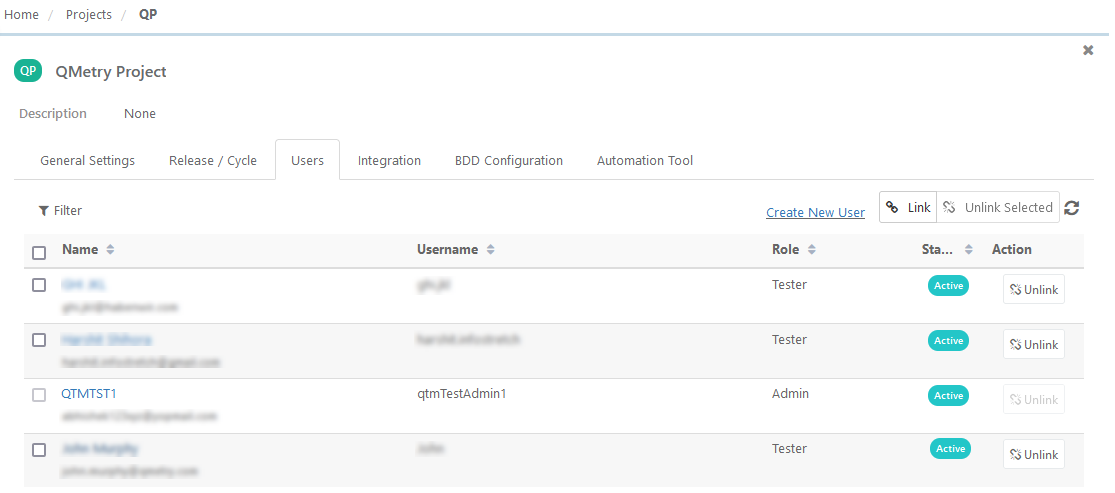
In the QTM instance, you can see the users are added to Customization > Users.

Users are also assigned to the project with the role.Users are also assigned to the project with the role.
Go to Projects.
Open the Users tab.
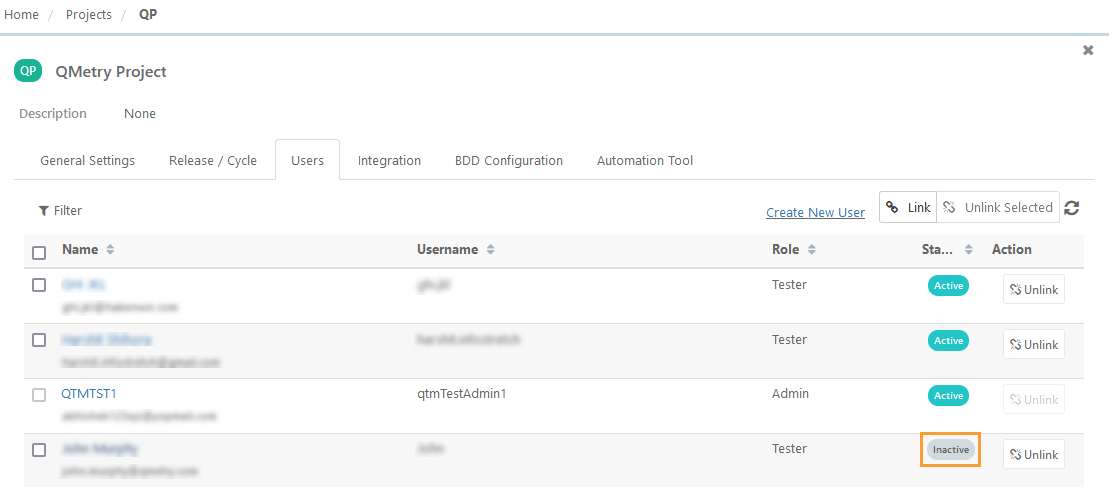
If a user is inactivated/removed from Okta, the Status appears as “Inactive” if the user does not have any other projects assigned to them.
View Audit Logs
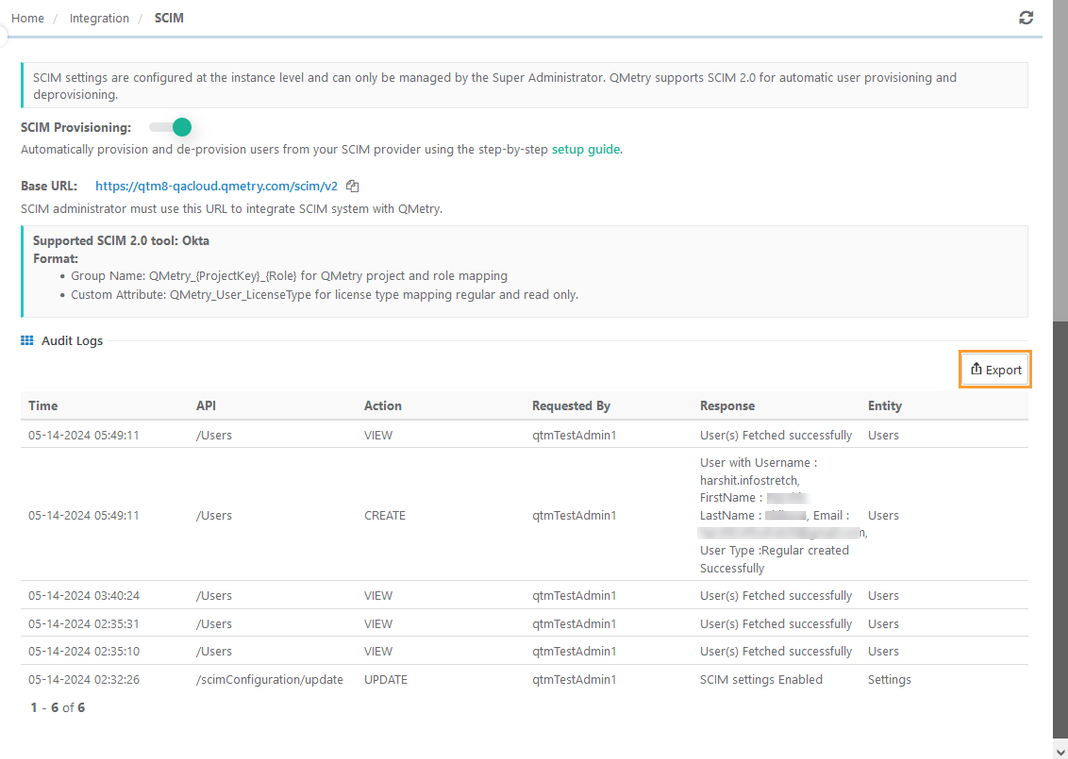
Audit logs are captured for all the operations like enabling or disabling SCIM settings, project assignments, user creation, user deactivation, and user updates done for SCIM.
Go to Integration > SCIM to view the audit logs.
To export the logs into Excel, click on the Export button.
Scenarios when SCIM is Enabled in Okta for QTM Instance
The following are some use cases when SCIM is enabled for the QMetry project.
In QMetry, these user details can be updated Username, Alias, First Name, Last Name, and Email.
Update Project Assignments for usersPush Group.
Go to Okta > Directory > Group.
Open the People tab.
Remove the user from the existing Group.
Push Group.
How will the user get deactivated?
From Okta > Application > Assignments > People
Go to Okta > Applications > Applications.
Open the Application.
Open the Assignments tab
Select the People section.
From the list of users, remove the user that you want to deactivate.
From Okta > Directory > People
Go to Okta > Directory.
Select the People section.
Open More actions drop-down and select Deactivate.
Open More actions drop-down and select Deactivate.
What operations will be prohibited from QMetry for other users (i.e., users other than Super Admin)?
Any other user, regardless of their role or permissions, will be unable to create, update users, or assign/unassign users to projects.
Users can not edit self-details of Username, First Name, Last Name, and Email.
In Project, the Add new LDAP/SAML users to this Project option will be disabled.
Users can not activate or deactivate other users.
Other users cannot do User Role Assignment and cannot edit Role Title.
The Authentication Type cannot be changed.
The Make this the default role for new LDAP/SAML users option will be disabled.
When a new project or new role is created, sync the newly created project or role.
Go to Okta > Applications > Applications.
Open the Push Groups tab and click on the Refresh App Groups button.
How to sync a non-synced user?
Go to Okta > Applications > Applications.
Open the Assignments tab.
Click on the Provision User button to sync non-synced users.
Scenarios When SCIM Is Disabled in Okta for QMetry
When SCIM is disabled, Okta no longer manages user provisioning or deprovisioning for QMetry.
User creation, updates, and project assignments must be done manually in QMetry.
Automatic synchronization of users and groups between Okta and QMetry stops.