General Settings and Audit
Use General Settings and Audit to configure instance-level settings that apply to all users in QMetry. The screen has three tabs:
General Settings. Configure security, session, and workflow settings.
Audit. Set the log retention policy and download audit logs.
Configure Logo. Upload a logo for PDF, Word, and email exports.
Note
You need the Customization package to modify these settings.
 |
General settings tab
Paging
Set the maximum number of records that appear per page in the grid. The maximum value is 100 records per page.
Note
The Records initially loaded value in Default User Settings cannot exceed the Page Limit set here.
Maximum login attempts
Set the maximum number of times a user can attempt to log in before QMetry locks the account. Enter the value in the Login Limit field. This is applicable for QMetry user(s) only.
Account reactivation after failed login
Once you hit the maximum Login Limit, your account gets deactivated. Use Re-activate after to set how many minutes the account stays locked before it can be reactivated.
If the account is locked, you must wait for the reactivation period to pass or contact your administrator.
Idle session timeout
Configure how long a user can stay inactive before QMetry logs them out. This setting applies to QMetry, LDAP, and SSO authenticated users.
To configure idle session timeout, do the following:
Go to Customization and select General Settings and Audit.
On the General Settings tab, locate Idle Session Timeout Settings.
Turn on Activate Idle Session Logout.
Enter the inactivity period in minutes. You can set a value between 15 and 240 minutes. The default is 60 minutes.
Select Save.
When the toggle is Off (default), QMetry logs the user out only when the browser closes, when the connection is lost, or when the user logs in on another browser or device.
Note
Logout activity is recorded in the Login Summary Dashboard.
Password expiry
Password expiry period
Set the number of days after which passwords expire automatically.
To configure password expiry, do the following:
Turn on Expiry Time Period.
Enter the number of days in the Days field.
Select Save.
Password expiry notification
You can also configure the Password Expiry Notification period to email users before their password expires.
Note
Only QMetry-authenticated users (non-LDAP and non-SAML) receive password expiry email notifications.
The notification period must be shorter than the password expiry period.
If you do not have the Customization app, the system defaults to five days before password expiry.
Approval and closure workflow
Configure the number of approval levels and users per level for reviewing requirements, approving test cases and test runs, and closing test runs. This setting is available only if the eSignature feature is enabled.
Setting | Description |
|---|---|
Maximum levels | The maximum number of approval levels. You can add up to five levels. Once levels are added, you cannot reduce the maximum below the number of levels already configured. |
Maximum users per level | The maximum number of approvers, reviewers, or closers per level. You can add up to 50 users per level. Once users are added, you cannot reduce the maximum below the number of users already assigned to a level. |
Approver/closer notification frequency | The number of days between reminder emails sent to approvers and closers for pending actions. |
Initially the Maximum Levels is set as 5. Admin has added 4 levels. Now, the Admin cannot make the Maximum Level 3.
Initially the Maximum Users per Level is set as 25. Admin has already added 20 approvers. Now, the Admin cannot make the Maximum Users per Level 15.
Edit Execution Time
Control whether users can change the date and time of a test execution after it is recorded.
Turn on Allow manual edit of last executed date/time to make the Executed At field editable on the Execution screen. Users can then change the date and time for individual test cases or in bulk using Bulk Operations.
Select Save to apply all general settings.
Audit tab
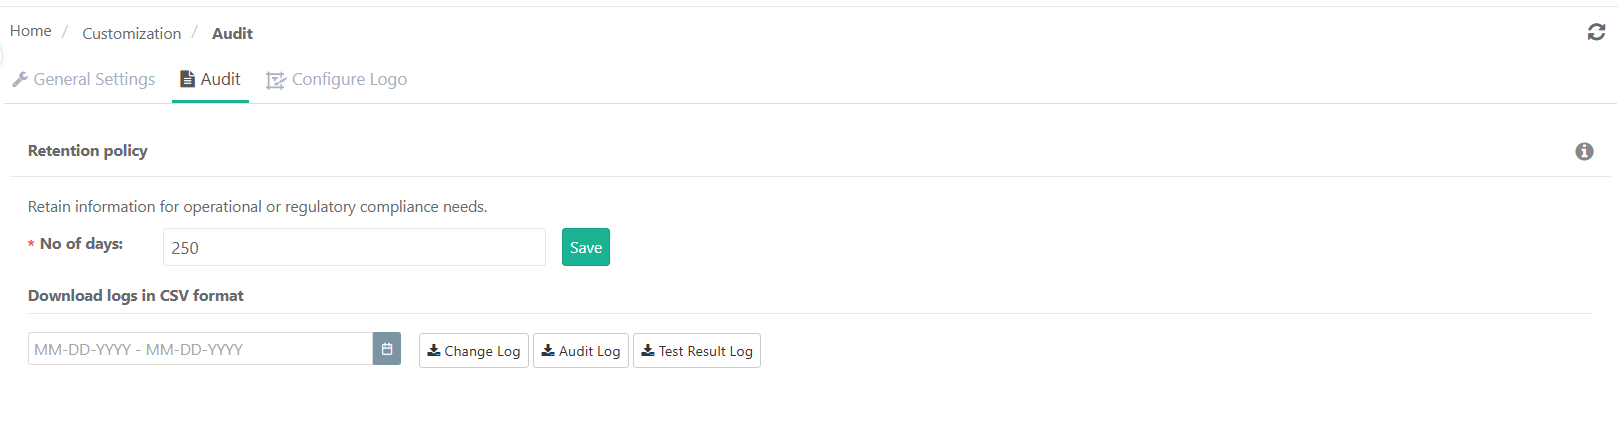
Use the Audit tab to set how long QMetry retains audit and change logs, and to download logs for a specific date range.
Note
You need both the Customization and Audit and Compliance packages to modify audit settings.
Retention Policy
The retention policy controls how many days QMetry keeps audit logs, change logs, test result logs, and eSignature logs. This is useful for organisations in regulated industries such as life sciences and pharmaceuticals that must retain records for compliance.
To set the retention period, perform these steps:
Go to Customization and select General Settings and Audit.
Select the Audit tab.
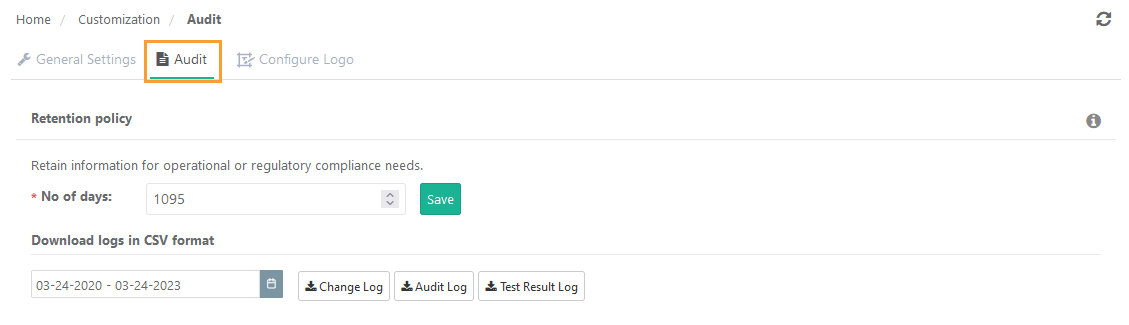
Under Retention Policy, enter the number of days in the No of days field.
Select Save.
Note
You can set a value between 30 and 1,095 days. The default is 180 days.
If you increase the retention period, QMetry makes data available going forward from the change date. If you increase the retention period, data from the date of the change onwards is retained for the new period. Data beyond the previous retention limit in the past is not available and cannot be recovered.
Download Logs
You can download audit logs, change logs, and test result logs as CSV files for any date range within the retention period.
To download the logs, perform these steps:
On the Audit tab, select the date range using the calendar.
Select Change Log, Audit Log, or Test Result Log to start the download.
Select the notification icon on the header. A list of activities appears.
Select Scheduled Tasks. The screen shows all completed and queued activities.
Expand the audit log activity to check its progress. Select the Download icon to save the file.
Configure Logo tab
Add your organisation's logo to PDF and Word exports, system reports, custom dashboards, scheduled reports, and email notification templates.
Note
You need the Customization app to access this feature.
Email notifications always use the logo configured at the instance level, regardless of project-level settings.
Logos uploaded in the past are not preserved when you upload a new one.
Events of upload or change the logo on the Instance or Project level are captured in the Audit Logs
Required Permissions
Instance-level settings: You must have the Customization Modify permission to configure instance-level settings.
Project-level settings: Admins must first enable project-level configuration at the instance level. After enabling, you must have the Project Modify permission to configure project-level settings.
Note
Project settings are given higher preference than Instance settings.
The logo must meet the following specifications:
Format: JPG or PNG.
Orientation: horizontal (recommended 144 x 50 px).
Background: white or transparent.
Maximum file size: 1 MB.
Configuring the logo at instance level
To configure the logo at the instance level, do the following:
Go to Customization and select General Settings and Audit.
Select the Configure Logo tab. The QMetry logo appears as the default.
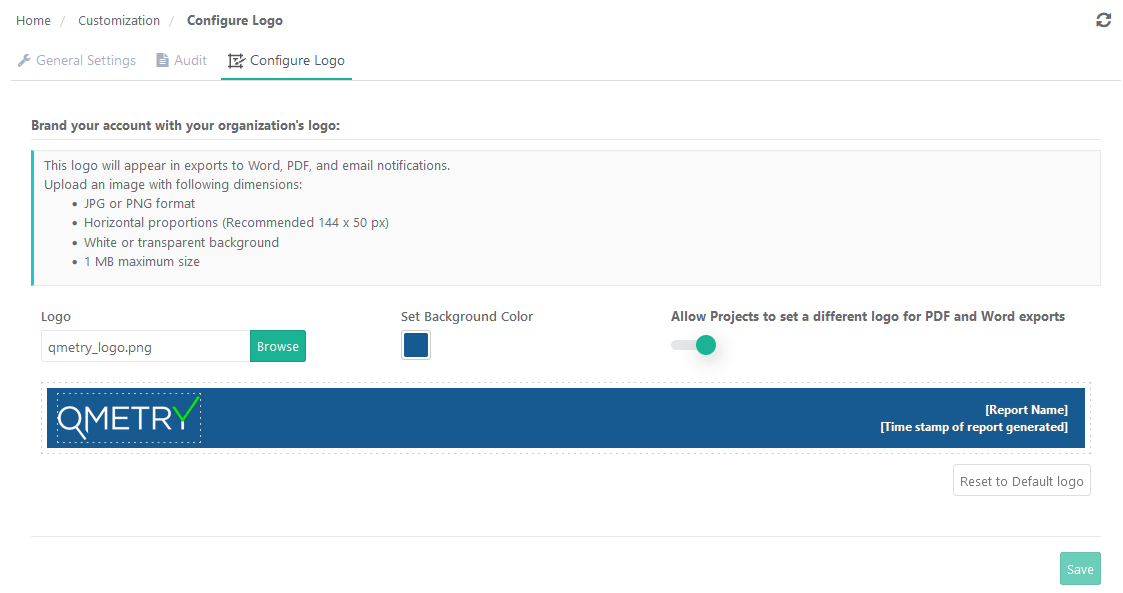
Select Browse and upload your logo. A preview appears on the screen.
Select Set Background Color to set the logo background colour.
To let project admins use a different logo for their project exports, turn on Allow Projects to set a different logo for PDF and Word exports.
Select Save.
To revert to the default QMetry logo at any time, select Reset to Default Logo.
Configure logo at project level
Project admins can set a project-specific logo for test case exports, test execution exports, exploratory testing reports, system reports, custom dashboards, and scheduled reports. This option is available only if a system admin has enabled Allow Projects to set a different logo for PDF and Word exports at the instance level.
To configure the logo at the project level, do the following:
Note
Email notifications will always display the logo configured at the instance level.
Go to Project Management, and select Projects.
Select the Configure Logo tab. The QMetry logo appears as the default.
Select Browse and upload your logo. A preview appears on the screen.
Select Set Background Color to set the logo background colour.
Select Save.
To revert to the default logo, select Reset to Default Logo.
Set API usage alerts
Super admins can configure email alerts that fire when hourly or daily API usage exceeds a set threshold. These alerts help you monitor and control usage of the Open API and Automation API.
Use Case: Configuring email alerts for hourly and daily API usage will enable effective monitoring and optimization of API usage.
Note
Total API Utilization Reports are available under Login Summary Dashboard
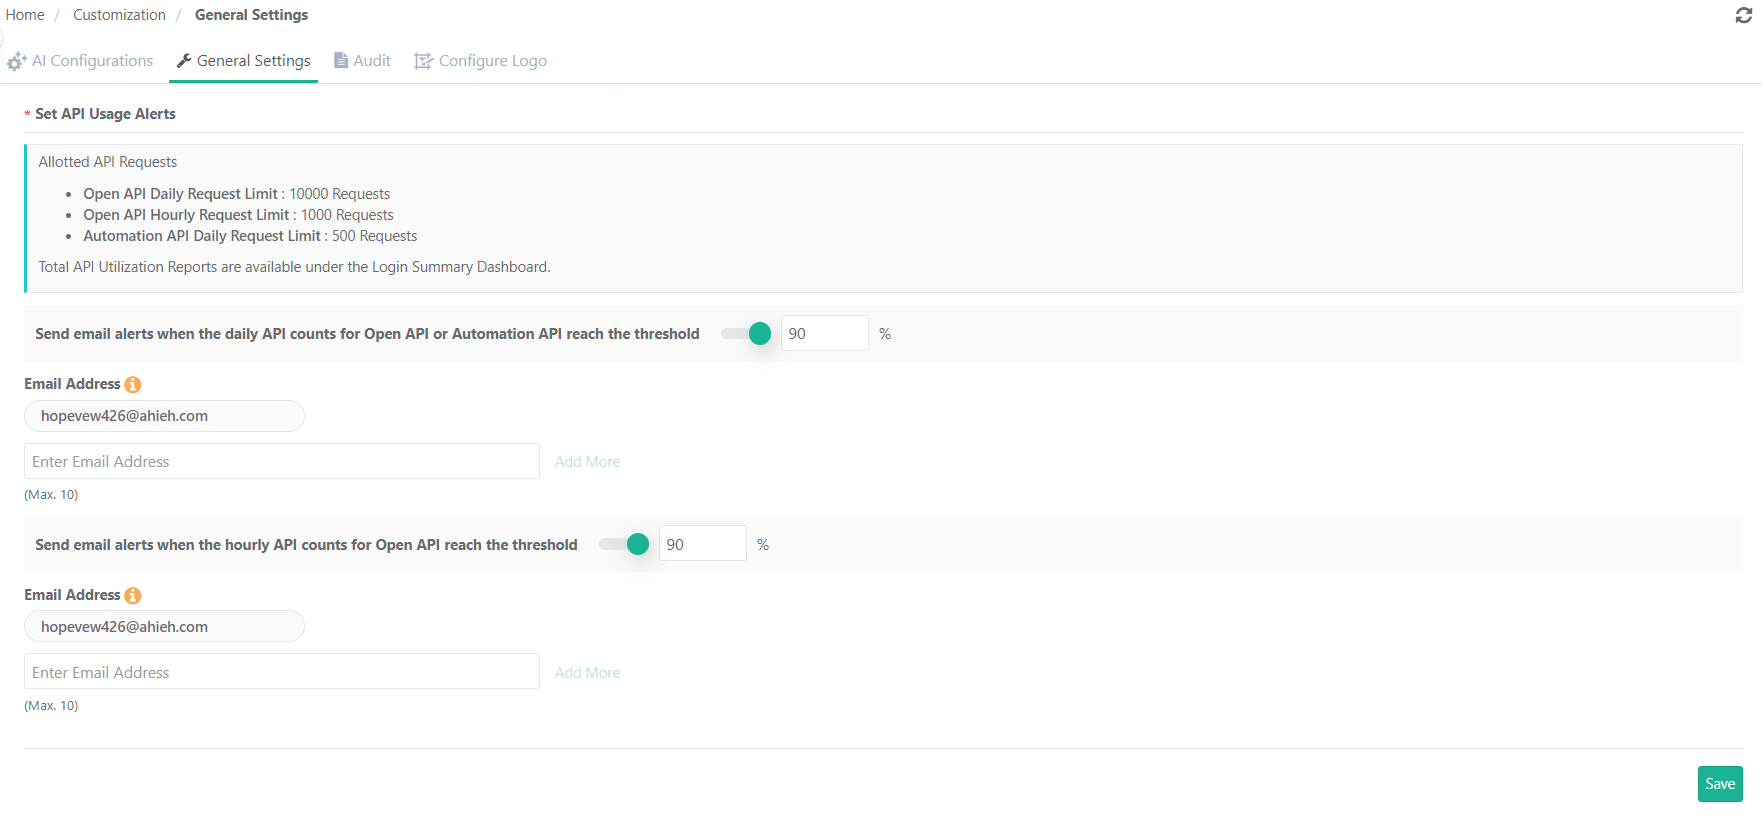 |
The super admin can configure email alerts for the following scenarios:
Alert Type | Applies to |
|---|---|
Daily API usage alert | Open API and Automation API. |
Hourly API usage alert | Open API only |
Note
Total API utilisation reports are available in the Login Summary Dashboard. If the Integration app is not subscribed, Open APIs are not available.
To configure API usage alerts, perform these steps:
Go to Customization and select General Settings.
Locate the API Usage Alerts section.
To configure daily alerts
Turn on Send email alerts when the daily API counts for Open API or Automation API reach the threshold.
Set the threshold percentage. The threshold must be between 10% and 100%. The default is 90%.
Add the email addresses to receive daily alerts. You must add at least one address. You can add up to ten addresses.
To conflgure hourly alerts
Super admins must turn on Send email alerts when the hourly API counts for Open API reach the threshold.
Set the threshold percentage. The threshold must be between 10% and 100%. The default is 90%.
Add the email addresses to receive hourly alerts. You must add at least one address. You can add up to ten addresses.
Select Save.
Note
The super admin receives alerts by default. You can add up to ten additional email addresses per alert type.
Open APIs are available only if Integration app is subscribed.