Import Automation Results through REST API
Import automated test results into QMetry using the REST API. This reference describes how to generate an API key, make an import call, and pass user-defined fields for test cases, test suites, and test runs.
Note
A maximum of 500 automation API calls per day per instance is enforced for cloud deployments.
Automation API details
To generate your API key and make your first import call, perform the following steps:
Generate the Automation API key.
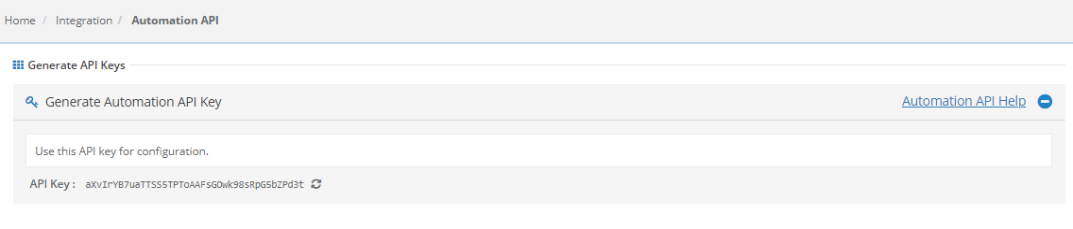
Log in to QMetry.
On the Integration menu, select Automation API.
Copy the Automation API Key.
Use the following details to make your API call.
REST API URL: (For Cloud Customers) https://testmanagement.qmetry.com/rest/import/createandscheduletestresults/1
Method: Post
Header Details:
The following table describes the header parameters:
Parameter
Value
Required
projectProject key, project name, project id or default.
Yes
apikeyCopy the API key from the screen.
It's an autogenerated key that is specific to a user login.
Yes
Body parameters
The following table describes the body parameters. Rows highlighted in the table indicate behavior that changes when you import results with a Custom Automation Import Template.
Name
Located in
Required
Description
Default
Schema
fileformData
yes
The result file to upload.
Supported file extensions: .json, .xml and .zip
(zip file must contain files of the format given in the
entityTypeparam)You can import result files up to 30 MB using API Automation.
When you import with a Custom Automation Template, only .xml files are supported.
-
string
entityTypeformData
yes
Supported formats:
TESTNG or CUCUMBER or JUNIT or HPUFT or QAF, ROBOT, XMLCUSTOM
-
string
customTemplateName
formData
Required only when Format is XMLCUSTOM.
Exact name of the Template defined under Custom Automation Templates.
automationHierarchyWhen you import with a Custom Automation Template, QMetry ignores this parameter.
formData
no
Applies only to TestNG and JUnit
Define the hierarchy of a Test case i.e. Test Case-Test Step, Test Case or Test Suite-Test Case.
For TestNG
Create Test Case-Test Step. The <class name> tag under the <test> tag is referred to as Test Case and <test-method> tag as Test Step. (The default value is 1) Create only a Test Case. The <test-method> tag is referred to as Test Case. Create Test Case-Test Step. The <name> tag under the <test> tag is referred to as Testcase and <test-method> tag as Test Step
JUnit
1. Create Test Case-Test Step. The <testsuite> tag is referred to as Test Case and tag <testcase> as Test Step. (The default value is 1)
JUnit File Type 1
The test suite name matches the test case classname.
Test Suite contains test cases as per the <testsuite> tag with steps
as per the <testcase> tags.
QMetry creates only one version of the test cases, with multiple test steps.
JUnit File Type 2
The test suite name does not match the test case classname.
The test suite contains multiple versions of the same test case, linked as per the testsuite tag.
The number of versions matches the occurrences of the <testcase> tag.
Each test case version has atleast one test step.
2. Create a Test Case. The <testcase> tag is referred to as a Test case. If you import multiple JUnit files, QMetry creates a single test suite with the test cases of all the files combined.
3. Create Test Suite-Test Case. The <testsuite> tag is referred to as Test Suite and the <testcase> tag as Test Case.
1
string
testsuiteNameformData
no
The test suite name to use. If not provided, QMetry creates an auto-generated name with a UTC timestamp.
QMetry ignores this parameter, if any of the following cases stands true:
When automationHierarchy is 3 for JUnit or 2 for Robot (multiple test suites).
When the custom template maps Test Suite Summary. In this case, QMetry autogenerates the name from the mapping.
-
string
testsuiteIdformData
no
The ID or entity key of an existing test suite to reuse.
QMetry ignores this parameter, in any of the following cases:
When automationHierarchy is 3 for JUnit or 2 for Robot (multiple test suites).
When you import with a custom template, use this parameter to link results to an existing test suite.
-
string
tsFolderPathformData
no
Folder path for new test suites.
QMetry creates if it does not exist and ignores when the test case is reused.
-
string
tcFolderPathformData
no
Folder path for new test cases.
QMetry creates if it does not exist and ignores when the test case is reused.
-
string
platformIDformData
no
Target Platform Id or Platform Name.
Fetch
platformIDwith the List Platform API.Get Platform Name from detail view of target Platform.
No Platform
string
projectIDformData
no
Target project ID, project key, or project name. If passed, it overrides the project value in the header. Fetch the Project ID with the List Project API.
-
string
releaseIDformData
no
Target
Release IDorRelease name. PassprojectIDwhen you passreleaseID.Fetch the
Release IDusing List Release API.-
string
cycleIDformData
no
Target
Cycle IDorCycle Name. PassCycle IDandprojectIDtogether.Fetch
Cycle Idwith the List Cycle API-
string
buildIDformData
no
Target Build ID or Build name.
Fetch the
Build idwith the List Build API from list detail of the target Project.-
string
testcase_fieldsformData
no
System-defined fields and user-defined fields for rhe test case in JSON.
Include all mandatory fields other than Summary.
Ignored when an existing test case is reused.
-
JSON
testsuite_fieldsformData
no
System-defined and user-defined fields for the test suite in JSON.
Applied on every import. If provided, existing values are overwritten; if not provided, existing values are retained.
-
JSON
testrunudfformData
no
User-defined fields for the test run in JSON.
Applied on every import.
If provided, existing values are overwritten. If not provided, existing values are retained.
Test Run UDF values specified during import are applied to all executions created during the automation run.
-
JSON
skipWarningformData
no
0 - The import fails if the result file contains a test case summary with more than 255 characters.
1 - QMetry truncates the summary to 255 characters.
0
string
is_matching_requiredformData
no
True - QMetry creates a new test case or version when the summary and steps do not match.
False - QMetry reuses the linked test case version when the entity key or summary matches, and updates the execution status.
True
string
Note
When you import with a custom template, all other parameters behave as they do for the default frameworks. The template name must exactly match a template defined in Custom Automation Templates, and the result file must be in XML format.
Post-import behaviour
The following table describes what happens after the file is imported, depending on which parameters you passed.
Parameters passed
Result
If only File format and entityType were passed as part of the body
A new auto generated Testsuite will be created with UTC timestamp. "No Platform" would be linked as Platform. Test cases would be auto linked and execution results would be updated.
If only File format, entityType and platformID were passed as part of body
A new auto generated Testsuite will be created with UTC timestamp. Platform would be linked as per platform id. Test cases would be auto linked and execution results would be updated.
If only File format, entityType, platformID and testsuiteId were passed as part of body
Test cases would be auto linked and execution results would be updated in the respective Testsuite that was provided.
If only File format, entityType and testsuiteId were passed as part of body
Test cases would be auto linked and execution results would be updated in the respective Testsuite that was provided. No Platform would be linked to the Test suite.
Supported Fields
The following rules apply to lookup list and multi-lookup list fields:
Use the Field Name as shown in QMetry > Customization > Manage Fields > Field Name. The following rules apply to lookup list and multi-lookup list fields.
If the value does not exist in the project and auto-create is enabled, the value is added to the list and assigned to the test case.
If the value does not exist in the project and auto-create is disabled, the value is not added and the field is blank or set to its default value.
When you add a new value to a multi-look up list, the existing values are retained and the new value is added.
List values are added to the same version of test case.
System Fields
The following table describes the system fields that you can set for a test case or a test suite.
Field | Example | Test Case | Test Suite | Notes |
|---|---|---|---|---|
component | "component" : ["Label1, "Label2"] | Yes | No | Old values persist and new value is added. e.g., L1 and L2 are set and L3 is assigned, then the updated values for component will be L1, L2 and L3. |
priority | "priority" : "Minor" | Yes | No | Behaves as described for lookup and multi-lookup lists. |
testCaseState | "testCaseState":"Open" | Yes | No | Set as requested. |
testCaseType | "testCaseType":"Automated" | Yes | No | Set as requested. |
testcaseOwner | "testCaseOwner":"John" | Yes | No | Pass the user alias in the request. QMetry does not set the owner if it cannot find the user or if the user lacks rights to the Test Case module. |
description | "description":"Sample Description." | Yes | Yes | Set as requested. |
estimatedTime | "estimatedTime": "2h:3m:1s" or "4h" or "7m" or "0s" | Yes | No | Set as requested. The allowed value of estimated time is from 0 to 99999 minutes. |
testSuiteState | "testSuiteState":"Open" | No | Yes | A new Status value is added if it does not exist in the project. |
testsuiteOwner | "testsuiteOwner":"lizamathew" | No | Yes | Pass the user alias in the request. QMetry does not set the owner if it cannot find the user or if the user lacks rights. |
User-defined Fields
The following table describes the user-defined field types and their validation rules.
Custom Field Type | Validation Rule | Example | Notes |
|---|---|---|---|
STRING | Accepts text on a single line | "tagName": "Sample test asset." | Set as requested. |
LARGETEXT | Accepts text in multiple lines | "additionalComment": "this is a sample test asset" | Set as requested. |
LOOKUPLIST | Accepts a single value from the list | "country": ["United States"] | Set as requested if its list value exists. Auto-create rules apply as described above. |
MULTILOOKUPLIST | Accepts comma separated values | "langaugePreference": ["English",Portuguese"] | Set as requested if the values exist. New values are added while old values are retained.
|
DATEPICKER | Accepts the Date format that has been set in user profile | "reviewedDate": "08-30-2019" | Set as requested. |
NUMBER | Accepts any number with decimal | "executionTime": 4 | Set as requested. |
Test case fields with UDFs in JSON format
{

"component":["com1", "com2"],
"priority":"High",
"testCaseState":"Open",
"testCaseType":"Manual",
"testcaseOwner":"lizamathew",
"estimatedTime":2h:3m:1s,
"description":"Sample Description",

"userDefinedFields" : {

"reviewedDate": "08-30-2019",
"executionTime": 40,
"tagName": "Sample test asset.",
"additionalComment": "This is a sample test asset",
"country": ["United States"],
"langaugePreference": ["English","Portuguese"]

}

}
Test case fields with UDFs in JSON format
{

"testSuiteState":"Open",
"testsuiteOwner":"lizamathew",
"description":"Testing 8.5.4 API Changes",

"userDefinedFields" : {

"reviewedDate": "08-30-2019",
"executionTime": 40,
"tagName": "Sample test asset.",
"additionalComment": "this is a sample test asset",
"country": ["United States"],
"langaugePreference": ["English","Portuguese"]
}

}
Test run UDF fields in JSON format
Use the testrunudf parameter to set user-defined field values for test case runs at the time of import. All field names must match the Field Name values configured under Customization > Manage Fields for the Test Case Execution module.
{

  "userDefinedFields": {
  "testrun_singleselectlist": "Open",
    "testrun_largetext":"Testing API changes.",
    "testrun_string":"Testing UDF API changes.",
    "testrun_number": 40,
    "testrun_multiselectlist": ["Hindi","English"],
    "testrun_cascading":["US", "Nevada"],
    "testrun_date": "08-30-2019"
  }
}
Import Behaviour for Test Run UDF Values
The following table describes the import result based on whether the UDF is mandatory, whether auto-create is enabled for list values at the project level, and whether the UDF value already exists.
Is System Field/UDF Mandatory? | Is Auto-Create Enabled? | Does UDF Value exist? | Import Result |
|---|---|---|---|
No | No | No | Fail |
No | No | Yes | Success |
No | Yes | No | Success |
No | Yes | Yes | Success |
Yes | No | No | Fail |
Yes | No | Yes | Success |
Yes | Yes | No | Success |
Note
If you do not provide a value for an optional UDF, the existing value is retained. If you provide a value, the existing value is overwritten.
Import XML Results with a Custom Automation Import Template
A Custom Automation Import Template is a JSON structure that maps the elements and tags in an XML result file to QMetry fields, so you can import results from frameworks that QMetry does not support out of the box. You create and manage templates in the QMetry web interface, under Integration > Custom Automation Import Templates.
To import XML results with a custom template through the REST API, do the following:
Set entityType to
XMLCUSTOM.Set
customTemplateNameto the name or ID of the template. The value must exactly match a template defined under Integration > Custom Automation Import Templates.Set
fileto an XML result file. Only XML files are supported for custom templates.Pass the remaining parameters, such as project, release, and cycle, as needed.
When the API receives the request, it verifies that the named template exists, then imports the results using the field mappings defined in the template. The automationHierarchy parameter is ignored, and testsuiteName and testsuiteId behave as described in the body parameter table above.
To retrieve the list of custom templates available on the instance, use the Open API that returns each template's name, description, JSON template, created date and time, created by, last updated date and time, and last updated by.
Import using Postman
To import test results using the Postman tool, perform the following steps:
Download and install Postman.
Open and log in to the Postman application.
Select New in the application header.
Open the Headers tab and add the header details from the Automation API details section.
Open the Body tab. Select form-data and enter the mandatory and optional parameter values.
Select Send. A success response confirms that the import completed.
After the import, verify the results as described in Step 3: Post-import results.
Code Snippets
Python Example
Pre-requisties : Python 3, pip3, requests
Download Sample Code - importResult.py file below
Sample Projects
Have a look at Sample projects sections for a more concrete end-to-end example.