Layout Management
Note
The Layout Management feature is only available if you have purchased the Customization Package.
Layout Management enables administrators to configure and organize the page layout of the Add, Detail, Bulk Edit, and Save New Versionscreens for supported modules. A system-provided default layout is available for all supported modules and serves as the baseline configuration.
Module | Default Layout Available | Is Customizable |
|---|---|---|
Requirement | Yes | Yes |
Test Case | Yes | Yes |
Test Suite | Yes | Yes |
Issue | Yes | Yes |
Test Case Run Execution | Yes | Yes |
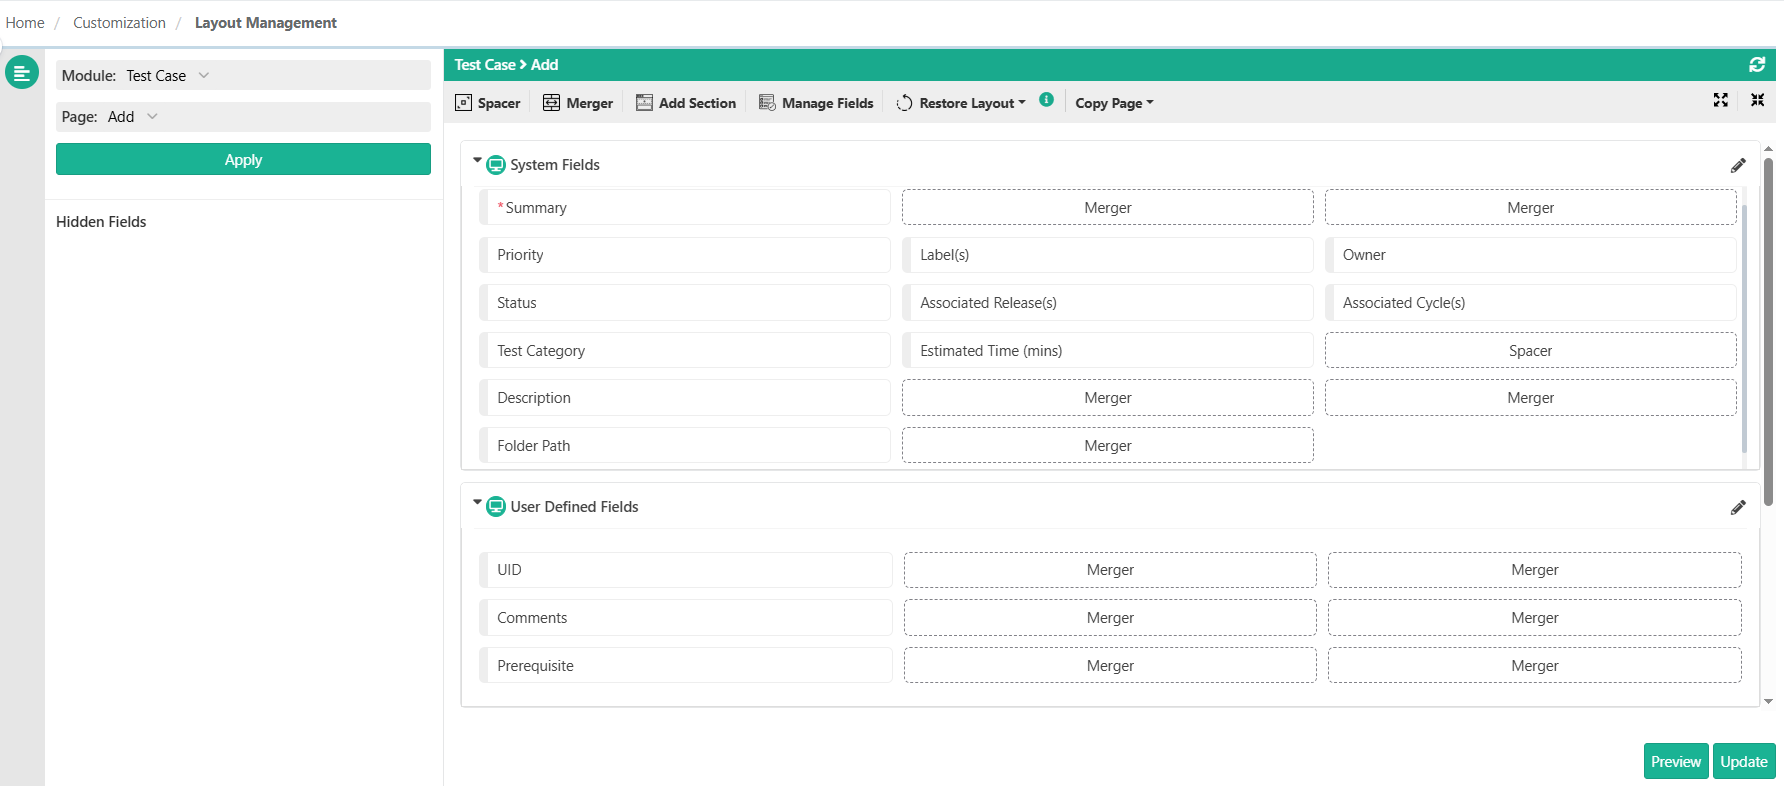
You can access Layout Management under the Customization section.
 |
Admin Configurations
Field organisation
Admins can arrange both system fields and custom (user-defined) fields within the layout. Admins can :
Group fields into named sections that are meaningful to the team.
Reorder fields within a section by dragging rows up or down.
Move fields across sections by dragging a field row from one section to another.
Admins can also reorder the sections on the page to control the visual flow of the screen.
Field visibility
Administrators can mark any field, system or custom, as visible or hidden on the page layout without deleting or deactivating the field.
Example: A QA organisation does not use the Test Category system field. Rather than leaving it on screen where it occupies space and disrupts the add and edit workflow, the admin hides it from the layout. The field continues to exist in the system and can be re-enabled at any time, but is no longer rendered on the Add or Detail screens for that module.
Page Layout
A page layout or template is a saved configuration of fields and their position for a particular screen within a QMetry module. For example, Add Test Case is a specific page within the Test Case module.
Note
The layout is managed project-wise and any change within the page layout is applicable to all users of that project.
The left panel on the Layout Management screen contains drop-down lists for Module and relevant Pages. On the selection of Module and Page, the default layout is rendered at right.
Modules | Available Page Layout |
|---|---|
Requirement | Add, Detail, Bulk, Save as New Version |
Test Case | Add, Detail, Bulk, Save as New Version |
Test Suite | Add, Detail, Bulk |
Issue | Add, Detail, Bulk |
Updating a Page Layout
You can make changes to the default page layout to suit your organization’s needs.
Select the module on the Module drop-down.
Select the Page to update the default page layout.
Click Apply.
You can use the following toolbar options to update the page layout. The options are described in detail in later sections of this document.
Toolbar options
Spacer: Click the option to drop the spacer field in the hidden fields section. Drag and drop it to the field’s desired location.
Merger: Click the option to drop the merge field in the hidden fields section. Drag and drop it to the field’s desired location.
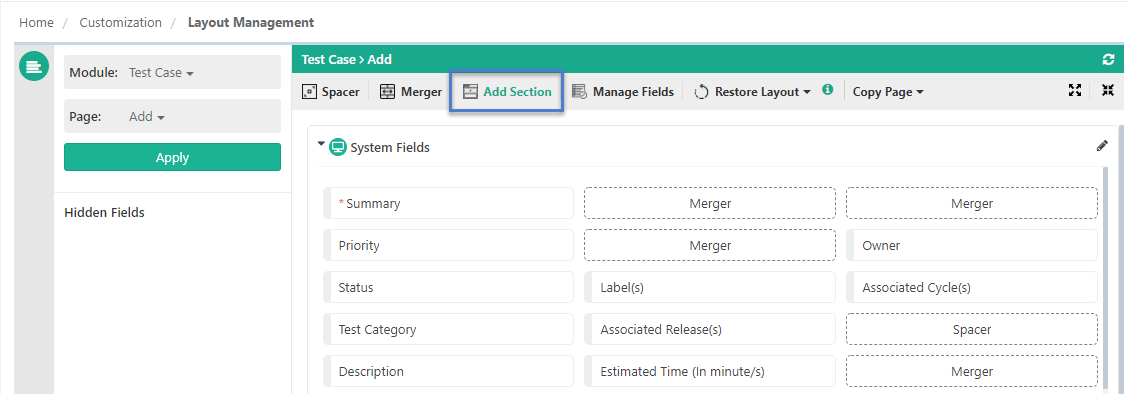
Add Section: Click to add a new section with either the "Collapsed" state or "Expanded" state on the page.
Manage Fields: The option allows the user to create and manage Manage Fields.
Collapse All/Expand All: The icons are provided to keep all the sections on the screen either collapsed or expanded.
Restore Layout: There are two options on this toolbar button:
Load to previously saved state: It will Load the layout to the state in which it was last saved.
Load to system default: It will Load layout fields out of the box default settings.
Copy Page: It allows to copy fields from another view to the current view. For example, by keeping the Add view open you can copy fields from Bulk view.
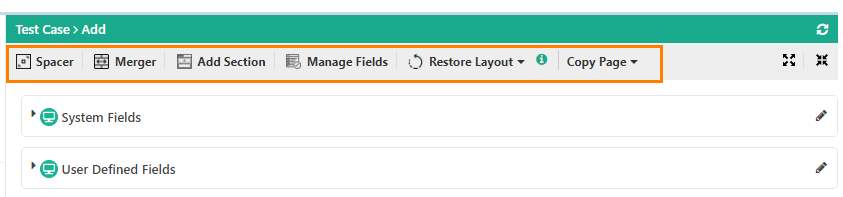
Buttons at the bottom of the page layout screen:
Preview: Click to have a preview of the module page before you save the page layout.
Update: Click to save the layout of the module page.
Configuring the Test Case Run Execution Layout
The Test Case Run Execution layout controls how you can arrange the UDFs in the Execution Run Details section of the run detail panel on the Test Suite execution screen.
Default Behaviour
When you create and project-map a new Execution Run UDF, QMetry automatically places it in the Default Section of the Test Case Run Execution layout for that project. You can start using the field immediately without any additional layout configuration.
Customising the layout
Go to Customization and select Layout Management.
Select Test Case Run Execution from the module list.
Select the project from the project picker.
Specially Treated Sections
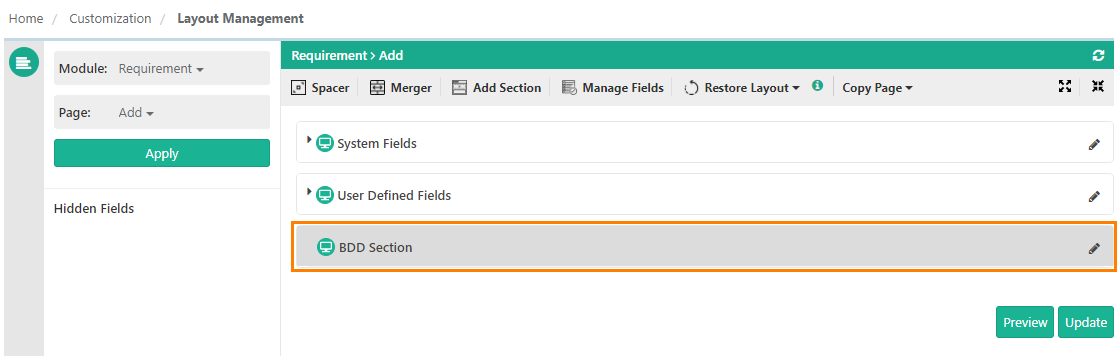
BDD section, Approval Workflow Sections and external tracker sections are treated differently. The application displays only the outline of these sections on the page layout.
You can only see the section headers on the page layout (without fields underneath the section) and can arrange these sections on the page.
If your current QMetry project is integrated with BDD, Jira, Azure, the system displays the corresponding sections on the page layout of the respective modules.
When you integrate an external tracker with the Issue module, the Issue module page layout becomes unavailable in the Layout Management.
BDD: When BDD is configured with the QMetry project
External Tracker: When an external tracker like Jira is integrated with the QMetry project
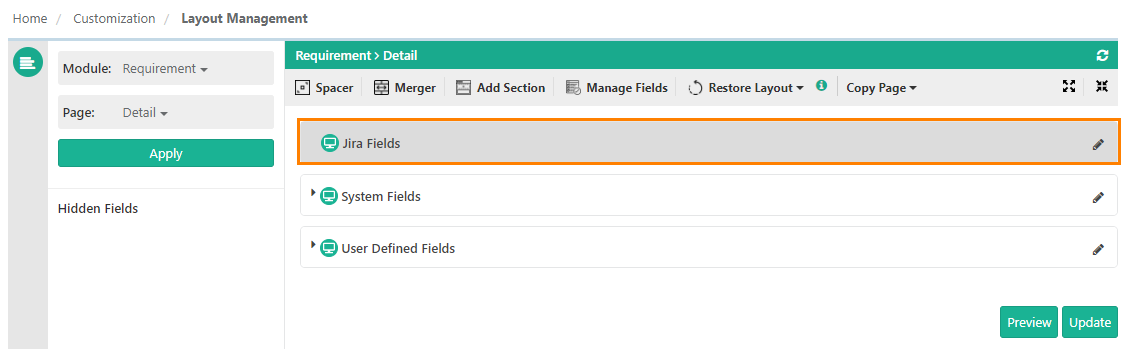
Approval Workflow: When the eSignature feature is enabled for the QMetry project

Spacer
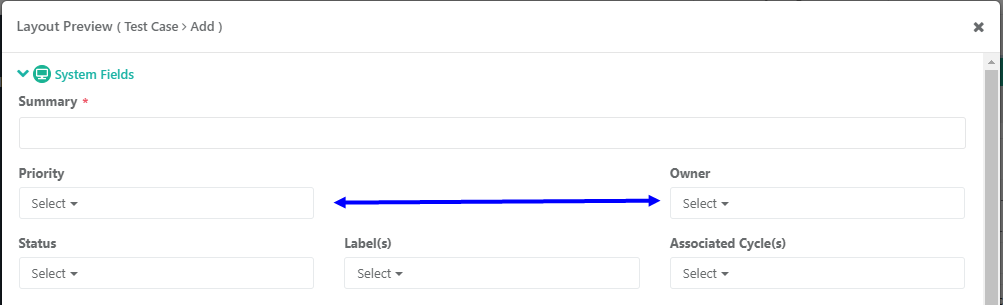
You can use Spacer to insert a space between two fields. The field size remains unchanged.
1. Click Spacer on the toolbar. The Spacer is added on the panel at left.
2. Drag the Spacer to the desired location where you want to insert space on the page.
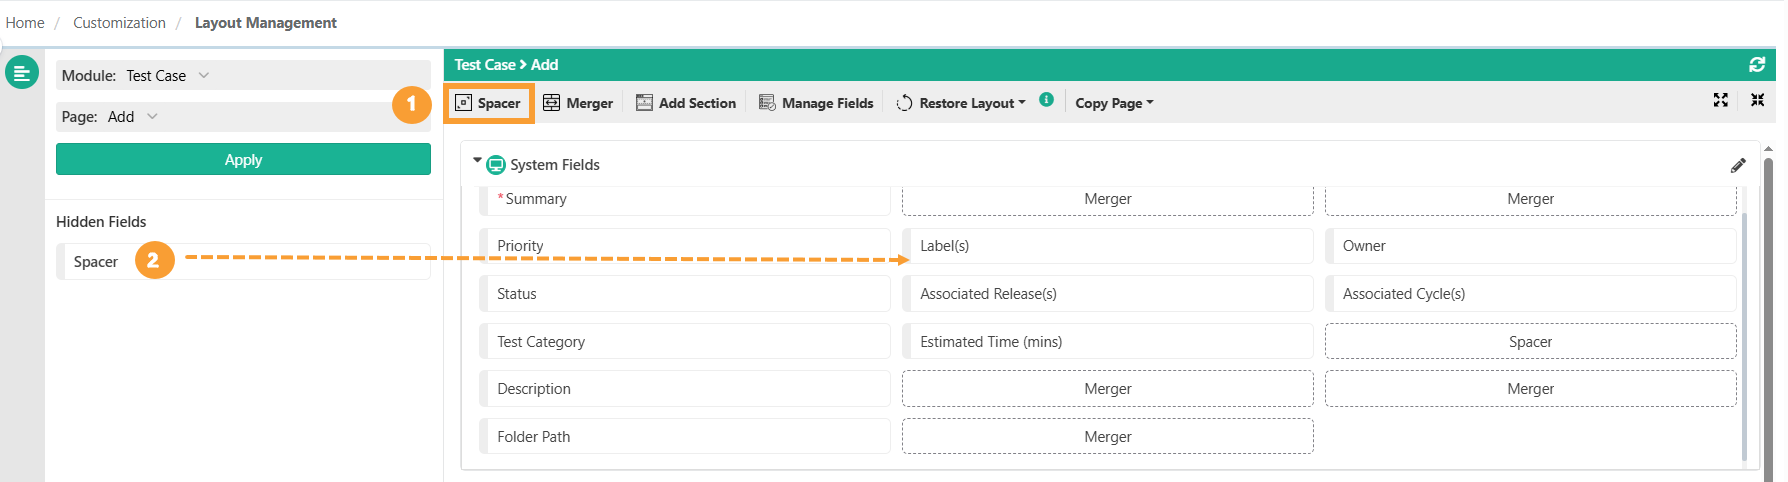
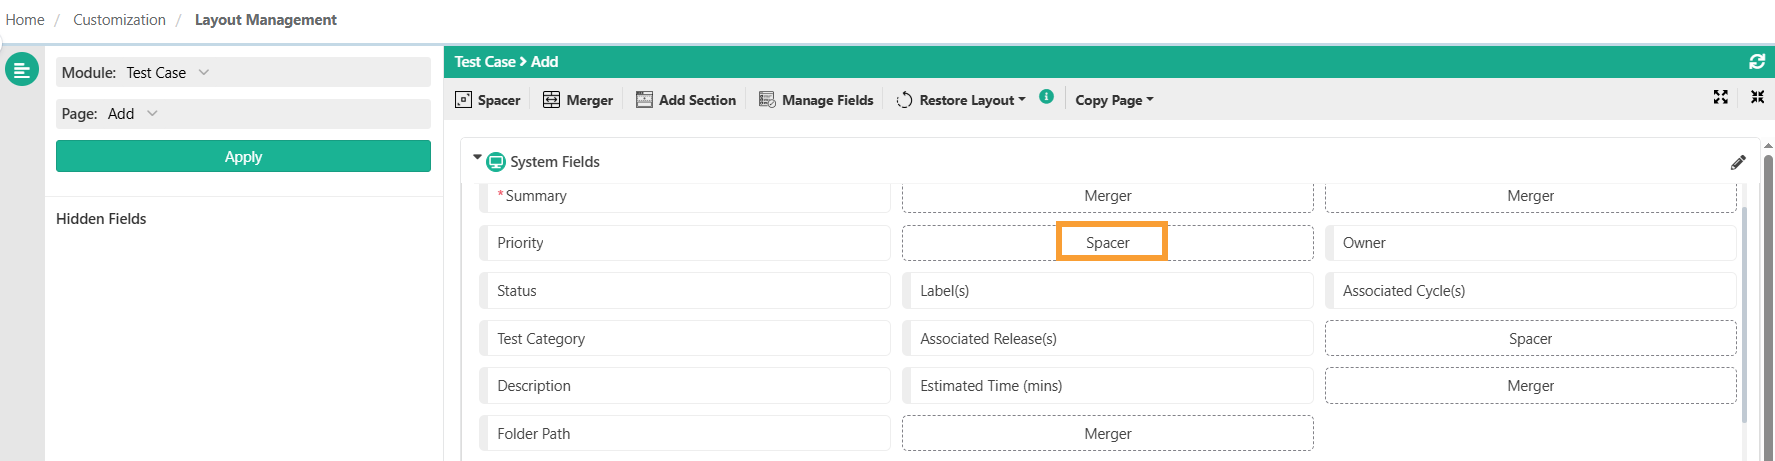
The Spacer is placed on the layout.
Preview the layout. You can see the space added between the fields.
To remove the space on the layout, hover over the spacer and click the cancel x sign.
Merger
You can use Merger to merge the two fields - making the field size bigger.
1. Click the option to drop the merge field in the hidden fields section.
2. Drag and drop it to the field’s desired position.
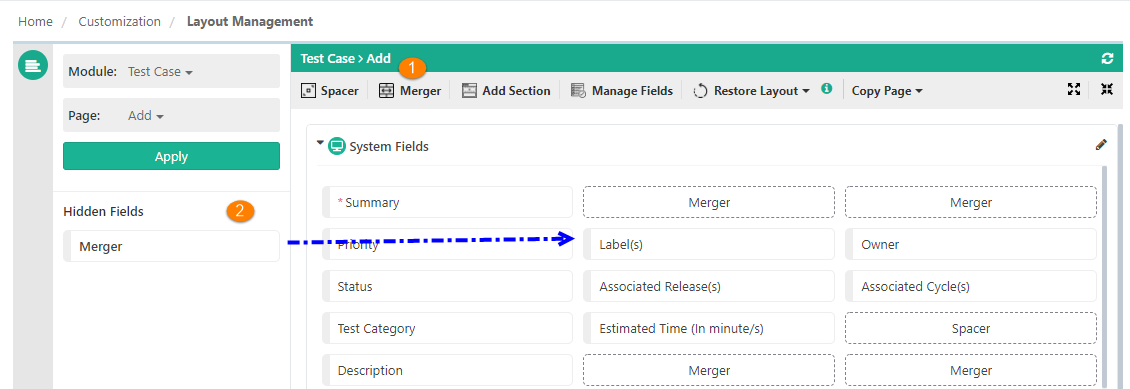
The merger is placed on the layout.
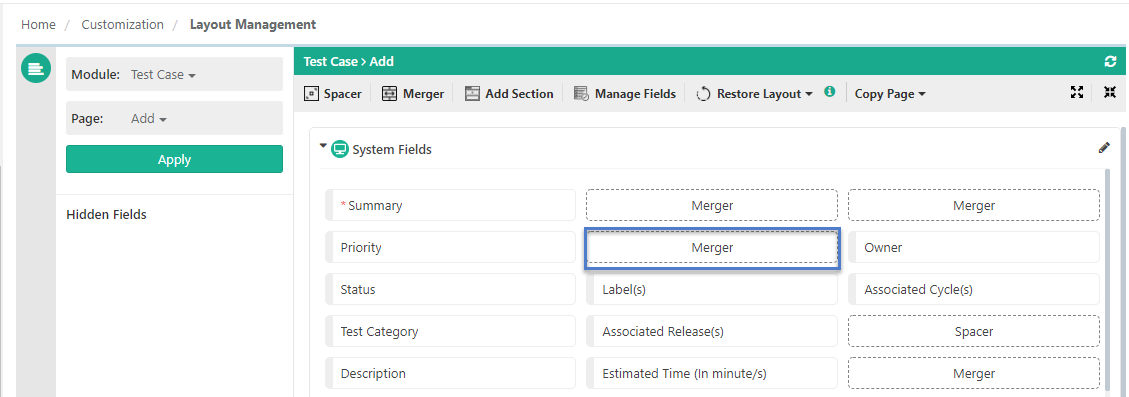
Preview the layout. You can see the two fields are merged.
Add a Section
The default page layout view displays system sections. Users can add custom sections to the page layout.
Click on the Add Section toolbar options to add a new section on the selected page.
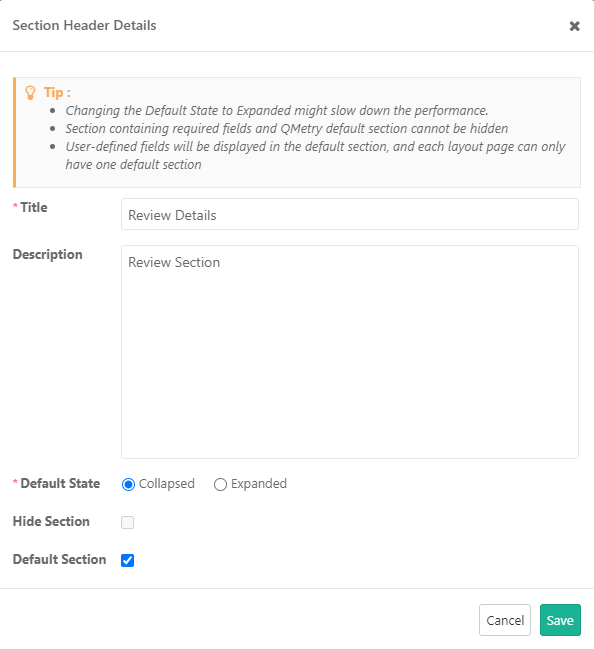
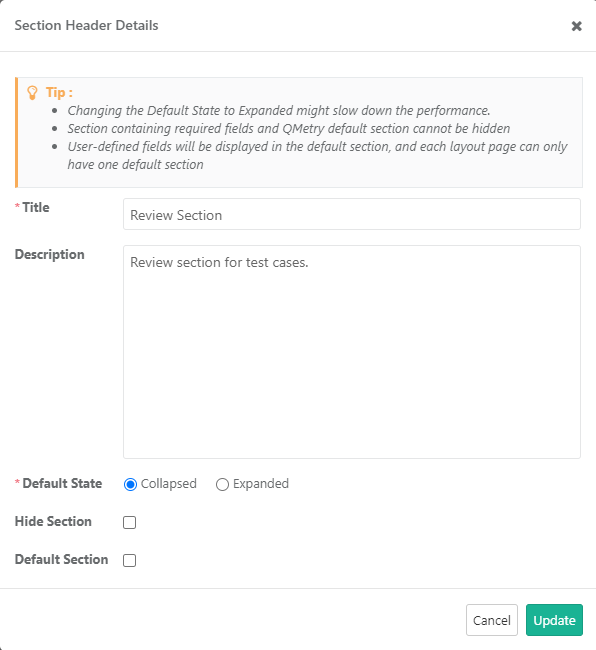
The Section Header Details pop-up opens.
Title: Enter Title of the section. Each custom section should have a unique title. Custom sections with duplicate names are not allowed.
Description: Enter Description for the section.
Default State: Select from Collapsed and Expanded.
Note
Changing the Default State to Expanded might slow down the performance.
Hide Section: If you do not want to display the custom section on the module page, then select the Hide Section check box. The section will remain hidden with fields under it. Users can not hide System sections.
Default Section: If you want to make the section as the default section on the module page, then select the Default Section check box. When a new user defined field is created, it gets added to this Default Section of the module.
Note
Sections containing required fields and QMetry default sections (which are marked as “Default Section”) can not be hidden.
User-defined fields will be displayed in the default section, and each layout page can have only one default section.
Click Save to save the section header details.
The newly created section is added at the bottom of the screen.
Arranging Sections on the Page
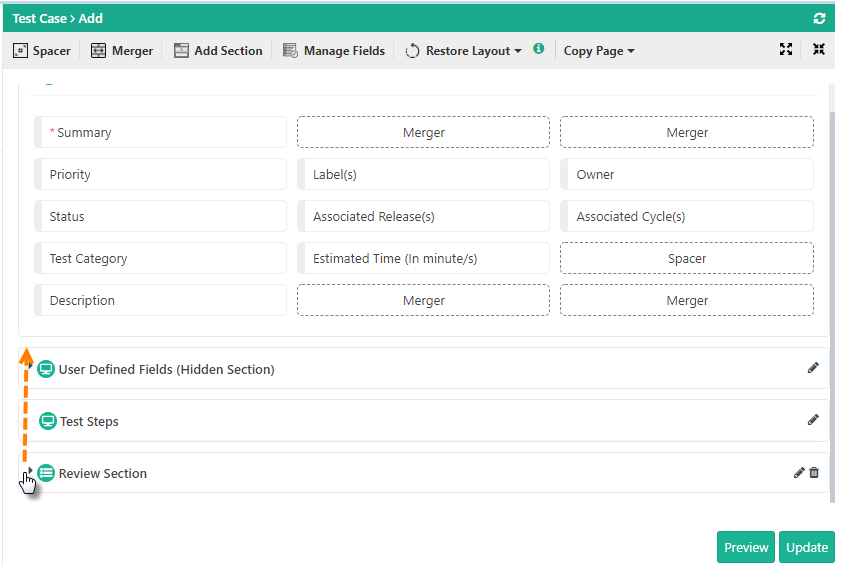
You can arrange the section through the drag and drop operation on the page. Keep the sections collapsed while shuffling the sections.
Arranging Fields in a Section
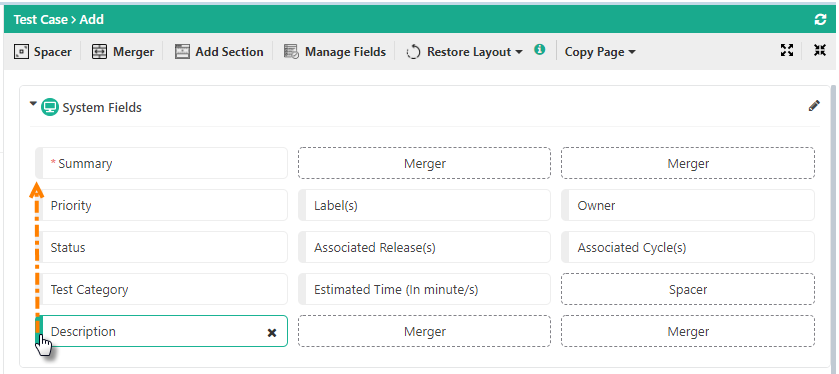
Users can arrange custom fields and system fields of Requirement, Test Case, Test Suite and Issue modules in their different sections. For example, mandatory fields can be at the top, custom fields can be at the bottom of the section.
Editing a Section
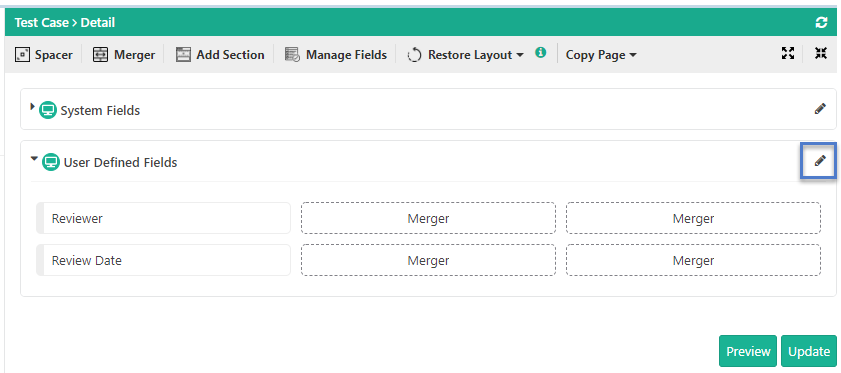
You can edit each section by clicking the Edit icon for that section.
System sections | Custom sections |
|---|---|
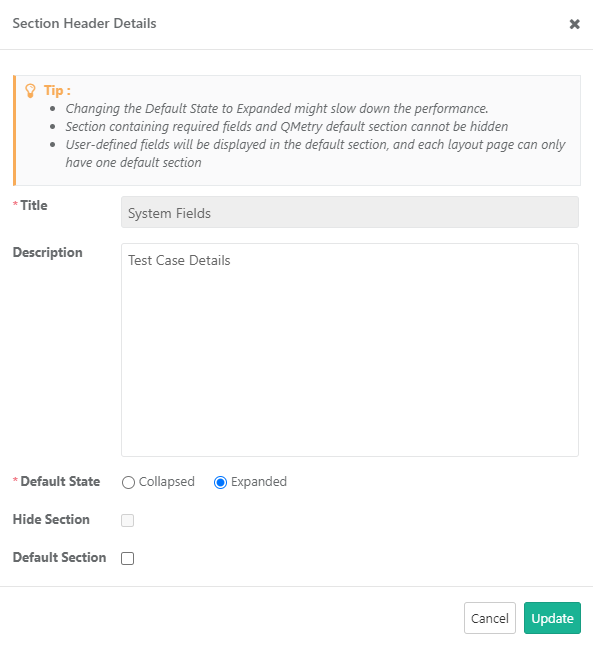
You can change the Description and Default State of system sections. You can not change the Title of system sections and hide system sections. | You can change the Title, Description, and Default State of custom sections. You can opt to hide custom sections on the page. |
 |  |
Hide Fields/Removing Component
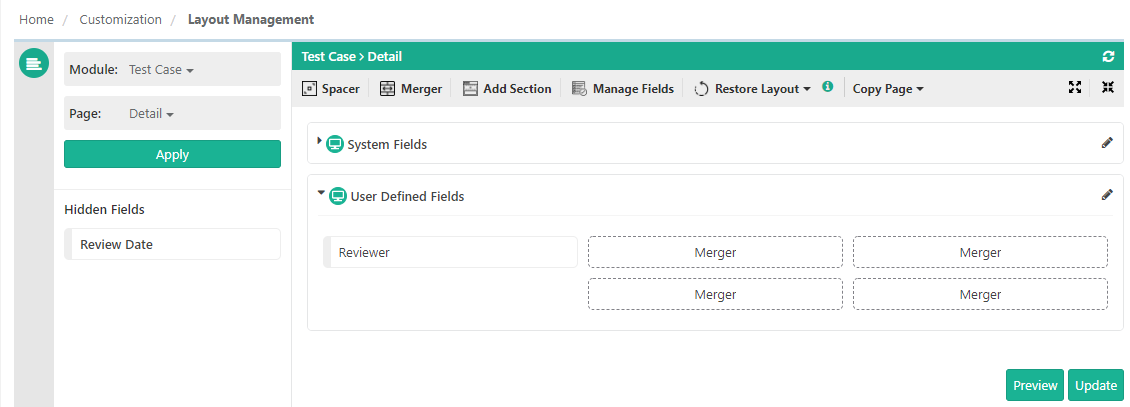
Users can hide/remove spacer/merger or field from the screen. The removed spacer/merge or field appears on the left panel under Hidden Fields.
Users can not hide a mandatory custom field (i.e. the field marked as “Mandatory” under Manage Fields). Even the custom section that contains such mandatory fields can not be hidden.
Vice-a-versa, if a non-mandatory field is hidden on the page layout or the section containing it is hidden on the page layout, and the user tries to mark the field Mandatory afterwards from Manage Fields. The warning message pops up. First of all, users need to make the field visible on the page layout, only then this field can be marked as Mandatory.
To hide/remove a field on the page, follow either of the following -
hover the mouse over it and click the "X" sign.
drag the field to the Hidden Fields panel at left.
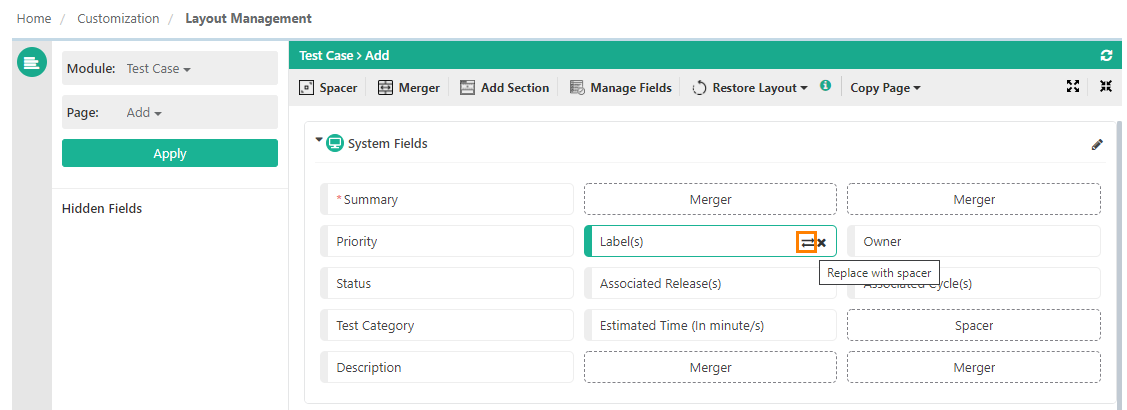
Replace Field with Spacer
The swap button is provided on the fields to preserve the default/existing layout when a field is removed from the layout. It saves the position of other fields and keeps the layout design intact.
When clicked, the swap button will move the field from the layout to Hidden Fields at the left and insert the spacer in that place. The field below the removed field remains at its place.
Arrange/Move Fields across Sections
Associated Releases and Associated Cycles should be in the same section. If you want to move the fields, then move both the fields together in the same section. If only one of the fields is moved, then the error will be displayed on saving the page layout.
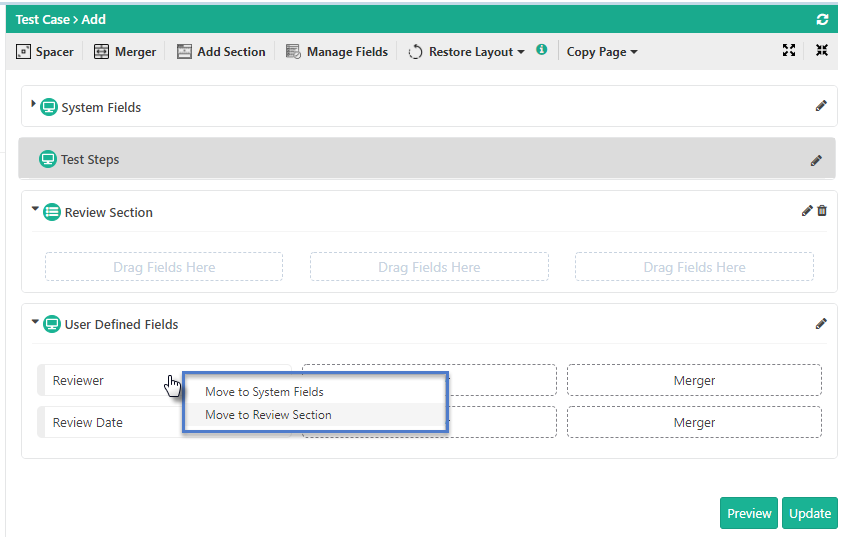
A. You can move fields from one section to another through the drag and drop operation.
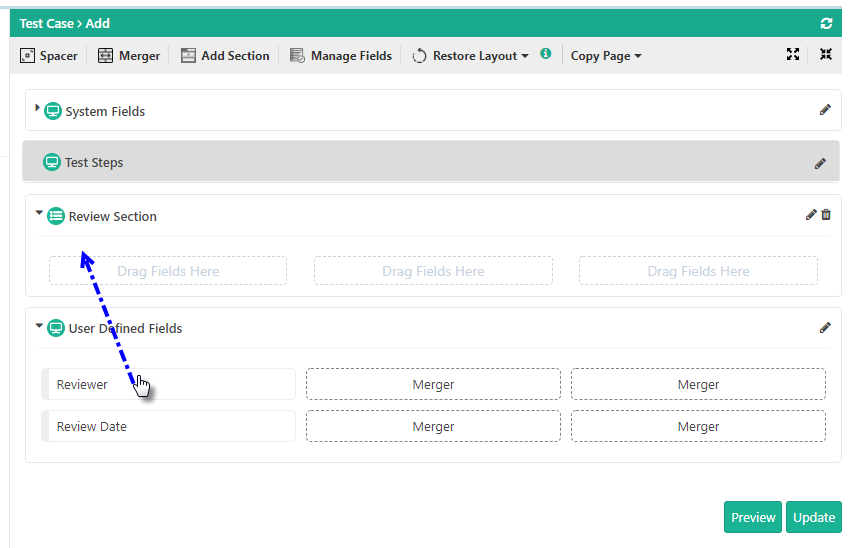
B. Right-click on the field. It shows options as per the available sections on the page. Select the section in which you want to move the field.
Copy Page
Copy from functionality provides users with the flexibility to copy layout across pages in the same module. Custom sections and arrangement of sections get copied to the destination page.
It allows users to copy sections and fields from other views to the current view. For example, you can copy sections and fields from the Add view to the Bulk view. The feature is useful to maintain a similar page format for the views.
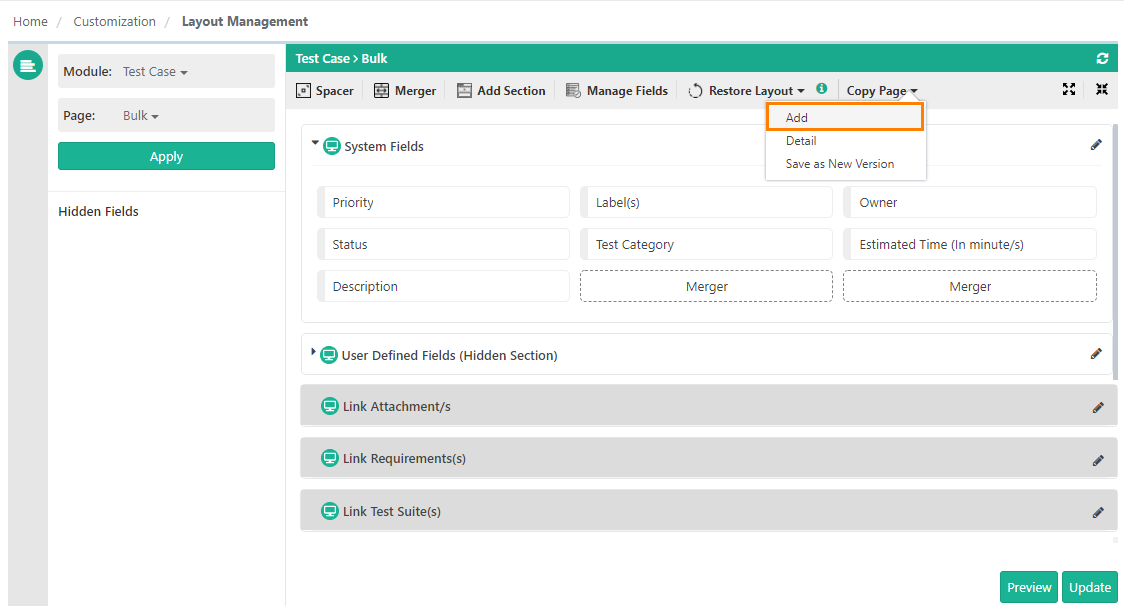
The newly copied sections are appended at the bottom of the screen and the newly copied fields are appended at the bottom of respective sections.
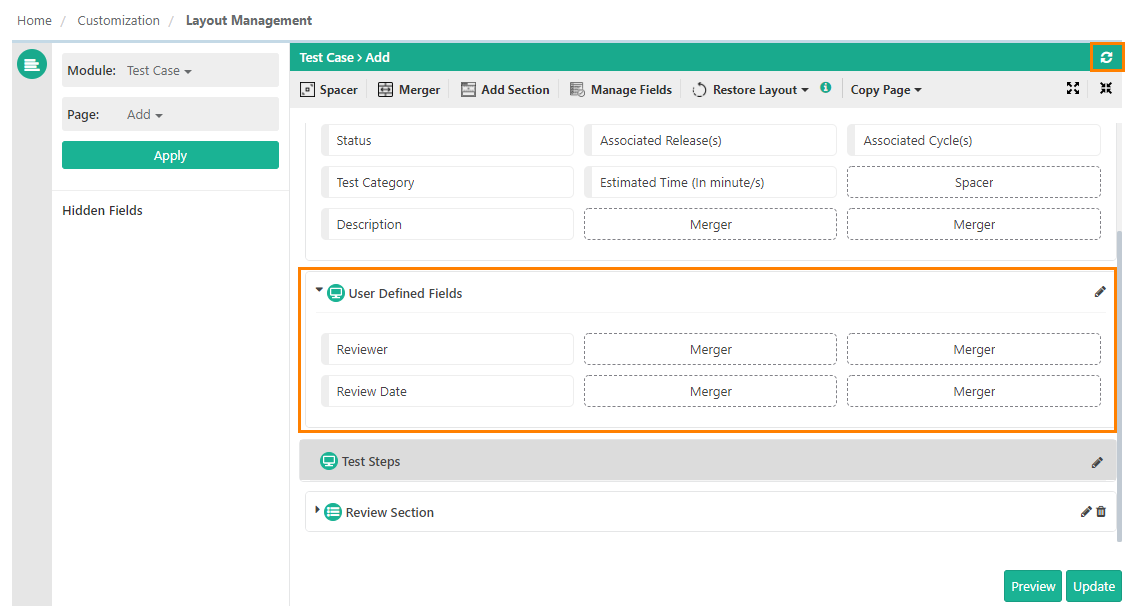
Refresh Layout
To sync the current layout with any changes done in the Manage Fields section, click the Refresh Layout icon placed at the top right corner.
Note
Before clicking Refresh, make sure you save all the changes you have done in the layout. All unsaved changes will be lost on page refresh.